10 July 2013

WOYWW # 214

The beautiful UK weather has had me out and about a little or the heat had me in bed trying to keep cool. Since being paralysed, my body doesn't like the weathers changes very much and it takes awhile to get acclimated. So when it got so warm, my body, being the rebel that it is, swelled up to twice it's size and then terrible leg pain from the swelling. (Yes even paralysed I can feel pain. It's actually a blessing.) But I have been in my craft room the last few days making (or sttempting to make) some craft goodies. Thought I would share this over at WOYWW.  Here's what I got on my desk today:


I've been thinking about doing a couple of Christmas Craft Fairs so I thought I could whip up some cheap and cheerful goodness for Christmas. So last night and this affy, I'm making some altered clothes peg sets. Here are the pegs painted. Don't mind the whitish ones. They are a major crackled effect FAIL. The crackle I used stinks!!! It's the Plaid FolkArt one, this is the second time I've used it and the second time it failed to crackle. Maybe I have a bad or old batch? Gosh I hope so because I'm going to have to throw this junk away and get a new crackle glaze...ugh!

Above I'm using my old craft sheet under neath but...on the other side of my desk is my brand new craft sheet (which I haven't used yet because I want to protect it...weird I know.) Since my desk is so big and WHITE, I wanted to cover as much of it as possible when inking and painting so I bought me a huge one! It's 50 x 100 cm and it takes up over half my desktop...woo hoo! You'll see it once I get my video camera set up and running. You want a big giant craft sheet to protect a big area and are in the UK?  I got it here: Craft Obsessions. They have 50 x 50 cm, 50 x 100 cm and 80 x 100 cm. You can also request bespoke sizes as well so you can have basically any size you need. The 50 x 100 does me fine though I wish I had bought the 80 x 100 one. Great price on them too!

That's all from me today. Hope you all have a wonderful day and those in the UK I hope you get outside and enjoy the weather while you can!

Hugs, Dorothy

19 June 2013

WOYWW #211

I haven't posted to WOYWW in the last few weeks because showing a messy  DIY zone was getting a bit boring...lol. I'm posting today so guess what that means? It's about DONE! Here is what it looks like today:

Here is a small glance at my little craft room corner and what's on my new desk. I'm painting shelves for a little vestibule on the wall behind me (a pic is further down post.) I bought my hubby a new power saw for his birthday just so he could cut me some shelves...lol. They are cut from a piece of MDF which are being painted white. I still have another coat of white to do plus varnish.

Want to see the rest of my almost complete room? Here it is!


Here are some more photos of my new craft room. Notice on the pegboard the frame isn't finished being put up. It's done now though. At the end I'm going to list the supplies and stuff I used to put my little room together. All that's left is to fill it with all my crafting goodness and go pick up my short drawer set that matches the colourful tall one...lol.

I created my own stencil for this word across my wall. I used 300 gsm cardstock and cut with craft knife since my Silouette was packed away.


PEGBOARD...yeah! It was hard to find here in the UK as slatboard is what is used most in Europe YUK! This was so cheap and cheerful to put together, even the hooks were cheap. I bought white pegboard and stenciled the pattern in the blue paint. I used matt spray varnish to coat the whole pegboard so the paint wouldn't wear off so easily.


Here is the other end of my desk. I already had this set of plastic drawers. I wans't going to use them but they really did go well witht he rest of the room so now I'll get the shorter set to match for the other side. I might even get 2! Notice my hutch is back. It's not that old, about 8 months so kept that too.

This is the other wall. There is this recess in it that had these horrible homemade shelved nailed up in it. They were crooked and too thick for the small space and took them down years ago. My hubby had this good idea while waling around B&Q. Less that £25 for the metal back rails, shelf holders and the MDF we cut the shelves from. Not bad huh?

So that's my craft space. It's not that big and storage is going to be interesting but I'm a relatively new crafter so don't have a ginormous amout of stuff yet but getting there (to my hubby's chagrin.) Here is a list of the supplies I used to decorate my room and where I got them. Some items will have the prices as well since I did my best to do this on a budget. Hope you like it...I sure do. It will inspire me for a good while...lol.

Furniture:
Desk - Ikea, Galant Corner Desk w/1 side extension in white
Hutch - Ikea, Hemnes Add on unit in white stain
Drawer Set - Hobbycraft, Really Useful Drawer Unit tall
Recess Shelving - Wickes, Single Slot Metal Upright x 2, Single Slot Brackets 150mm x10,
                              B&Q, MDF for shelves (we got it for under £10 in store, not as priced on website)

Paint:
White Matt Emulsion - Homebase
Colour Paint - Wilkinson's Neptune Matt (This paint was not very nice to work with. It was too thick and had too much vinyl in to so it peels off when dry. Next time I'll get a better quality. Paint is brighter than seen on web.)

Stencils:
Create Word - 300 gsm cardstock printed with 1 letter per A4 sheet. Font used: Cafe Rojo
Round stencil on Pegboard - Pronty Mask Stencil 12" x 12" (I'm having my daughter add the stencil on the wall in a few more places too.)

Pegboard:
Pegboard - White faced Perforated Hardboard (pegboard) 2440 x 1220 x 3.2mm (You can only find this stuff at timber/lumber suppliers here in the UK. Not everywhere has it in white either. The place above was only place I found that did. Ordered it online to have it picked up. Had it cut to measure.)
Hooks for Pegboard - 4" Euro Hooks
Wood for base - 1" x 2" approx. wood bars
Frame -  Wood Architraving (OK tried to get framing wood but here in the UK it's so darn expensive that it wasn't affordable to frame the 1550 x 735 mm piece of pegboard so used basic architraving instead...cheap cheap!)

04 June 2013

What's Your Colour Score?


Since I'm still waiting for my craft room to get finished (hubby has been working a lot hence the delay,) I've been surfing craft blogs and watching YouTube crafting videos. I came across this colour test. I thought it looked quite challenging...give it a go yourself!

What's your score?  Take the Test HERE

I'm 48 and I scored an 8. Guess many years creating graphics helped me out! LOL

29 May 2013

WOYWW 208, Happy 4 Year Anniversary!

 
I'm new to posting at Julia's blog for the WOYWW but this week is the 4th Anniversary of WOYWW and I'd like to wish her all the very best and also to thank her for such a great way to be a voyeur into other people's crafty worlds. It's also a great way to connect with other bloggers. Why don't you join us or at least take a peek at our messes...lol.

In my case my desk and ROOM is a real live mess! My craft room has taken longer than hoped because I forgot the these last few weekends my hubby was taking his FA Level 1 Football Coaches Training. The last day was this past Sunday and he passed with flying colours so it's official: My hubby is a certified FA Coach! so congratulations to him as well. Anyone need a football (soccer for us Americans) coach? He's planning on taking Level 2 next year. He will make an awesome coach and that's not just me being biased either. :D

Here is my workdesk now for WOYWW 208. As I said in a previous post, I decided to change the end wall colour to something else. Here is the red overcoated with white and paint junk all over my new desk. Tonight it will be repainted in Neptune which is basically teal blue. I've been looking for storage units for underneath the desk but I'm not finding quite what I want. Weird since I only need plastic storage drawer thingies. Either they are too tall or too expensive or too wide. I'll get there eventually though. This weekend is dedicated to finishing the craft room so hopefully by next week I'll have something more interesting on my desk beside a diy project...lol.

I'm having severe craft withdrawal now. LOL Thanks for having a peek at my workdesk this week. I hope you have a wonderfully blessed day!

26 May 2013

Owl Couple Digial Layout

Since I'm still waiting on my craft room to get painted, I've been doing some digital art in Craft Artist Pro. Just downloaded this new kit and knew it would make a cute card front.


I used one of the new digital stamps I won from Lacy Sunshine Stamps. Ain't they da cutest? lol
The digital scrap kit I used was a freebie I downloaded today over at Pixels and Company.

I colourised the digi stamp in Photoshop then assembled the page using Craft Artist Pro. 

CHALLENGES:

Lacy Sunshine Challenge - Anything Goes
The Sketchy Challenges -  Karen's sketch
Challenges 4 Everybody - #21 Anything Goes
Word Art Wednesday - #81 Anything Goes
My Heart Pieces Challenge - Be Sentimental


25 May 2013

Mold and Moulds (tutorial)

Wow 2 posts in one day! Can't you tell I'm bored...lol. Nah not really. Well first let me tell you about MOLD as in mold and mildew. We took out my countertop with cabinets underneath and in the corner of the craft room there was a huge damp patch covered in black mold. I didn't get a chance to get a photo of it though. It was up the wall and all over the floor as well. Hubby bought cleaner for it and damp proofing stuff. He added mold resist paint to it. Then he patched the wall for new paint.

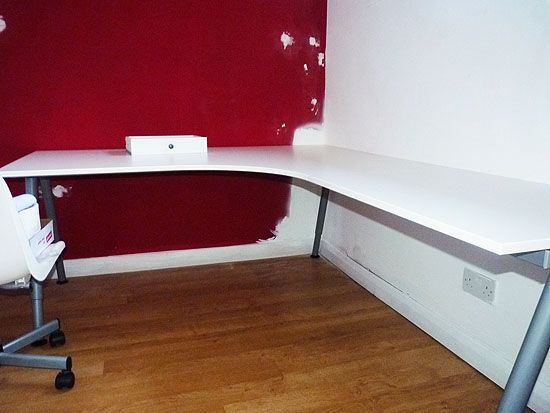
And there is my new desk all put together! I still need to get some storage drawers for underneath though. But you can see how the skirting board is all warped from damp. This is the front corner of the house and we're pretty sure our gutter is all stopped up there which is why water ran in the wall. Our roof gets covered in green moss and it falls off the roof all over and gathers in the gutters...yuck! I decided to change the red wall colour. It's going to be teal blue instead...woo hoo.

Next part here is a tutorial of sorts. I got a bit craft deprived these last few weeks so I sat and watched You Tube videos. I also watched too much Creat and Craft tv...lol. One day on C&C they had this Martha Stewart air dry clay and moulds on there and I thought that looked like fun...useful too. But the clay was a bit expensive so on to You Tube I went and found tons of videos on how to make your own air dry clay with cheap and cheerful ingredients so I thought I would try it out. Search for Cold Porceline tutorials on YT.

First I ordered some cute moulds. I ordered mine from 
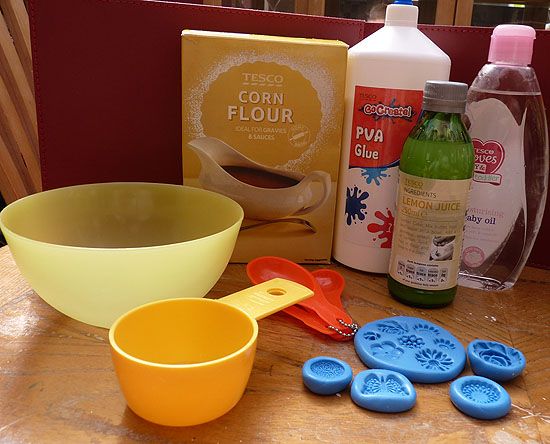
Picklelilly Moulds. She not only had a big selection, the prices and designs were great. Then off to Tesco for the ingredients.

After watching about 20 different videos on how to make this, here is what I found worked for me:

Ingredients:

1/2 cup Cornflour
1/2 cup PVA Glue (I got my huge 1 litre bottle for £5)
1 tablespoon Lemon Juice (you can also use white vinegar)
1 tablespoon Baby Oil (you can also use olive oil or vegetable oil but note these may tint your clay)
Hand or Body Lotion (whatever you have around the house or just get cheapest)
Non stick craft mat or plastic wrap or greaseproof paper
Plastic wrap and zip lock sandwich baggie

(If you want more clay, just double the recipe and use a bigger bowl.)

SUPPLIES:

Mixing bowl (if choosing microwave method, make sure bowl is microwavable)
Mixing spoon
1/2 cup Measuring cup
1 tablespoon Measuring spoon

Add cornflour to bowl. Use spoon to break up any lumps in it.
Add PVA glue and mix together until combined.
Add both the oil and lemon juice.
Stir mixture until as smooth and until it pulls away from the sides of the bowl.
There may be a film of oil on the top of the mixture that doesn't get completely mixed in but that's ok.
Lay out your craft mat or big piece of greaseproof paper on the table.
Smear a little of your body lotion on the surface of the craft mat or greaseproof paper.

 Now here is where I tried 2 different methods:

Method 1 - Cold straight from bowl
Empty the bowl of cornflour/glue mixture onto the body lotion. Add more lotion to your hands. Knead this like you would bread dough until is smooth and stretchy. This takes about 10 minutes.

Roll the clay into a fat tube shape, wrap with pastic wrap, put it into a zip lock sandwich bag and refrigerate overnight.

Method 2 - Microwave first
Put the bowl of cornflour/glue mixture into the microwave and heat for 20 seconds.
Remove and stir with spoon. Micrwave for another 20 seconds. Remove and stir again.
At this point check the consistency of your clay. If it seems too runny, microwave for another 10-15 seconds. The consistency should be creamy, stretchy and very slightly stiff. DO NOT OVERCOOK!!! I overcooked mine and you will see below how it turned out.

Empty bowl onto body lotion on craft mat/greaseproof paper and knead until smooth. (WARNING: clay WILL BE HOT. Knead as you can until cooled.) Roll the clay into a fat tube shape, wrap with pastic wrap, put it into a zip lock samdwich bag and refrigerate overnight.

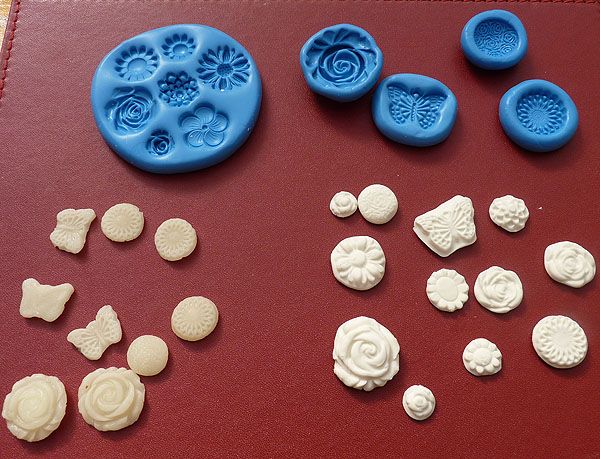
Here are my new moulds and the 2 batches of clay after they have been moulded and dried completely.


 Aren't those moulds just the cutest???!!! They will make great embellishments for cards and other projects. Also some will be great for flower and bow centres.

Now on the right is the non cooked method clay after it has dried. This clay when moulding was very soft and silky. It was hard to get into the mould and hard to get out of them too because the clay was kind of mooshy. I had to redo them a lot of times. But the clay was nice and white and dried a nice translucent white as well. The pieces are light and feel just like dried clay.

On the left is the microwaved clay. I overcooked this clay by about 10 seconds. It was too hard and turned yellow on me. But it was really easy to get into the moulds and especially easy to get out with designs intact first time. But they dried even more yellow and they look rubbery once dried. Feels more like resin not as nice looking. That's why I have to stress to not overcook this stuff!

Note on drying these. The right side non cooked ones I dried for 8 hours on one side then turned them over so the underside dried for another 6 hours. The left side cooked ones, are still not dried in the middle after 2 whole days. So each recipe has it's problems but I think I'm going to stick with the non cooked recipe for my next batch.

Store your clay in an airtight container. You don't have to keep it in the refrigerator all the time, just the first overnight. I suggest you stick some damp kitchen roll sheets in there with the clay. When using the clay, add a squirt of hand lotion to your hands to knead the clay before each use. This will remoisten the clay and keep it from sticking to your hands.

Note about gloves...I actually made 3 batches but the first batch became a disaster when I tried to use rubber kitchen gloves to protect my hands to knead it. It glued onto the gloves even with lotion and ruined not only the clay but also the gloves. In fact they melded together so badly you couldn't tell where the clay started and the gloves ended. Both got binned. Use bare hands when doing this with lots of lotion on them...works fine and dandy.

As soon as the craft room is done, I'm going to paint, glitter and fancy these up. I'm also going to make some beads with the clay. Those will work a treat. Fun fun fun!!! If you give this a try, drop me a comment and link to your photos. I'd love to see what you come up with!!

Have a great bank holiday weekend!

A "Deer" of a Challenge

I missed last week's challenge due to craft room woes (more on that later.) So I'm back with another digital layout for Digitally Sweet. This week was an inspirational image. The image of choice racked my brain a little so I decided on the obvious...a deer and similar colours.


Scrap kit used: Sunny Daze Freebie Mini kit by Mari Koegelenberg from Sweet Shoppe Designs.
Deer Photo: morguefile.com
Page created in: CraftArtist 2 Professional (PC) (affiliate link)

CHALLENGES ENTERED:

Digitally "Sweet" Challenges - Photo Inpiration


Thanks for looking!
Hugs


20 May 2013

Scrap N Pieces Designer Mentor Free Kit

Hi everyone! Well it's finally here! We've completed our kits for the Designer Mentor Class over at Scrap N Pieces and it was a great class. Karen was my group's mentor and she was great. I can imagine how hard it was going through all our files checking to see if they were good enough for a kit. I did learn alot though as we were really pushed to make all our scrap items to be as perfect as possible so let me tell ya...this kit and the others you may want to download from there are really going to be excellent quality. So here is my kit. There are lots of images here so bear with them loading. The link to download my kit is over at the SNP Gallery and you will have to register there to download. it's free though so no worries....and look at the other kits in the class...you'll love them!

To download my kit go here:  Scrap N Pieces Designer Mentor Kit

Elements

Papers part 1

Papers part 2

Alpha

Word Art

Templates

Now here is an add on mini kit that didn't make it into the kit. You can download that right here:


Download Direct - HERE

Download via 4Shared - HERE

Thanks so much for having a peek and I hope you enjoy the scrap kit!

16 May 2013

WOYWW 206

Not much crafting going on in my craft room lately because the room has finally been packed up and my new desk arrived! Here is what my current desktop looks right this moment:


Very very empty. Sad isn't it? lol I do have my new desk, it's just not put together yet. Hubby of mine won't have time until Saturday to put it up. :( I still need to buy some drawers or units of some sort to go underneather the desk to store all my crafty goodness. I packed up my stuff yesterday and I found a few bits I forgot I had like these cool 12" Bazzil decorative strips and a box of pastel brads among other things. Here is the main part of my desk that's arrived:


It's HUGE. Also yesterday I received a little something in the post that I'm looking forward to working with. I'll be testing them out tomorrow so I'll report my outcome tomorrow night. Have to get in at least a little bit of crafting sometime. So until then...y'all have a wonderful blessed day!

Thanks for lookin at my sad little desk.

13 May 2013

Mother's Day Challenge

After winning over at Digitally "Sweet" Challenge, I thought I would enter again this week just because I want to promote this challenge for all us digital graphics lovers out there...lol. Please hop on over and show them what you created using digital graphics. It could be a digital scrapbooking layout, digtally made card or images you printed off the computer used in real life crafting or scrapping projects.

This week theme is Give Mother Flowers for Mother's Day and I made this digital layout card. It's a photo of my Mother-in-law who passed away many years ago...love you and miss you Mum!


I created this layout using Craft Artist Pro and using their digi kit called Butterfly Garden.

CHALLENGES ENTERED:

Digitally "Sweet" Challenges - Give Mother Flowers

Challeges 4 Everybody - Anything Goes

The Squirrel and The Fox - Mother's Day

Fussy and Fancy Challenge - Anything Goes

Thanks for looking!

12 May 2013

I WON!


I've won my very first challenge and I have to say I'm really chuffed. The best thing is, it with digital scrapbooking which is my all time fave. I'm so proud my digital layout won over at Digitally "Sweet" Challenges and I cannot wait to start using my new Lacy Sunshine Digi Stamps!!!

THANK YOU SO MUCH!

PS: I was also featured over at Digitally Sweet and I'd like to thank them for that as well. :)

11 May 2013

Mother's Day Freebie

Tomorrow is Mother's Day in America and it has me thinking of my own Mom. She passed away back at the end of September and I hadn't gotten a change to visit her before she passed. She had been sick for a long time so it wasn't unexpected...still...it's MOM. I miss her every single day. Always will.

As a little celebration for those of you back home in the USA or for anyone who wants to snag this...I created some printable bookmarks for you to give as a gift or add photos to so you can remember your Mother.


They are in PDF format so just click and print...easy! I also made them in A4 World size and in US Letter size so anyone can use them.


I hope you enjoy them! HUGS

09 May 2013

WOYWW

I have such a lovely Hubby. He is helping me redesign my craft room and he surprised me the other day by clearing out most of my craft room! I didn't even get a chance to take any "before" pics when the room was realllllly cluttered. What you see below is all that's left in my room...my messy craft desk! Thought I would post this over at WOYWW to show off my mess...lol.


Basically what you see on my worktop is leftover bits that didn't get packed away yet and my hutch of death which isn't as orgaised as I thought it would be. :( This whole set up is going though. My new Ikea Galant corner desk with some extention parts is going in the far right corner. It will run all across the back wall and up the side wall almost to the sink. This will give me lots of counter space plus the openess underneath will hold a few more storage drawers than those cabinets above. My desk top had to be delivered though as it wouldn't fit in the car...it arrived just over an hour ago. Yippee!

Another thing...going on the wall under the window, is pegboard! It's called perforated hardboard here in the UK. Once the desk is put together we will measure the space between the window and desktop and cut the pegboard to go in there. I got a bunch of Ikea storage buckets and rails to hang on there. This will greatly solve my problem of having to have everything lower down so I can reach them in my wheelchair. Here's another photo of the side wall where the pegboard is going (yes I have a hot AND cold water sink in my craft room:)


I desperately need new curtains on these windows. I'm not crazy about lace and I'm too short to be able to open and close curtains so I'm thinking about getting some funky black and white blinds instead. I can use a grab stck to pull the blinds up and down much easier methinks. The end wall is staying red and other walls staying white but I will be having red, black and white accents as well.


Thanks for looking and reading with me today...go do something crafty today! (I sure can't until me room is done...blah.) LOL

04 May 2013

Welcome Back & Scrap Layout

It sure has been a rough winter around here. Beside it being so cold for so long and my hubby and mine's (accounting, bookkeeping, payroll) business is growing, doesn't seem I've gotten much of anything else done. No cards, no crafting, no scrapping....NOTHING. I do hope that's about to change though...lol.

Now that spring has finally sprung here in the UK, hubby and I are finally starting to get things done around the house. One new thing is the stuffed up gutters on our house. In 2 sections they are so filled that they caused leaks in our ceiling inside...YIKES! That's scheduled to be fixed. We have spring cleaning of our bedroom on for this weekend. Next on the agenda in renovating my little craft room.

And I can't wait!! I am a messy crafter but I do like having my tools and bits organised. It's easier to find things when each item has a home. My biggest problem with my craft room is....I cannot keep anything up higher because I am in a wheelchair. Since I'm paralysed I cannot stand up at all so I cannot put things on nice shevling units. Everything and I do mean EVERYTTHING has to be down low within my reach. And my room is small, just a little extension really, that has to fit my wheelchair it in. Once that project gets going I will get some photos posted.

In the meantime, I'm doing some digital scrapbooking. A few weeks back I joined the Designer Mentoring program over at Scrap N Pieces. We are in week 4 of 6 and once our kits are done, I 'll let you know when they go up for free download in their forum so you can snag some great digital kits. There are a bunch of categories and I'm an Intermediate designer so my group each member is making their own kit, same with the other Intermediate group and the Advanced. The Beginner groups are making a whole group kit. For my kit, it's called "Each Day is Ours" and here is my colour swatch:


That leads me to the last item for today. I opened my Craft Artist Pro this morning to make a layout! Shock horrors I know...lol. I found a challenge blog that is for digital craft and scrap images so I thought I would enter this week. Here is a layout of my lovely daughter.


I have lots of graphics programs: Photoshop, Paint Shop Pro, GIMP...but I do like making scrapbook pages in Craft Artist Pro. It's so easy and I love the templates. i even converted a few of my kits to CAP!

I'm entering this layout in the following challenges:

Digitally "Sweet" Challenges - Bingo "N" frames, flourishes, free, sewing, ovals.

C.R.A.F.T Challenge - A stitch in time, use stitching

Thanks for looking!

01 February 2013

Girly Card

I'm not really a girly type person who is into pink and purple but I was going through my stash, ya know...as you do...and I came across this bit of shiny sparkly coated paper. I've had this for at least 7 years so I thought it was about time I used it...lol.


This is based on a challenge sketch and has lots of layers of purpleliscious goodness on it...lol. It's also a lot more girly than what I usually do. And the digital stamp was drawn by ME!

SUPPLY LIST:
Coredinations Dark Purple Cardstock
Swirly paper and shiny sparkly papers are from stash (and old!)
Purple streaked digital paper created by me in Photoshop. Get it FREE HERE.
Dark purple ribbon from Ribbon Oasis
Plastic purple flowers and acrylic stars from stash.
Liquid Pearl sprinkled with pink glitter
Sentiment from Create with TLC
Copic Ciao pens
Showgirl digital stamp by me, Dorothy'sCreations. Get it HERE.

CHALLENGES ENTERED:
Dream Valley Challenge - Girls Girls Girls 
Joanna Sheen Challenges - Recipe 3-2-1 
Stamp With Fun - Sketch Used 
Daisy Doodle Creative - Something Girly w/ shades of pink & purple
Inky Chicks Challenge - Becky's Bingo Grid- Sentiment Image Bow


31 January 2013

Been Awhile

Hope you all are having a great 2013 so far! Yep it's been awhile since I've posted on the ole blogeroni. I got out of making cards for awhile and life happened. Then the holidays hit and I got swept away. But I've been inspired again so it's back to crafting for me. I've made a bunch of new cards to enter into challenges. Here is my first one of 2013!


On this card I used a brand new set of clear stamps I got for Christmas. It's a set from Hobbycraft brand called Flourish Frames. I also used my brand new Spellbinder die to cut the scalloped circle. Everything is cut and printed on beige card. I used Bundled Sage Distress ink to stamp the swirls then stamped again in black.

SUPPLIES USED:
Stamps - Hobbycraft's Flourish Frames Cleat Stamp Set
Sentiment from Create with TLC
Flowers from  http://www.mulberrycraftsuk.co.uk/  (colourised with Copic markers)
Feather from my stash
Spellbinders Scalloped Circle Die
Bundled Sage Distress Ink
Antique Linen Distress Ink
Black Inkpad

CHALLENGES ENTERED:
Crafty Calender Challenge - What's New?  (new stamps and die)
Challenges 4 Anybody -  Anything Goes
Crafty Boots Challenge - New (new stamps and dies)
Related Posts Plugin for WordPress, Blogger...