Showing posts with label Altered Crafting. Show all posts

16 February 2015

It's Swap Time!!

I had another crafty swap at UK Ireland Craft Swaps Group over on FB and this time I participated in the Note Card & Tag Folio Swap. We were to create the folio from a tutorial on YouTube by papercrafter45 and you can find part 1 HERE. This is the one I made for my swap partner, Anita:

Here is how it looks closed up:


And here is what it looks like opened up as well as the cards:


I also sent her a few other craft goodies which I won't give away in case she reads my blog LOL. I started with white card but it was too stark so I toned it down with Old Paper Distress Ink. I also left the tags blank so that Anita cold do with them whatever she wanted such as journaling, stamping, staining, etc. The paper live I used was the gorgeous Tilda Tiny Treasures 12" x 12" paper pad. It came with a 3 sheets of thick card die cut toppers which I used on the front and insides of the folio and also on the cards. On the cards I wanted to give the die cuts some dimension so I curved them a bit with my bone folder and used Pinflair Glue Gel to pop them up just a little bit. I went searching through my glue stash (I have a glue foR EVERYTHING) and found some envelope glue. I made the envelopes with my WRMK envie punch board and add this glue to the flaps, let it dry, now you can lick it and seal the envies...cool huh? Here is a full supplies list:

SUPPLIES USED:
Tilda Tiny Treasures 12" x 12" paper pad
Distress Ink in Old Paper
Spellbinders Die - Sue Wilson Designs Lattice Accents
Martha Stewart Punch Around the Page Modern Garland (old one, used corner only) 
Viva Decor Pearl Pens (on front cover of folio & on cards)
Flowers from Mulberry Crafts (on front cover of folio)
Prima Flowers (on front cover of folio)
Prima Say It In Crystals (for tea steam on front of folio, mine were beige and crystal ones)
Tags - Fundamentals Australia
Jute piece in beige - Poundland (on front cover of folio) 
My Craft Studio Envelope Glue(no longer available but just google evelope glue and you should find some)

Now here is the folio and extras that my swap partner, Anita, sent to me:

I snet her a big THANK YOU as I really love what she sent me, including the flat backed pearls, xcut embossing folder and stamp. If you are in the UK, Ireland or anywhee really, why not join us at UK IReland Craft Swaps Group and join in the swapping fun! Thank so having alook and my crafty swap and I hope you have a most blessed day!

Happy Crafting!
hugs, Dorothy

09 October 2014

Dominoes & Art Tile Swap

OOPS...I forgot to post about this earlier in the week. I guess I was still in birthday mode with getting absolutely nothing done for a week...lol. I particiapted in a crafty swap over at UK and Ireland Craft Swaps. I was paired up woth Donna, which was cool as she lives in the same town I do.

The swap rules were to make a set of 3 inchie art tiles, any theme we wanted and a set of 3 altered dominoes.

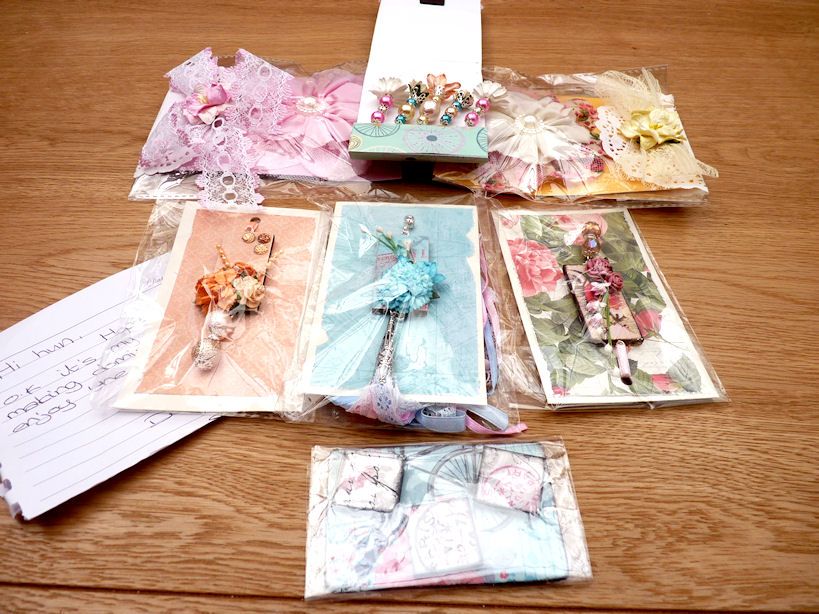
First let em show off what Donna sent me. I got this weeks ago, she was so fast! Me, I'm slooooowww.


It's kind of hard to see them as I rushed to get the photo done. I should have taken them out of the plastic first. Ah well, lesson learned there. The art tiles are really hard to see but they are pretty, trust me! The middle items are the dominoes. She didn't use real dominoes but thick MDF ones from Fernli Designs methinks. Each is mounted on its own pretty cardstock base. She also put dangles on them all too. All of them are simply gorgeous! The top items are some extra goodies she made me. She made me 2 handmade lace flowers in adorable packaging and a set of homemade jewelled stick pins. I love them all! I don't do much beading or dangly bits so I always appreciate things like that.

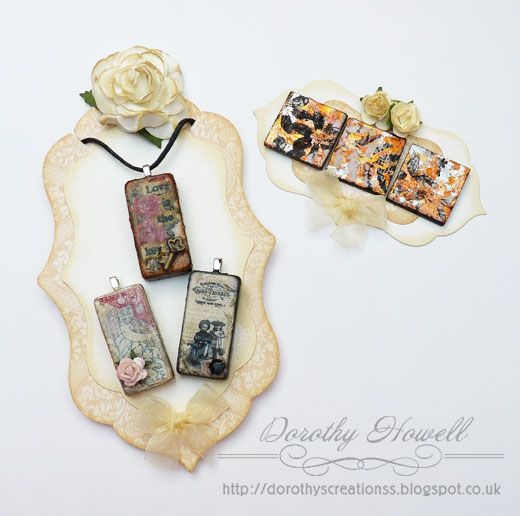
Here are the altered dominoes and art tiles I made for Donna. She did receive mine and has seen them. I'm glad she liked them too.


I didn't photo the extra bits I gave her. Mine weren't as nice as hers...lol. I sent her some laser cut wood bits, lace and stickers. For mine I used real dominoes. These are not the big ones but are a pack of smaller size donimoes that are perfect for necklaces. I measured the domino and printed out 3 digital images that I resized to correct size in Photoshop. Then I looked for colours to colourise the sides and backs of the dominoes. One coloured with my black Copic marker. For the roses image I used Ranger Alcohol Ink in Cappucino and using that and blendng solution to get a marbled look to it. On the pale image one I painted it with Mother of Pearl acylic paint. I cut the images and glued them onto the dominoes with Glossy Accents. I sealed the whole dominoes front and back with Mod Podge so the ink jet prints wouldn't blur. Then to seal the top and image I used Ultra Thick Embossing Powder and my heat gun. These gave the top a slightly rippley shiny look which I liked. Then I added the embellishment to each: a little metal key, a black gem and a flower. 

I wanted these to be used as a necklace or something your could hang onto something else so I added bales to them with E6000 glue. Then I made my very first necklace! I took black waxed cord, a lobster clasp, jump rings and bar ends and put them all together myself. I had to make sure it all fit through the bales so it could be interchanged between the dominos.

For the art tiles I started with 2 mm greyboard that I cut into 1 inch squares. I glued the 3 images I printed out on them. Then I had a think about what else to do to them. I've made a few art tiles before that turned out nice but I wanted an Autumnal theme to match the vintage images. Then I saw it...my Indigo Blu jar of guilding flakes in Lancashire Rose. These guilding flakes are a mixture of gold, copper, silver and fushia metal flakes. GORG! SO I had a dig through my stamps to see what I could stamp over top and I wanted lots of shine so I chose a Penny Black stamp with lots of solid background. I stamped on the tiles with the Indigo Blu glue, added the guilding flakes, scooched off the excess, used Black Soot Distress ink to colour the sides and back of tiles, sealed with Mod Podge then again used Ultra Thick Embossing Powder on the top. I love how they turned out!

I used my X-Cut Doorplate dies to make the display backings out of cardstock then added a little bow and flowers.

Images Used:
Black & Cream image of label words and 2 children domino - Astrid's Artistic Efforts
Dark Roses with Key image domino - Lilac - n - Lavender
Pale birdie image domino - I forgot and can't find it now. :(
Art Tile Images all from Lilac- n - Lavender

Other Supplies Used:
Xcut 5-Piece Large Nesting Dies Doorplate
Ultra Thick Embossing Powder (generic brand)
Indigo Blu Lancashire Rose Guilding Flakes
Indigo Blu Flitter Glue

Thanks so much for reading! Hope you enjoyed and...

Happy Crafting,
Dorothy

28 August 2014

TWO Crafty Swap Received!

In today's post I dodn't get one, but TWO craft swap! I love getting these goodies in my post...lol. I belong to a Facebook group called UK Ireland Craft Swaps. There are so many talented, creative ladies over there and we have different craft projects swaps. We are mostly UK and Ireland based but we also have International members so why not join us.

I made a little video of the goodies I received today. Thanks for having a peek!

22 May 2014

My First Swap

Happy Thursday All! I'd like to show you what I received. I recently joined my first Swap Group on Facebook and just completed my very first swap ever! The group is UK-Ireland Craft Swaps. Since I am just beginning to get into Altered Art and Crafting, I thought I would start simple by entering a Tag Swap. We were to stamp with Stazon black ink on 10 tags with 10 different stamps and swap with a partner.

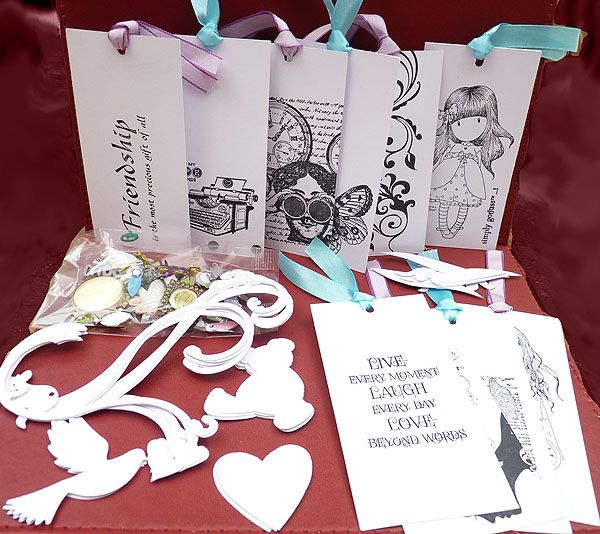
My lovely partner was Mandy and here is what she sent me:


She sent me some great stamped images that I know I can use in other projects. It's also customary to send other extra little goodies to add to our stashes. She sent me some really neat die cuts: a huge swirl, doves, teddy bears, hearts, little tulip blossoms and brackets. There were several of each, I didn't count them but I think there are 4 or 5 of each. The last item was a bag of sparkly goodness full of beads, flat backed gems, brads, resin pieces, bottle cap, etc.

I also sent her 10 tags with goodies but I didn't take a photo of them. I sent 5 white tags and 5 kraft card tags with seam binding ribbon that I colourised in 5 different colours. I did 2 in each colour as follows: 2 were spritzed with white pearl homemade glimmer mist, 2 spritzed with dark grey homemade glimmer mist, 2 spritzed with Mr Huey Tan Paint Mist, 2 coloured with Distress Ink in Dusty Rose and the last 2 I colored with Ranger Alcohol Ink in Cloudy Blue. The goodies I sent were a bunch of sheer ribbons in black, gray and white, a smal heart frame, 2 very large black roses from Mulberry Crafts, 4 Vintage images I printed out and coated in matt medium and 2 large panels of really interesting lace I recently bought. Mandy does lots of altered projects so I hope these will come in handy for her.

So I think my first swap was a success. I really enjoyed putting it all together. It was so much fun waiting for my parcel to arrive from Mandy and wondering if she would like what I sent her. I will participating in a few more swaps coming up so I'll be reporting how they go. If you like altered art and altered crafting and live in the UK or Ireland (or anywhere really as there are International swaps as well) then come join us over at UK-Ireland Craft Swaps...we would love to have you join in the fun!

Have a wonderful day and Happy Crafting!!!

09 May 2014

DSC #87 - Mother's Day

Happy Friday all! It's time for this week's challenge at Digitally Sweet challenges! This week our theme was Mother's Day since it's this Sunday in the US. Our lovely sponsor is Lunagirl and we were given a bunch of images to choose from.

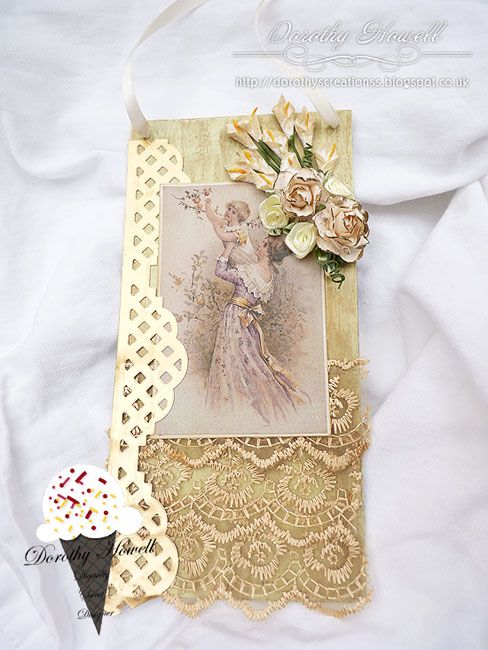
I chose to use one image on a little hanging plaque that would make a quick, inexpensive gift for Mum.


Supplies List:

White coated Chipboard base - from stash
Pale green paint - I mixed 2 Dulux paint tester pots to get a yellowy green
Gold Paint - DecoArt Dazzling Mettalic Elegant Finsh in Glorious Gold
Flowers (Lillies, large roses) - Mulberry Crafts
Little Silk Rosettes - from stash
Gold Lace - from a kit bought from Fiona aka Jennings644
Matt Gold Mirror Cardstock - from stash
Spellbinder Dies -  Lattic Accents
Galleria Matt Medium
Distress Ink in Antique Linen

I painted the white side of the chipboard in the yellow-green paint and dried with heat gun. I then took some metallic gold paint and smudged it in one direction with my finger. This gave the background an antiqued look. I coated the printed Lunagirl image with matt medium to protect the inkjet print surface. I added the lace, lattice side boder and flowers. I used my Crop a Dile Big Bite to punch 2 holes in the corners and added a cream ribbon for hanging.

It was a quick project that would make a great Mother's Day gift that doesn't cost a lot of money.

27 March 2014

DSC #81 - Add a Frame

Welcome to my FIRST official Design Team project for Digitally Sweet Challenges!

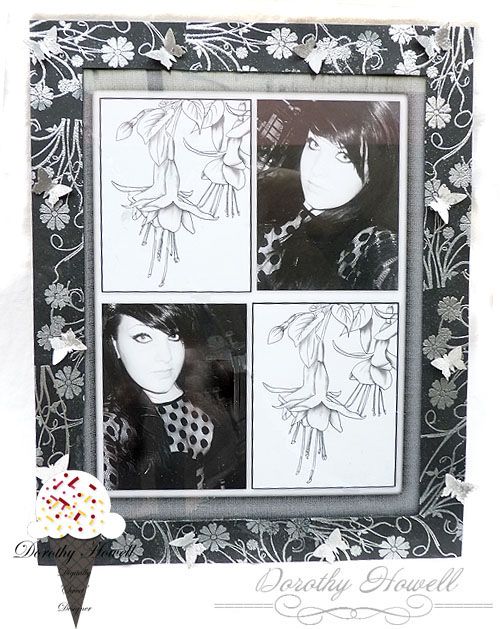
This week we are sponsored by Stitchy Bear Digi Outlet. We, the DT, were given a wonderful choice of image to create from. I chose this fushia to create a lovely layout with photos of my daughter, Aurora, and the digi stamp. I left everything monochrome as I kinda like that look in my home. How I did this is below:

I started with one of those simple frames that is just a pane of thin glass with clips that clip it onto a mat base. Mine was large, 12" x 9.5" which is larger than an A4 piece of paper so I had to adapt it somehow. I created my layout in Photoshop by opening a A4 sized image then added my daughter's photos, the fushia digi stamp and a canvas texture looking border which I printed out on good quality paper.

I trimmed the image some so it fit evenly under the glass. I clipped the frame back together. Then I took black cardstock and cut out a frame a little bigger than A4. The borders are 1" wide. Then I handstamped around the frame, covered with silver embossing powder and heated it up. I glued this right on top of the glass. I hand punched small butterflies in white card, added some silver embossing to those as well and scattered them around the frame.

This frame is going to hang in my lounge. I'm sure my daughter will hate it...lol...but I love it. Hope you like it too and it inspires you to use digital printable around your home!

SUUPLIES USED:
Stitchy Bear Digi Outlet - fushia stamp
Papermill Direct - 12" x 12" black cardstock 300 gsm
X-Cut - Buterfly punch (just picked this up at The Range for £3.99!)
Related Posts Plugin for WordPress, Blogger...