08 April 2014

Craft Haul & New Card

Hi all!  Got a couple things for ya here. First, let me show you a new clean and simple card I made last night. I got inspired from this week's theme at the Less is More Challenge Blog whichis "A Touch of turquoise." Here is my take on the theme:


I used some of my new stamps sets that I recently purchased. I have a nice crafty haul video below that shows you more of what I bought too! I basically cut offpart of the card front and replaced it with acetate. I stamped the chevrons on the inside of the card so it showed through the acetate. It's a nice CAS design. My new Peacock Feathers ink pad was a bit blotchy though. I don't know if it was the ink, the clea stamp or just my own terrible stamping technique...lol.


SUPPLIES USED:
TH Distress Ink - Peacock Feathers
Acetate - from stash
 
ENTERING THESE CHALLENGES:
Simply Less is More - A Touch of Turquoise
The Paper Players Challenge - Three Spree
4 Crafty Girls Challenges - Anything Goes
Sister Act Card Challenge - Anything Goes

05 April 2014

I Won Crafty Goodness!

Earlier this week I was surfing and I came across a link to a new line of crafty goodness that is starting soon. They have a Twitter feed (linked with image below) right now with their website coming soon. They were running a contest to win some of their products and I was one of the WINNERS!  I can't wait to see what I receive. I think I will do an unboxing video when I get it!

https://twitter.com/craft_asylum

You can also check them out on Facebook here: Craft Asylum where they have another contest to win a set of papers, stamps and embellishments from their Meadow Sweet collection. It's sweet stuff so check it out!

04 April 2014

DSC #82 "Anything but a Card"

Welcome to this week's DT project for Digitally Sweet Challenges! DSC has weekly craft challenge that's all about digital! If you love scrapping and cardmaking with digital images, then come join us!

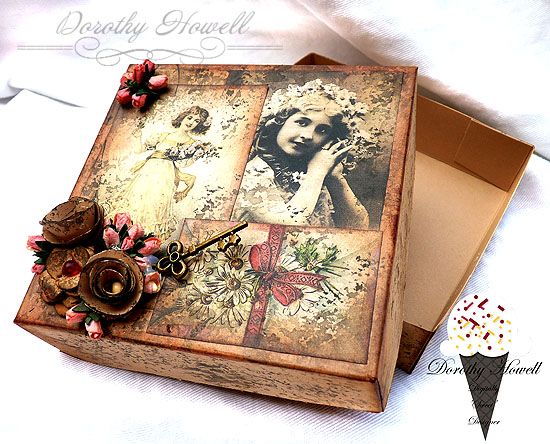
This week we are sponsored by Lunagirl Images. Lunagirl was kind enough to supply us DT members with some gorgeous vintage-y images to work with and here is what I made for you...a box:


It's always nice to have a cute little box onhand for little last minute Mother's Day or birthday gifties. This box is 4" x4" and made of kraft card. I printed and cut out 3 of Lunagirl's images then distressed the edges in Vintage Photo Distress Ink. I adhered them to the lid with matt medium, which I think turned out nice as I just LOVE the matt non shiny look. I took a piece of natural sponge and dabbed around the box with watered down Black Soot Distress Ink. I edged and dabbed the whole outside of the box to match.

I took more of the kraft card and made 3 flowers, 2 rolled ones and 1 with a Tonic flower punch. Those got distress and dabbed with the sponge as well. I added tiny Mulberry Crafts rosebuds that I coloured with a waterbrush and Fired Brick Distress Ink. Lastly I tucked in a little brass key.

It came together so quick and easy, hope you like it!

SUPPLIES USED:
Lunagirl Images - 3 vintage images
Papermill Direct - 12" x 12" Buff cardstock
Mulberry Crafts -  Off white Mulberry paper rose buds small S#151
Yummy Honey Crafts - key
Galleria Matt Medium
Beads from stash
Tonic Sm Flower Punch
TH Distress Inks - Vintage Photo, Fired Brick & Black Soot

Entering in the following challenges:
Glitter n Sparkle Challenges - Mother's Day
Dream Valley Challenge - Mothering Sunday 
Scribble and Scrap Challenge - Anything Goes
Papertake Weekly Challenge - Anything Goes
Crafts 4 Eternity - Anything but a card
Crafty Hands Challenge Blog - Shabby Chic
Seemacraft Challenge - Vintage

27 March 2014

DSC #81 - Add a Frame

Welcome to my FIRST official Design Team project for Digitally Sweet Challenges!

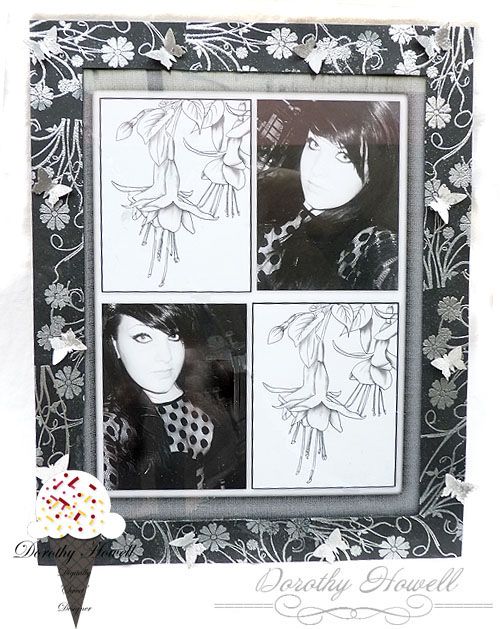
This week we are sponsored by Stitchy Bear Digi Outlet. We, the DT, were given a wonderful choice of image to create from. I chose this fushia to create a lovely layout with photos of my daughter, Aurora, and the digi stamp. I left everything monochrome as I kinda like that look in my home. How I did this is below:

I started with one of those simple frames that is just a pane of thin glass with clips that clip it onto a mat base. Mine was large, 12" x 9.5" which is larger than an A4 piece of paper so I had to adapt it somehow. I created my layout in Photoshop by opening a A4 sized image then added my daughter's photos, the fushia digi stamp and a canvas texture looking border which I printed out on good quality paper.

I trimmed the image some so it fit evenly under the glass. I clipped the frame back together. Then I took black cardstock and cut out a frame a little bigger than A4. The borders are 1" wide. Then I handstamped around the frame, covered with silver embossing powder and heated it up. I glued this right on top of the glass. I hand punched small butterflies in white card, added some silver embossing to those as well and scattered them around the frame.

This frame is going to hang in my lounge. I'm sure my daughter will hate it...lol...but I love it. Hope you like it too and it inspires you to use digital printable around your home!

SUUPLIES USED:
Stitchy Bear Digi Outlet - fushia stamp
Papermill Direct - 12" x 12" black cardstock 300 gsm
X-Cut - Buterfly punch (just picked this up at The Range for £3.99!)

22 March 2014

My First DT Place!

Woo hoo! I applied for a Design Team and have been accepted over at Digitally Sweet Challenge Blog! I am so happy this one will be my first as I love digital design. All the gals there have been so encouraging and friendly, I know it will be a good time. Not only do I get to work with terrific people, I also get to work with wonderful digital art from our sponsors.

So I whipped up a card last minute for this week's challenge:

(Use STARS on your project)


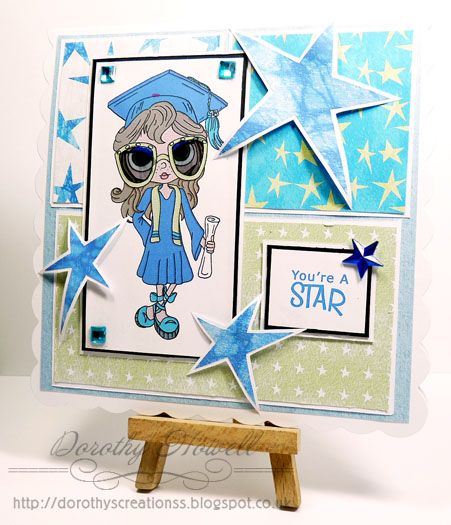
 We were given a choice of images to use by this week's sponsor, Lacy Sunshine. I chose this adorable Graduate girl. I colourised the digi stamp in Photoshop in colours that matched the papers. I added Pinflair Glaze to her eyeglass lens. The photo doesn't show how glaoosy it is, it just looks like she has sunglasses on...lol.

Supplies Used:
Scalloped 6" x 6" blank white card
Stars in Your Eyes  digital paper pack designed by ME
Big Blue stars and sentiment also designed by me.
White and Black cardstock for matting layers.
Square and Star gems from stash.

21 March 2014

Another Winner


I won again. My Pnk and black digital cardfront won last week's challenge at Digitally Sweet Challenges. I have such a soft spot for using digital designs in my crafting being that I did a lot of designing in Photoshop for so long. I still design sometimes and I have some images for sale at Card Making Downloads. Have a peek if you like!

I would like to thank everyone over at Digitally Sweet Challenges for my win this week and I greatly appreciate the new Lunargirl digi images I won. Can't wait to use them to!

I'm off to my craft room for the rest of the afternoon as I just printed off a bunch of new digi stamps. I want to break out the Copics and have a colour...lol.

Hugs, Dorothy

19 March 2014

Digital Card Front

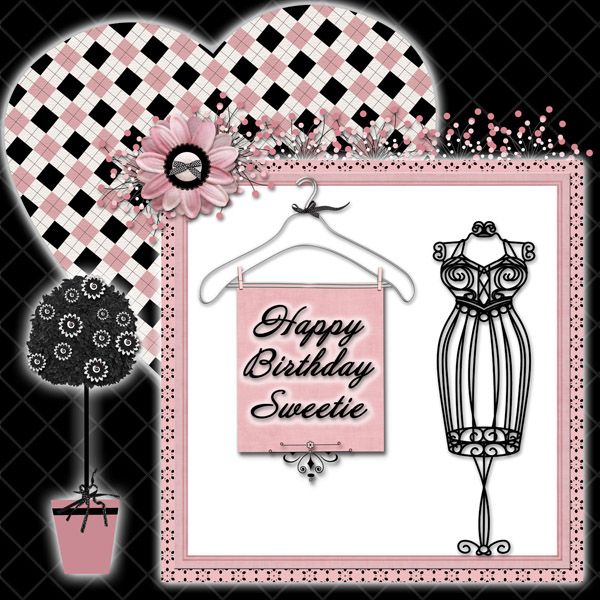
I sat here this afternoon playing in Craft Artist Pro and decided to make a printable card front for a quick birthday card. Here is what I whipped up:


It's pretty basic but I just loved the images in the freebie digital scrapbooking kit I used. I'm going to mount this on some pink and white matting then finally onto a blank 6" x 6" black card. I can see me using this kit for other projects as it had so many cute graphics inside it.

The kit I used was an old freebie kit called "Silhouette" by Numb Bum Designs. I would love to link to her but her blog no longer exists and she is not available in any online digital shop anymore either. But she did design some really cute scraps, ashame really. Then again I don't design digital kits anymore either. One day the designing bug might hit me again...lol. At the moment I really enjoy making real life crafts in my craft room. there is just something about having glue, glitter and inkyness everywhere that makes me happy.

ENTERING IN FOLLOWING CHALLENGE:

Digitally Sweet Challenges - Black & White + One Other Colour


16 March 2014

My Card WON!


 I would love to thank everyone over at Crafting When We Can Challenges for giving me this Winner's award on my anniversary Bookatrix card I entered in their challenge last week. I was really surprised and very honoured!

http://craftingwhenwecanchallenges.blogspot.co.uk/


I won some very cool digital stamps from Sassy Studio Designs...check out their blog shop! I cannot wait to get them and use them.

It was such a gorgeous day here in Essex that the hubby and I went to the seafront for the day then came home to watch The Arsenal barely beat Spurs so a good day all round...Thanks be to God!

Hope you all had a lovely weekend as well. Those of us in the UK have had such rotten winter weather that now it's warm and the sun is out, we all were at the seaside today. It was crowded at Southend-on-Sea but it was worth fighting the crowds. 


14 March 2014

Last Minute Card

Wow...two posts in one day! YIKES Scoob! I was wandering around the challege blogs and saw this one about to end and thought I would whip something up. The first card I made was a huge fail but this little CAS card turned out cute. Thought I'd enter it.


When I saw the theme of Spring Flowers I immediately thought of this new stamp set I bought on ebay. I bought it used and it came with no packaging. It looks like and Inkadinkadoo stamp set. If anyone knows, please leave me a comment so I can give credit.

I stitched around the stamped floral block with my Copic 02 liner pen and I used Papermania pigment inks.

Entering in the following challenge:

Simply Less in More - One Layer CAS Spring Flowers

Hugs, Dorothy


My First Bookatrix

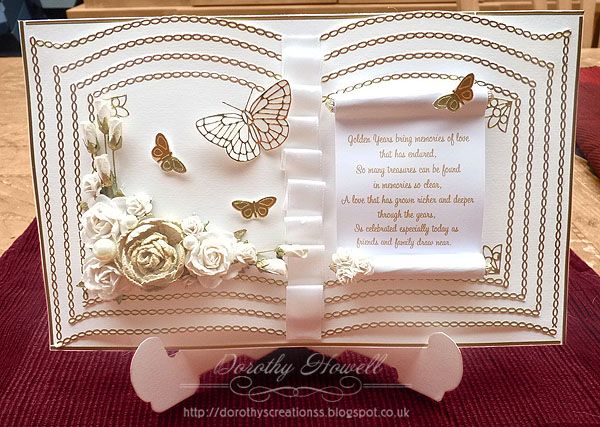
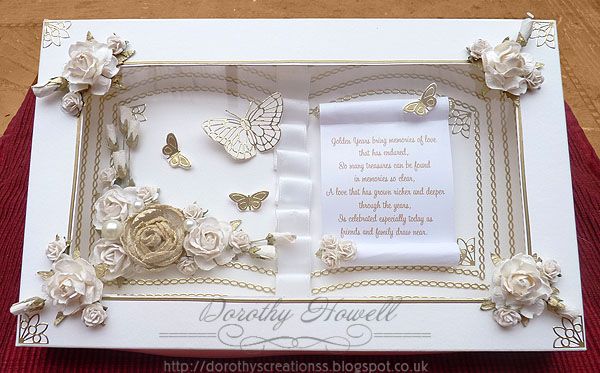
A friend of mine asked me to make her a card for her parents Golden 50th Anniversary and I agreed. I thought of a few designs and settled on an easel card...then I had an even better idea. I remembered that a long time ago someone gave me a bookatrix board. Funny thing that I foundit quite quickly in my mess of a craft room...lol. So I grabbed an old folder of peel offs and lots of white cardstock and away I went to making my very first ever bookatrix card.


I even created it's own stand and presentation box:


My friend just loved it as she had never seen anything like this before. I sure hope her parents like it as well. Thanks for having a look at my creation!

Here's my supply list:

White 300 gsm card (A3 sized) - Papermill Direct (I LOVE their card)
Gold peel offs in butterflies gold links, lines and fancy corners. Can't remember where these are from.
All white flowers  - Wild Orchid Crafts
Largest gold paper rose  - Hobbycraft  (white rose misted with homemade gold glimmer mist)
Folk Art Antique Gold paint (I painted the green leaves under the flowers in gold)

I would like to enter my bookatrix in the following challenges:

Crafting When We Can - Anniversary

Challenges 4 Everybody - Anything Goes

Glitter n Sparkle Challenge - Anything Goes

Scribble and Scrap - Anything Goes

That Craft Place Challenge - Anything Goes

Related Posts Plugin for WordPress, Blogger...