Photo courtesy Screenwallpapers.net
Yep...it's my birthday...I'm gonna party like it's my birthday! LOL It's a BIG one too...I am 50 years young today. Hubbs asked me if I felt like an old lady...sheesh. I had to remind him that although I am older than he is, I'm not THAT much older and he will be catching me up soon enough. Then he informed me that he already felt like an old man...double sheesh!
So it's not just a special day but my birthday is lasting a few days. It started last night with Hubbs and I going to The Arsenal match at Emriates Stadium. Hubbs bough me a new home shirt...here's me outside the stadium wearing it:
OK confession time.. I DETEST having my photo taken. There are many reason why I suppose, mostly it's because I've always been very overweight. I can honestly say (shockingly!) that I like this one of myself. I mean it's alright. I've really changed how I eat and it's working. I got lots more to lose and you cannot see my big roll of fat and loose skin down around my lower abdomen but hey. It's so hard to be objective of yourself, especially when you ain't so confident in how you look (like me!) Just to compare, here's a photo of me a few years ago with my daughter in Biarritz, France:
Back in April of this year (2014) I had a mini stroke. It was a huge wake up call and I decided it was time to get my health back or at least do what I could. Being a paraplegic causes all kind of health probs as well as being so fat. Drastic times called for drastic measures and after months of trying to find the best lifestyle for me, I became vegan. In fact I am a Raw Til 4 Vegan. You can find out more about this at RawTil4.com. I love the food I eat and it's making me more aware of what I put on the inside AND outside of my body.
I know my blog is mostly about crafting and I don't go into my private life too much but I'm hoping to change that. I'd like to take my blog on a journey with me this year, my 50th year on planet Earth. I'd like you to get to know me through my faith (I'm a Christian,) my food (I'm a Vegan) and my free time (I'm a Crafter.) I hope you will join me on this journey.
Thanks for reading...have a wonderful day...God bless...and as always...
HAPPY CRAFTING,
Dorothy
02 October 2014
01 October 2014
Challenge #273 - Use Orange
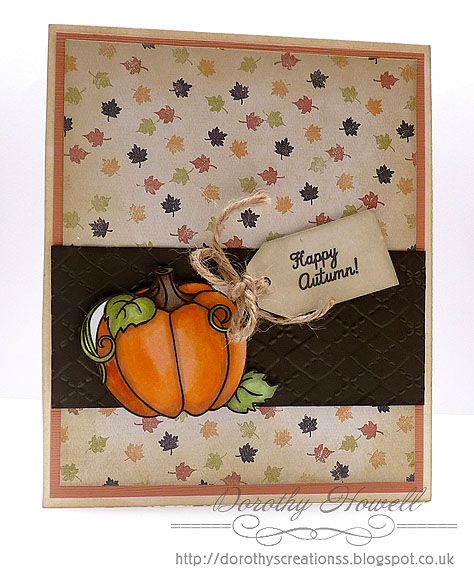
Two weeks gone and it's time for a new challenge at Crafty Creations Challenges! Our theme this time around is to use orange in your project. Our sponsor is Robyn's Fetish and I used one of her gorgeous images. I made a Happy autumn card:
First I coloured in the Fall Pumpkin digital stamp with my copic Ciao markers. Then I fussy cut it out. I took a white card base, inked the edges with Linen Distress Ink. On top I layered burnt orange card, the fall leaf digital paper from a digital scrapbooking kit then some dark brown card that I embossed with a folder and my Cuttlebug. I added a tag I also distressed with the Linen ink. I added jute twine to the tag. A simple yet effective card!
SUPPLIES USED:
Robyn's Fetish Fall Pumpkin digi stamp
Fall Leaf paper from digi kit - "Autumn Thoughts" by Designs by Megan Turnidge
Orange and Brown card from stash
White card base from stash
Copic Ciao markers
Cuttlebug Embossing Folder Argyle
Jute Twine from stash
First I coloured in the Fall Pumpkin digital stamp with my copic Ciao markers. Then I fussy cut it out. I took a white card base, inked the edges with Linen Distress Ink. On top I layered burnt orange card, the fall leaf digital paper from a digital scrapbooking kit then some dark brown card that I embossed with a folder and my Cuttlebug. I added a tag I also distressed with the Linen ink. I added jute twine to the tag. A simple yet effective card!
SUPPLIES USED:
Robyn's Fetish Fall Pumpkin digi stamp
Fall Leaf paper from digi kit - "Autumn Thoughts" by Designs by Megan Turnidge
Orange and Brown card from stash
White card base from stash
Copic Ciao markers
Cuttlebug Embossing Folder Argyle
Jute Twine from stash
New Bearly Mine Challenge
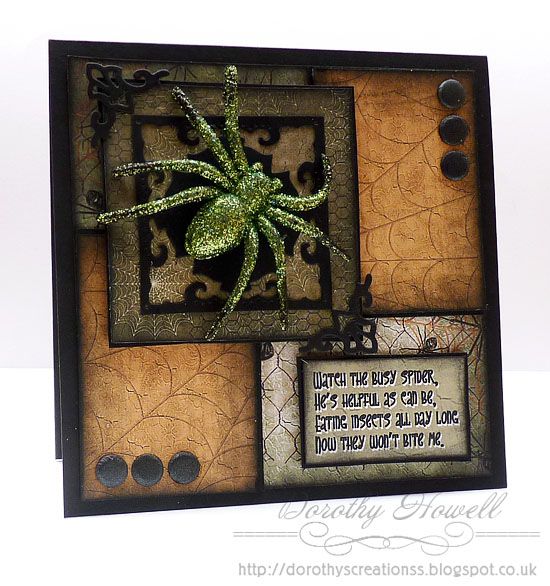
It's a new month so that means it's time for a new challenge at Bearly Mine Challenges! Join us for this month's challenge with the theme halloween. I personally don't "do" halloween so I made a card with a basic theme...SPIDERS...lol.
Whatcha think? Not halloween but still a bit scary huh? Well if you live in the UK you will know we get some really big spiders here, I mean creepy, massively huge, long hairy legged suckers. Don't what it is about the UK that breeds big spiders...lol. Anyway, I used the Bearly Mine paper set called Halloween Fantasy. I used 4 different papers and I colourised 2 of them to match in Photoshop. I edged the papers with Distress Ink in Black Soot. I placed these on a black card base. I embellished with black Card Candi, Spellbinder diecuts and a big green glittered spider I got in a pack of 4 from a local 99p Store.
SUPPLY USED:
Bearly Mine papers - Halloween Fantasy
Black Cardstock - Papermill Direct
Spellbinders - Nestabilities Marvelous Squares S4-383
Craftword Card Candi-Metropolis
Green Glitter Spider - from a local 99p Store
Whatcha think? Not halloween but still a bit scary huh? Well if you live in the UK you will know we get some really big spiders here, I mean creepy, massively huge, long hairy legged suckers. Don't what it is about the UK that breeds big spiders...lol. Anyway, I used the Bearly Mine paper set called Halloween Fantasy. I used 4 different papers and I colourised 2 of them to match in Photoshop. I edged the papers with Distress Ink in Black Soot. I placed these on a black card base. I embellished with black Card Candi, Spellbinder diecuts and a big green glittered spider I got in a pack of 4 from a local 99p Store.
SUPPLY USED:
Bearly Mine papers - Halloween Fantasy
Black Cardstock - Papermill Direct
Spellbinders - Nestabilities Marvelous Squares S4-383
Craftword Card Candi-Metropolis
Green Glitter Spider - from a local 99p Store
26 September 2014
DSC #107 Music
It's another Friday and it's time for the weekly challenge at Digitally Sweet Challenges! Here is my Design Team project for this week...a card:
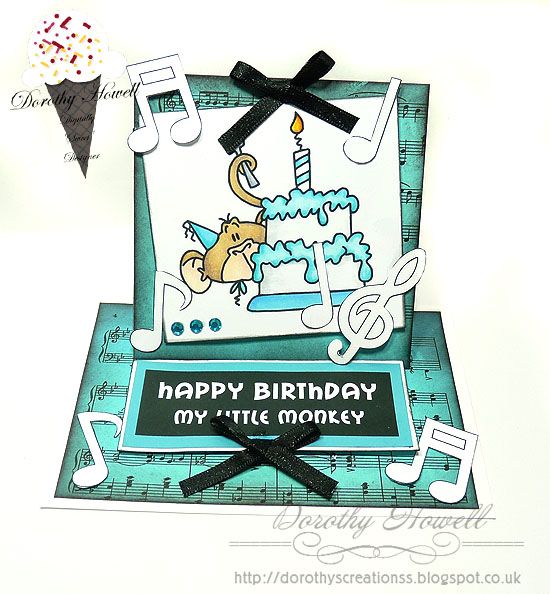
I made an easel card this time using one of our sponsor's digi stamps. You can find this stamp here at Bugaboo Stamps. I took the stamp and coloured it in with my Copic Ciaos I then printed off a music sheet that I colourised in Photoshop and laid that as a base top and bottom all edges with Black Soot Distress Ink. I also printed out the music notes and fussy cut those out. I made the sentiment myself. Finally added 2 black bows and aqua blue gems.
Yeah I know I know...another BLUE project...lol. I know I've been using a whole lot of blue lately. Sorry about that. I'll make sure to use a diferent colour next time. I hope you enjoyed this week's card and I do hope you will join us for this week's challenge at Digitally Sweet Challenges!
I made an easel card this time using one of our sponsor's digi stamps. You can find this stamp here at Bugaboo Stamps. I took the stamp and coloured it in with my Copic Ciaos I then printed off a music sheet that I colourised in Photoshop and laid that as a base top and bottom all edges with Black Soot Distress Ink. I also printed out the music notes and fussy cut those out. I made the sentiment myself. Finally added 2 black bows and aqua blue gems.
Yeah I know I know...another BLUE project...lol. I know I've been using a whole lot of blue lately. Sorry about that. I'll make sure to use a diferent colour next time. I hope you enjoyed this week's card and I do hope you will join us for this week's challenge at Digitally Sweet Challenges!
23 September 2014
My Bearly Mine Inspiration Project
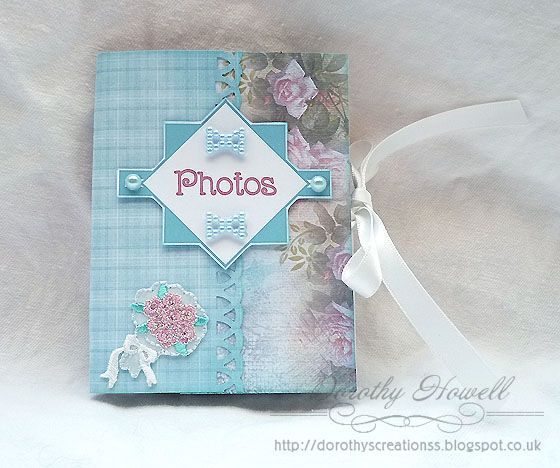
Hello all! As I posted the other day, I am one of the new Design Team gals for Bearly Mine Designs and it's my very first inspiration project using Bearly Mine digital papers. I created a cute little hybrid crafting wedding mini photo folio!
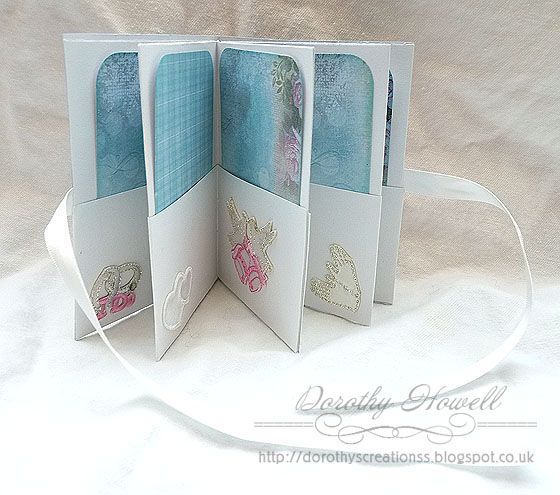
Here is what it looks like inside:
This is sute a cute and quick project to make. I followed a video tutorial by CreationsbyChristie and it uses only one sheet of 12" x 12" cardstock. I used a sheet of textured white card. I took a piece of white ribbon and glued it to the front and back covers. I covered over top the covers with papers I printed from a Bearly Mine Designs paper kit called Summer Floral Delights. I used an edge punch on a 4" x 4" square of the blue pattern to wrap the binding putting that over top a lovely rose print I also printed out eight 2 1/2" x 3 3/4" rectangles of more of the papers to make the photo mats for inside the folio. All the papers were edged in Broken China Distress Ink.
On the cover, I printed out the sentiment I created in Paint Shop Pro to match. Then put that on dimentional foam pads and added some pale blue pearl embellies from my stash. Finally I added these lovely fabric wedding stickers I just bought. They came in a big job lot of stickers I got off of eBay. The album measures 3" x 4" and it was quick and easy to make.
We have a monthly challenge on over at the Bearly Mine Challenge blog, so please check out the current challenge. I sure hope you join us! God bless your today, thank you for having a peek at my blog and, as always...
Happy Crafting!
Dorothy
CHALLENGES ENTERED:
Scribble and Scrap Challenge - Anything Goes
Crafting from the Heart Challenge - Anything Goes
Whoopsi Daisy Challenge - Bling and/or Pearls
Crafty Boots Challenge - Anything Goes
Crafty Cardmakers and more - Ribbon/Lace and Pearls
Inky Chicks Challenge - Anything Goes
Diva by Design Challenge - Anything but a Card
Ruby's Rainbow Challenge - Anything Goes
Crafty Girls Challenge - Anything Goes
Creative Fingers Challenge - Anything Goes
A Creative Romance - Anything Goes
Here is what it looks like inside:
This is sute a cute and quick project to make. I followed a video tutorial by CreationsbyChristie and it uses only one sheet of 12" x 12" cardstock. I used a sheet of textured white card. I took a piece of white ribbon and glued it to the front and back covers. I covered over top the covers with papers I printed from a Bearly Mine Designs paper kit called Summer Floral Delights. I used an edge punch on a 4" x 4" square of the blue pattern to wrap the binding putting that over top a lovely rose print I also printed out eight 2 1/2" x 3 3/4" rectangles of more of the papers to make the photo mats for inside the folio. All the papers were edged in Broken China Distress Ink.
On the cover, I printed out the sentiment I created in Paint Shop Pro to match. Then put that on dimentional foam pads and added some pale blue pearl embellies from my stash. Finally I added these lovely fabric wedding stickers I just bought. They came in a big job lot of stickers I got off of eBay. The album measures 3" x 4" and it was quick and easy to make.
We have a monthly challenge on over at the Bearly Mine Challenge blog, so please check out the current challenge. I sure hope you join us! God bless your today, thank you for having a peek at my blog and, as always...
Happy Crafting!
Dorothy
CHALLENGES ENTERED:
Scribble and Scrap Challenge - Anything Goes
Crafting from the Heart Challenge - Anything Goes
Whoopsi Daisy Challenge - Bling and/or Pearls
Crafty Boots Challenge - Anything Goes
Crafty Cardmakers and more - Ribbon/Lace and Pearls
Inky Chicks Challenge - Anything Goes
Diva by Design Challenge - Anything but a Card
Ruby's Rainbow Challenge - Anything Goes
Crafty Girls Challenge - Anything Goes
Creative Fingers Challenge - Anything Goes
A Creative Romance - Anything Goes
21 September 2014
New Design Team Member!
Yep, I did it again! I am now a new member of a Design Team. I am one of the new dsigners for Bearly Mine Designs! I get to work with their absolutely gorgeous digital paper designs and I'm so excited. You can join us on the Bearly Mine Challenge Blog as well to see gorgeous inspiration projects and enter into challenges to win great products too! Keep an eye out tomorrow when I show off an inspirational crafty project using Bearly Mine papers.
I want to also thank everyone at Bearly Mine for choosing me to be a part of the team...they are such a talented group of carfters and designers, I hope I will do you all justice!
19 September 2014
DSC #106 Rock It Out
Welcome to today's post everyone! It's Friday and you know what that means...time to show you this week's challenge and DT project for Digitally Sweet Challenges! This week's theme is "Rock It Out" and it's open to interpretation. Our lovely sponsor this week is Stitchy Bear Stamps and we had some great images to work with. Here is a digital card front I made for printing:
I used a Coosey Creations kit called "Saxy Frog" to create this digital image. I just love the colours in this kit. the blues and greens are so pretty. I used 3 of the paper designs and the frog digi stamp which I coloured in Photoshop. I overlaid one of the papers over him as well to give him a textured spotty look. The digital ribbons and corners were from my digi stash and I made the sentiment myself. The font I used in it is called Howser which you can find here at kevinandamanda.com.
I hope you all will join us over at Digitall Sweet Challenges this week and join in the fun! Have a terrific weekend too. God bless!
Happy Crafting, Dorothy
I used a Coosey Creations kit called "Saxy Frog" to create this digital image. I just love the colours in this kit. the blues and greens are so pretty. I used 3 of the paper designs and the frog digi stamp which I coloured in Photoshop. I overlaid one of the papers over him as well to give him a textured spotty look. The digital ribbons and corners were from my digi stash and I made the sentiment myself. The font I used in it is called Howser which you can find here at kevinandamanda.com.
I hope you all will join us over at Digitall Sweet Challenges this week and join in the fun! Have a terrific weekend too. God bless!
Happy Crafting, Dorothy
17 September 2014
My 1st DT Project for Crafty Creations!
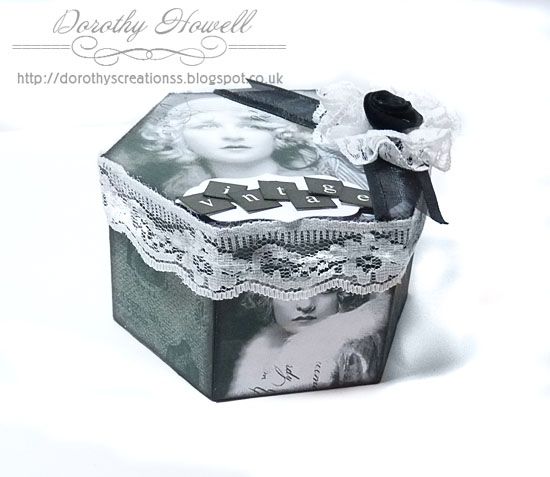
Hi everyone..it's time for my very first Design Team project for Crafty Creations Challenges! I do hope you will join us for this fortnight's challenge and the theme is VINTAGE! So come and show us your Vintage-ness...lol. Our sponsor for this challege is Whiff of Joy Stamps and they are offering an adorable Christmas mouse rubber stamp to the winner. Go HERE for more on this challege.
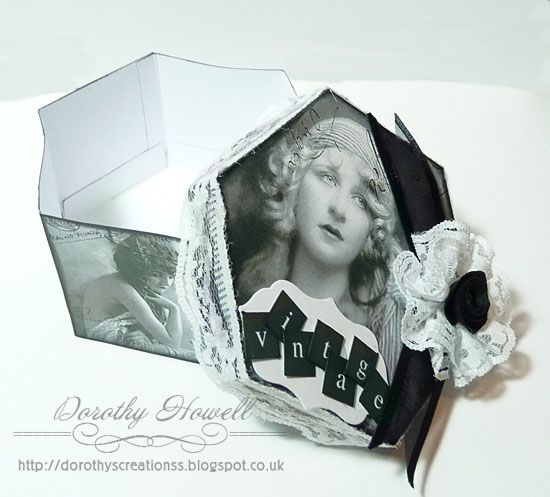
Here is my project...a sweet vintage box:
Ain 't it cute? LOL This is a vintage digital project, you know how I love doing digital. I started off with a template I downloaded free from Belle's Printables. I opened it in Photoshop and added a vintage dark digital paper and the free lady images which are from French and Sparrow (lots of gorgeous images there!) I then printed it off, cut it out and glued it together. Then it was a matter of decorating the box with lace, lace flower, felt flower, ribbon and the sentiment. It was simple to make and I hope you will give it a go too!
SUPPLIES USED:
Box Template - Belle's Printables (I used the one called Small Hex Box)
Vintage Ladies - French and Sparrow.com (link goes to the images page)
Sentiment badge - Xcut 5-Piece Large Nesting Dies Doorplate
Lace & Felt flowers were made by me with stash
Ribbon, lace, Vintage letters from my stash.
Hope you will join in the challenge at Crafty Creations! Have a Craft Happy Day!
Hugs, Dorothy
Here is my project...a sweet vintage box:
Ain 't it cute? LOL This is a vintage digital project, you know how I love doing digital. I started off with a template I downloaded free from Belle's Printables. I opened it in Photoshop and added a vintage dark digital paper and the free lady images which are from French and Sparrow (lots of gorgeous images there!) I then printed it off, cut it out and glued it together. Then it was a matter of decorating the box with lace, lace flower, felt flower, ribbon and the sentiment. It was simple to make and I hope you will give it a go too!
SUPPLIES USED:
Box Template - Belle's Printables (I used the one called Small Hex Box)
Vintage Ladies - French and Sparrow.com (link goes to the images page)
Sentiment badge - Xcut 5-Piece Large Nesting Dies Doorplate
Lace & Felt flowers were made by me with stash
Ribbon, lace, Vintage letters from my stash.
Hope you will join in the challenge at Crafty Creations! Have a Craft Happy Day!
Hugs, Dorothy
12 September 2014
DSC #105 "Charm"ing
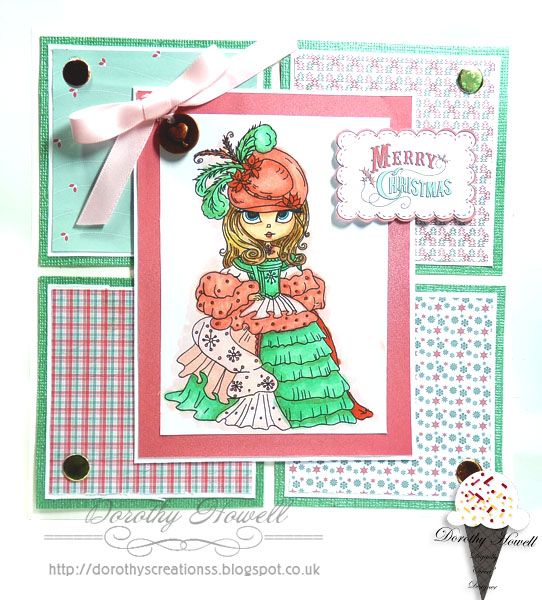
Good morning lovlies! It's dat time...it's time for this week's new challenge at Digitally Sweet Challenges! We have a terrific sponsor this week...you could win your choice of digi stamp from Lacy Sunshine Stamps! She was kind enough to let us on the Design Team have an image each to work with. I chose this beautiful stamp called Emily Snow Princess. Our theme this week is "Charm"ed - Add a charm to your project.
LOL it's hard to see the white card base, this is what happens when I photograph at night. There is just too much glare on the photo. I used an extra light but guess I shouldn't have...can we say "overkill?" LOL This is an extra large card. It measures 6 3/4" by 6 3/4" which I made out of A3 white cardstock. I printed out the digi stamp and the 4 digital papers and sentiment. These were from a freebie scrap kit I had downloaded awhile back. I coloured Emily with my Copics, then added corner dots, a ribbon and a charm which is metal with a heart on it.I definitely didn't use traditional Christmas colours on this one but I went with the colours of the scrap kit I used. All supplies are listed below.
SUPPLIES USED:
Emily Snow Princess Digital Stamp - Lacy Sunshine Stamps
Creativ Christmas Free Digi Scrap Kit - Regina Falango (kit no longer available but she has other freebies)
A3 Cardstock Base - Papermill Direct
Copic Markers
Card Candi
Green Cardstock - Core'dinations Gemstone Cardstock 12"X12"
Thanks for having a peek...hope you will join us at Digitally Sweet Challenges. We would love to see your creations!
Happy Crafting!
Dorothy
LOL it's hard to see the white card base, this is what happens when I photograph at night. There is just too much glare on the photo. I used an extra light but guess I shouldn't have...can we say "overkill?" LOL This is an extra large card. It measures 6 3/4" by 6 3/4" which I made out of A3 white cardstock. I printed out the digi stamp and the 4 digital papers and sentiment. These were from a freebie scrap kit I had downloaded awhile back. I coloured Emily with my Copics, then added corner dots, a ribbon and a charm which is metal with a heart on it.I definitely didn't use traditional Christmas colours on this one but I went with the colours of the scrap kit I used. All supplies are listed below.
SUPPLIES USED:
Emily Snow Princess Digital Stamp - Lacy Sunshine Stamps
Creativ Christmas Free Digi Scrap Kit - Regina Falango (kit no longer available but she has other freebies)
A3 Cardstock Base - Papermill Direct
Copic Markers
Card Candi
Green Cardstock - Core'dinations Gemstone Cardstock 12"X12"
Thanks for having a peek...hope you will join us at Digitally Sweet Challenges. We would love to see your creations!
Happy Crafting!
Dorothy
11 September 2014
New DESIGN TEAM Member Here!
I really enjoy being a Design Team member. I'm not very confident in my crafting so when I applied for my first DT position and got it, well I was chuffed. Welllll, I applied to another DT and I am again proud to say I was accepted!
I am one of the newest Design Team members at...
Crafty Creations Challenges has a new challenge every other Wednesday. The current challenge is now on and you can check it out HERE. You could win your choice of 3 digi stamps from Stitchy Bear Designs!
I'd like to say a big thank you to everyone at Crafty Creations for choosing me and I will do my creative best!
Thanks for reading...Happy Crafting!
Dorothy
Subscribe to:
Posts (Atom)