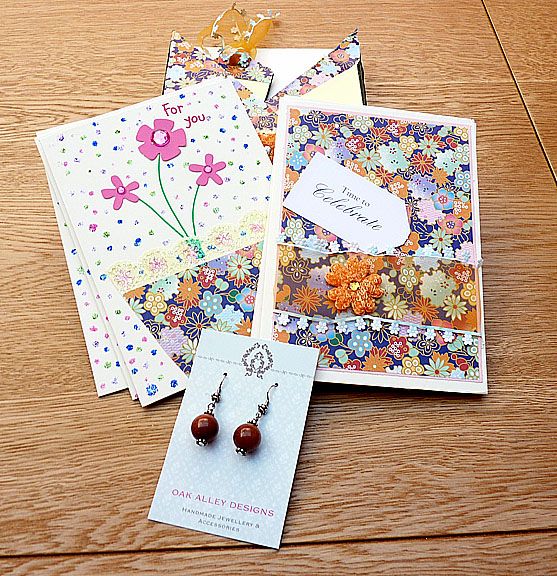
I received another swap and this time it's from Shirley! I'll be making mine to send to her this week but Shirley was fast so sent mine early. The swap for UK Ireland Craft Swaps was to make a criss cross box with a set of 6 cards inside. Here is how to make the criss cross box: Tutorial.
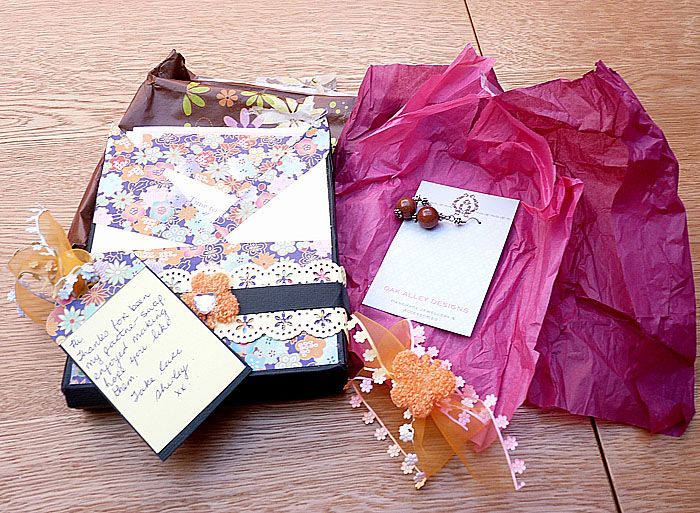
Here is what Shirley made for me plus a little gift as well:
Here's a look at the cards inside the box and the earrings she sent as a gift:
Aren't these wonderful! Thanks so much Shirley for the lovely swap. I do hope you enjoy what I send you as much as I love mine from you!
Happy Crafting!
Dorothy
09 September 2014
08 September 2014
My Rosette Creations
I participated in a crafty swap over at UK Ireland Craft Swaps Facebook group and were challenged to create 6 rosettes with packaging. My swap partner was Jacqui and I showied you what she made me in my video HERE.
Here is what I sent her:
I made 2 sets of matching rosettes and set them on extra long tags. Here is a clser look at all 6, click on image for larger view:
I do hope you check out our wonderful swap group at UK Iremand Craft Swaps if you like to craft and swap with others. It's so much fun and the different challenges really push my creativity!
Happy Crafting Everyone!
SUPPLIES USED:
Spellbinders Dies - Scalloped Circle & Fancy Circle
Martha Stewart Scoreboard to make rosettes
Old butterfly punch
Lace, feathers, black tassles, flowers, jewelled flower, pink lace butterfly, chipboard mask & corset, pearl strands all from my stash
Black & white papers from- Colorbok Paper Plus+ Fruit Punch 12" x 12" paper pad
Pastel Floral & Polka Dot papers from - First Edition by Tanya Whelan Floral Pavilion 12" x 12" paper pad
Here is what I sent her:
I made 2 sets of matching rosettes and set them on extra long tags. Here is a clser look at all 6, click on image for larger view:
I do hope you check out our wonderful swap group at UK Iremand Craft Swaps if you like to craft and swap with others. It's so much fun and the different challenges really push my creativity!
Happy Crafting Everyone!
SUPPLIES USED:
Spellbinders Dies - Scalloped Circle & Fancy Circle
Martha Stewart Scoreboard to make rosettes
Old butterfly punch
Lace, feathers, black tassles, flowers, jewelled flower, pink lace butterfly, chipboard mask & corset, pearl strands all from my stash
Black & white papers from- Colorbok Paper Plus+ Fruit Punch 12" x 12" paper pad
Pastel Floral & Polka Dot papers from - First Edition by Tanya Whelan Floral Pavilion 12" x 12" paper pad
05 September 2014
DSC #103 Chocolate & Cream
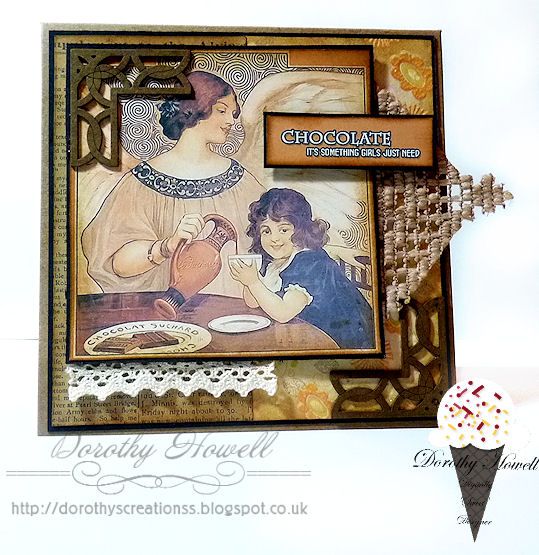
Happy Friday peeps! I'm here with my DT project for Digitally Sweet Challenges! Our sponsor this week is Lunagirl and she let us have some wonderfully vintage images all dealing with CHOCOLATE! I loved this image so made a card.
Much of this card was printed out from my computer: the main image by Lunagirl of course, the sentiment and one of the backing papers. I started with a 6" x 6" kraft card and matted using black card. I added a couple different laces and chipboard corners which I coloured with Distress Ink in Vintage Photo. I found a chocolate sentiment online and opened Photoshop to type it out. I added a background colour to the sentiment to match the image.
Thanks for looking and hope you'll join us over at Digitally Sweet!
SUPPLIES USED:
Main Image - Lunagirl
6" x 6" kraft card base by Papermania Square Card Blanks w/ Envelopes
Black cardstock - Papermill Direct
FLoral pattered paper - First Edition Desert Blooms Paper Pad 6 x 6 inch
Printed out Text Backing paper - Far Far Hill
Sentiment made by me in PS CS3
Vintage Photo Distress Ink
Laser Cut corners - shop no longer in business but find great laser cut mdf by Fernli Designs
Laces from my stash
Much of this card was printed out from my computer: the main image by Lunagirl of course, the sentiment and one of the backing papers. I started with a 6" x 6" kraft card and matted using black card. I added a couple different laces and chipboard corners which I coloured with Distress Ink in Vintage Photo. I found a chocolate sentiment online and opened Photoshop to type it out. I added a background colour to the sentiment to match the image.
Thanks for looking and hope you'll join us over at Digitally Sweet!
SUPPLIES USED:
Main Image - Lunagirl
6" x 6" kraft card base by Papermania Square Card Blanks w/ Envelopes
Black cardstock - Papermill Direct
FLoral pattered paper - First Edition Desert Blooms Paper Pad 6 x 6 inch
Printed out Text Backing paper - Far Far Hill
Sentiment made by me in PS CS3
Vintage Photo Distress Ink
Laser Cut corners - shop no longer in business but find great laser cut mdf by Fernli Designs
Laces from my stash
29 August 2014
DSC #103 Oriental
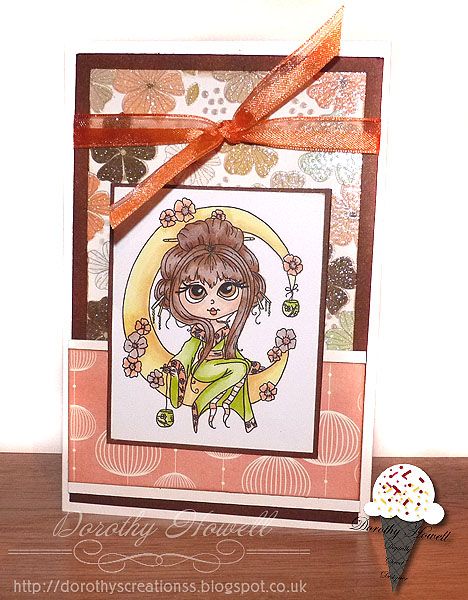
Welcome to Friday Design Team project for Digitally Sweet Challenges! This week we are sponsored by and the theme is Oriental. Time got away from me this week so I whipped up a cute little card.
I know it's not fancy but I did take time over the colouring and choosing the paper. The paper is Dovecraft Papermania Leaf 6" x 6" pad. The flower one I loved because of the encapsulated glitter that came on the paper. I used Copic Ciao markers to colour in this little cutie. I'm not entering any challenges this weeke either as it's time to go on holiday for a little bit. Hubs and I are just doing a little sightseeing in the Midlands here in the UK.
So hope you all have a really terrific weekend and enjoy yourselves! Happy crafting!
Hugs, Dorothy
So hope you all have a really terrific weekend and enjoy yourselves! Happy crafting!
Hugs, Dorothy
28 August 2014
TWO Crafty Swap Received!
In today's post I dodn't get one, but TWO craft swap! I love getting these goodies in my post...lol. I belong to a Facebook group called UK Ireland Craft Swaps. There are so many talented, creative ladies over there and we have different craft projects swaps. We are mostly UK and Ireland based but we also have International members so why not join us.
I made a little video of the goodies I received today. Thanks for having a peek!
25 August 2014
Video Crafty Haul - TK Maxx
Hope you're enjoying your Bank Holiday Monday. Mine is a wash out...literally...because it's been pouring rain all day. That's ok though. Hubby and I plans are all indoors anyway. My new dining room set is being delivered on Wednesday and we cleared and cleaned the room for it. Next it's time for a bedroom overhaul...lol.
In the meantime I got a chance to upload this crafty haul video. To set it up, this week the ladies over at UK Ireland Craft Swaps Facebook group were talking about how they got some great designer papers at their local TK Maxx. Their got nice ones from Recollections, Bo Bunny, My Mind's Eye, etc.
We haven't had a TK Maxx here in my town for about a year and even then I think I went into it once years ago. Good news for me though as we just had a brand new TK Maxx open over at Pipps Hill Shopping Centre. It opened this wekend so I had to go have a look for myself. Although the shop was quite picked over, they did have some paper, not much but I got at least one of all they had...lol. This video shows what I got. Hope you enjoy my mini haul!
In the meantime I got a chance to upload this crafty haul video. To set it up, this week the ladies over at UK Ireland Craft Swaps Facebook group were talking about how they got some great designer papers at their local TK Maxx. Their got nice ones from Recollections, Bo Bunny, My Mind's Eye, etc.
We haven't had a TK Maxx here in my town for about a year and even then I think I went into it once years ago. Good news for me though as we just had a brand new TK Maxx open over at Pipps Hill Shopping Centre. It opened this wekend so I had to go have a look for myself. Although the shop was quite picked over, they did have some paper, not much but I got at least one of all they had...lol. This video shows what I got. Hope you enjoy my mini haul!
22 August 2014
Bearly Mine DT Application!
I love surfing the challenge blogs and today I found a wonderful challenge blog that is looking for new Design Team members. I decided to apply. The reason is because it stresses digital design in your art! I submitted a card using lots of papers...that's why I chose it. Now the blog and digital designer is BEARLY MINE DESIGNS!!! She specialises is digital papers...yum yum yum...they are gorgeous too!
One of the requirements to apply was post on your blog why you would like to be a designer for Bearly Mine. Well that's easy! The papers are so beautiful and we can choose which ones to use each challenge too. Also the main reason is...I LOVE using digital designs in my real life crafting. If you look on my blog posts with projects on them, you'll see that 98% of them have something I printed off the computer on them.
I also do some digital designing myself in Photoshop, PSP and GIMP. I've designed digital scrapping kits, printables, craft projects, boxes, papers, digital stamps, etc. I appreciate great art and I think Bearly Mine's papers would be amazing to work with too as she has so many styles to choose from. I can also see me using their papers in combination with lots of other things like digi stamps, embellies, etc.
So you can see, from my love of digital designs, Bearly Mine having lovely and versatile papers, and me being able to commit to making projects for them, making comments and being available long term, I do believe I can be real asset to Bearly Mine Challenges. I will do my best to be a team member and show Bearly Mine in the best way possible.
Happy Crafting All!
Hugs, Dorothy
I also do some digital designing myself in Photoshop, PSP and GIMP. I've designed digital scrapping kits, printables, craft projects, boxes, papers, digital stamps, etc. I appreciate great art and I think Bearly Mine's papers would be amazing to work with too as she has so many styles to choose from. I can also see me using their papers in combination with lots of other things like digi stamps, embellies, etc.
So you can see, from my love of digital designs, Bearly Mine having lovely and versatile papers, and me being able to commit to making projects for them, making comments and being available long term, I do believe I can be real asset to Bearly Mine Challenges. I will do my best to be a team member and show Bearly Mine in the best way possible.
Happy Crafting All!
Hugs, Dorothy
DSC #102 Guys Only
Welcome to another DT project for Digitally Sweet Challenges! Our theme this week is GUYS ONLY and we had some wonderful images to choose from given graciously for this week's sponsor Stitchy Bear Stamps. I made a masculine birthday card:
I printed out the lighthouse beach digital stamp and one of the digital papers by Stitchy Bear and added to back card base. I coloured the digi stamp with my watercolour pencils and a water brush. I then used a die for the sides and corners in black and buff cardstock. This is the first time I've used this Spellbinders Marvelous Squares die too! I've had it in my stash waaaaay too long LOL. The sentiment is hand stamped and I added a dark beige ribbon that matched the buff card. I do make simpler style cards and I really wanted simple with this one as the image is so great. I wanted it to be the focus of the card. Hope you like it!
SUPPLIES USED:
Sunset at Sea digi stamp & backing paper - Stitchy Bear Stamps
Corner and border side diecuts - Spellbinder Die set called Marvelous Squares
Sentiment Stamp - Papermania Clare Curd's Signature Range (Sentiments)
Derwent Waltercolour Pencils
Dovecraft Premium Pigment Ink in black
Black and Buff cardstock - Papermill Direct
Ribbon from my stash
CHALLENGES ENTERED:
Papertake Weekly - To Die For (use a diecut)
Sweet Stamps - Anything Goes
Try It On Tuesday - Use your stash (ribbon and die)
Crafty Creations Challenges - Use Something Old from Stash (ribbon & Die)
Crafty Girlz Challenges - Anything Goes
Crafts 4 Eternity Challenge - Beside the Seaside
Creative Fingers Challenges - anything Goes
Suzy Bee's Bloomin Challenge - Anything Goes
Eclectic Ellapu - Seaside/Nautical and Anything Goes with Watercolours
Little Claire's Design challenges - Man's Birthday Card
I printed out the lighthouse beach digital stamp and one of the digital papers by Stitchy Bear and added to back card base. I coloured the digi stamp with my watercolour pencils and a water brush. I then used a die for the sides and corners in black and buff cardstock. This is the first time I've used this Spellbinders Marvelous Squares die too! I've had it in my stash waaaaay too long LOL. The sentiment is hand stamped and I added a dark beige ribbon that matched the buff card. I do make simpler style cards and I really wanted simple with this one as the image is so great. I wanted it to be the focus of the card. Hope you like it!
SUPPLIES USED:
Sunset at Sea digi stamp & backing paper - Stitchy Bear Stamps
Corner and border side diecuts - Spellbinder Die set called Marvelous Squares
Sentiment Stamp - Papermania Clare Curd's Signature Range (Sentiments)
Derwent Waltercolour Pencils
Dovecraft Premium Pigment Ink in black
Black and Buff cardstock - Papermill Direct
Ribbon from my stash
CHALLENGES ENTERED:
Papertake Weekly - To Die For (use a diecut)
Sweet Stamps - Anything Goes
Try It On Tuesday - Use your stash (ribbon and die)
Crafty Creations Challenges - Use Something Old from Stash (ribbon & Die)
Crafty Girlz Challenges - Anything Goes
Crafts 4 Eternity Challenge - Beside the Seaside
Creative Fingers Challenges - anything Goes
Suzy Bee's Bloomin Challenge - Anything Goes
Eclectic Ellapu - Seaside/Nautical and Anything Goes with Watercolours
Little Claire's Design challenges - Man's Birthday Card
15 August 2014
DSC #101 Recipe Challenge
Welcome to another Friday Design Team creations for the wonderful challenges at Digitally Sweet Challenges! Our fab sponsor this week is Sparkle n Sprinkle. They are offering a terrific prize for this week's winner! Our theme this week is a Recipe challenge: Use 1 image...2 designer papers [digital or real], 3 different embellies [digital or real]. Here's mine:
I used 1 image (just used it 5 times...lol,) 2 digital papers (one for bg and one used behind digital stamp), and 3 real embellishments (blue ribbon, red flat backed pearls and a frame I made. I know these colours are a bit unusual. I took it from the plaid digital paper I created for a digi scrap kit for a collab when I sold at a shop called Designs In Digital. I took the digi stamp and removed the white bg in Photoshop then added a matching digital paper in gold behind it and colourised the stamp in navy blue. Luckily I had some DCWV matching cardstock in a rustic red for the mats on the stamps, frame and punched border. Just added a gold card base and gold mirri frame layer.
SUPPLIES USED:
Pinecone & Needles Digi Stamp - Sparkle n Sprinkle (link goes directly to digi stamp page)
Digital papers - Designed by me
Red cardstock - DCWV Matchmakers Cardstock Stack in Neutrals
Gold card base and Gold mirri board - from stash
Border Punch - Martha Stewart Punch Around the Page Modern Garland (old one, used border)
Red flat backed pearls - MeiFlowers
Blue Ribbon - Ribbon Oasis
Antique Linen Distress Ink
CHALLENGES ENTERED:
Crafting When We Can - Bright Colours
That Craft Place Challenge - Autumn or Steampunk
The Squirrel and Fox - Anything Goes
Penny's Paper Crafty Challenge - anything Goes
Crafty Girls Challenge - Anything Goes
Creative Fingers Challenge - Anything Goes
Suzy Bee's Bloomin' Challenge - Anything Goes
I used 1 image (just used it 5 times...lol,) 2 digital papers (one for bg and one used behind digital stamp), and 3 real embellishments (blue ribbon, red flat backed pearls and a frame I made. I know these colours are a bit unusual. I took it from the plaid digital paper I created for a digi scrap kit for a collab when I sold at a shop called Designs In Digital. I took the digi stamp and removed the white bg in Photoshop then added a matching digital paper in gold behind it and colourised the stamp in navy blue. Luckily I had some DCWV matching cardstock in a rustic red for the mats on the stamps, frame and punched border. Just added a gold card base and gold mirri frame layer.
SUPPLIES USED:
Pinecone & Needles Digi Stamp - Sparkle n Sprinkle (link goes directly to digi stamp page)
Digital papers - Designed by me
Red cardstock - DCWV Matchmakers Cardstock Stack in Neutrals
Gold card base and Gold mirri board - from stash
Border Punch - Martha Stewart Punch Around the Page Modern Garland (old one, used border)
Red flat backed pearls - MeiFlowers
Blue Ribbon - Ribbon Oasis
Antique Linen Distress Ink
CHALLENGES ENTERED:
Crafting When We Can - Bright Colours
That Craft Place Challenge - Autumn or Steampunk
The Squirrel and Fox - Anything Goes
Penny's Paper Crafty Challenge - anything Goes
Crafty Girls Challenge - Anything Goes
Creative Fingers Challenge - Anything Goes
Suzy Bee's Bloomin' Challenge - Anything Goes
08 August 2014
DSC #100 - White on White with Pink
It's Friday and time for my Design Team project for Digitally Sweet Challenges! We have reached a milestone of 100 challenges. Why not come join us? Our sponsor this week is Lunagirl. I love the images we got to work with this week. Isn't a shame that I only used a small part of one...lol.
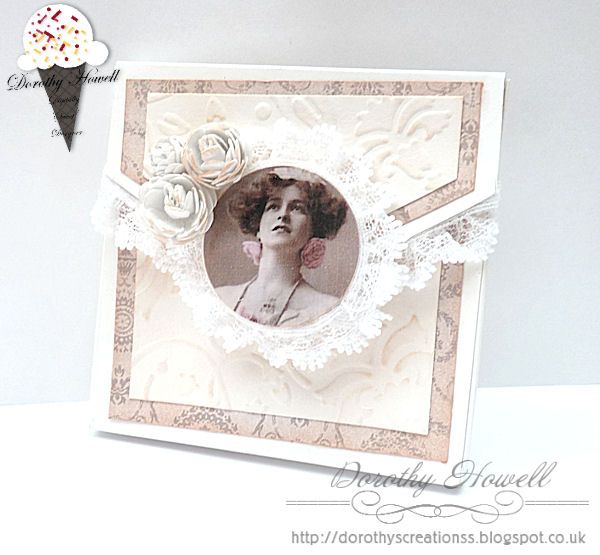
I was cleaning my craft room and I faound a small box of project I never finished. One was this 3" x 3" box with flap. It was plain white so I decided to finish it. I printed out part of the lady along with the patterened paper. I coated the lady with a few coats of glossy Mod Podge. You cannot tell but it's shiny. Then I punched out her face with a 1.5 inch circle punch. I hot glued some lace from my stash around the circle and around the edge of the box flap.
I also found a pile of backing papers I made. One was a piece of white card that I had embossed at one time. So I added some Distress Ink to it and some white roses. I added a piece of hook and loop (Velcro) to the flap to keep it closed. I think I will make some notecards to go inside...lol.
SUPPLIES USED:
Woman image - Lunagirl
Digital Pattered Paper - Far Far Hill
White Roses - Hobbycraft Brand English Roses
Embossed white cardstock - used Spellbinders M-Bossabilities folder: Enchanted Side B
Lace and white card box from my stash.
Mod Podge - Glossy
Distress Ink in Tattered Rose
Small Velcro circle
Thanks for having a look and do hope you will join in the challenge at DSC!!
Dorothy
I was cleaning my craft room and I faound a small box of project I never finished. One was this 3" x 3" box with flap. It was plain white so I decided to finish it. I printed out part of the lady along with the patterened paper. I coated the lady with a few coats of glossy Mod Podge. You cannot tell but it's shiny. Then I punched out her face with a 1.5 inch circle punch. I hot glued some lace from my stash around the circle and around the edge of the box flap.
I also found a pile of backing papers I made. One was a piece of white card that I had embossed at one time. So I added some Distress Ink to it and some white roses. I added a piece of hook and loop (Velcro) to the flap to keep it closed. I think I will make some notecards to go inside...lol.
SUPPLIES USED:
Woman image - Lunagirl
Digital Pattered Paper - Far Far Hill
White Roses - Hobbycraft Brand English Roses
Embossed white cardstock - used Spellbinders M-Bossabilities folder: Enchanted Side B
Lace and white card box from my stash.
Mod Podge - Glossy
Distress Ink in Tattered Rose
Small Velcro circle
Thanks for having a look and do hope you will join in the challenge at DSC!!
Dorothy
Subscribe to:
Posts (Atom)