25 July 2014

DSC #98 - Embellish It Up!

Welcome to Friday here on my blog. It's time for a new challenge at Digitally Sweet Challenges and our theme this week is Embellish It Up. IT leaves alot up to you in its interpretation but I think it means lots of embellishments on your project. Our wonderful sponsor this week is Stitchy Bear Stamp Outlet and they provided some lovely images to play with. I chose a cute little digi girl.


Sorry for the awful photo. It was late when I too the photo and I had to use 2 lights on it but I think there was too much light and it's a bit overexposed. Ah well...I never claimed to be a professional...lol. The card is actually a lovely coral colour but it looks too washed out above. You can check out my supplies list below. Most of the embellies are from my stash though. I hope you will join us over at Digitally Sweet and join in the Challenge. You could win some very cool images!

SUPPLIES USED:
Emolie Peace digi stamp - Stitchy Bear Stamp Outlet (link takes you to Emolie stamp page)
Papers & Coloured card - old DCWV 8" x 8" Scrapbook Kit in a Stack pad Birthday
Butterfly punch - Xcut Butterfly Punch
Prima Flowers
Light Pink Roses - Wild Orchid Crafts
Copic Ciao Markers
Sentiment made by me in Paint Shop Pro
White Scalloped Blank Card, Buttons, Flat backed Gems, Pearls - from my stash

18 July 2014

DSC #97 - Orange Shades

H there...it's Friday and time for a new Digitally Sweet Challenge this week! The DT's mission, if we chose to accept it, was to create with shades of ORANGE. Our sponsor, Limited Runs Stamps, gave use our choice of image to play with and this week I chose a fun Retro Cupcake:


I made this cupcake shaped card for this week's challenge. I resized the cupcake to approximately 15 cm x 15 cm, it's actually a little taller than 15 cm. I printed it off on thin cardstock and cut it out with scissors. I then traced it twice on 300 gsm white card and cut those out as well. I coloured in the cupcake using my trusty ole Copic Ciao markers. On the circles at the bottom of the cupcake wrapper, I used a new product I got the other week. It's from Imagination Crafts and it's called Detail Sparkle in White Shimmer (link to product below in Supplies List.) It's kind of like Stickles but I like it so much better and I'll tell ya why...the glitter is finer, it flows better, the bottle is a bit bigger, AND best of all, it has a very long, thin nozzle with an attached cap. The nozzle is awesome on it and I liked how it flows as well. Defintely check them out!

I glued the printed out cupcake onto one of the thick card ones. On the other plain cupcake, I made a score line across the top so it would fold out the back once glued onto the top edge of the printed out one. While assembling I added a toothpick out the top, it's glued between the front and back of the card. Then I punched 2 circles, stamped a sentiment on one and sandwiched orange ribbon loops between them. I then stuck that on the toothpick. So easy to do.

SUPPLIES LIST:
Retro Cupcake Digi Stamp - Limited Runs Stamps (link goes to stamp's page)
White 300 gsm Card - Paper Mill Direct
White Shimmer Detail Sparkle -  Imagination Crafts  (link goes right to product page)
Orange Satin Ribbon - Ribbon Oasis
Sentiment Stamp - studio g+ mini stamp set (birthday)
Copic Ciao Markers
Black pigment ink
1.5 inch circle punch
Toothpick
Tacky Glue


11 July 2014

DSC #96 - Boys at Play

I know I've been gone a few weeks. Well it's been busy around here with work this week but last week my hubby took an unexpected week off from work. He had no appointments so we did a bit of sightseeing. Wee took a few day trips out and about the UK and it was lovely since the weather was so great. IT was warm and sunny all week! That's kind of a miracle here...lol. This week though...UGH...it's back to rain, wind and chill.

But it's Friday and it's time for my DT project for Digitally Sweet Challenges! Our theme this week is BOys at Play and we are sponsored by Lunagirl Images! I chose a nice vintage image and decided to digital scrap it:


I did this in Photoshop. I used the Lunagirl image of the 3 boys plus bits of a freebie digi scrap kit and some vintage clip art images. Then I used a PS Action for the text. This is a simple layout but I really liked the paper and didn't want to cover it all up yet wanted to showcase the boys' image.

SUPPLIES USED:
3 Boys Image - Lunagirl Images
FTU Digital Scrap Kit - "Waiting For..." by Rucola Designs
Bird & Hand Images - Free Vintage Digi Stamps
Gold Text PS Action - ActionFX (no longer online)

27 June 2014

DSC #94 - Inpired by a Book

Howdy folks! It's Friday and it's time for our weekly challenge at Digitally Sweet Challenges! Out DT theme for this week is: Inspired by a Book. We got to chose a stamp to work with from our sponsor Bugaboo Stamps and you just KNOW I had to choose this one:

Wizard of OZ.


I made an easel card this week. Who doesn't love those?? I started with the Dottie Dorothy stamp from Bugaboo Stamps, printed it off 3 times and cut it out in different parts so I could create it in 3D decoupage. I used Promarkers to colour Dorothy and Toto. You can kinda see the shadows on her. I also printed off an image I found of the Emerald City off a Google search. I altered it a little in Photoshop by extending the grass and yellow brick road. The grass paper is an ancient paper I found stuck in my paper drawer. My sister, Cris, bought a pack of scrapbook paper for my daughter almost 9 yrs ago and I ended up with it. This grass paper was one of those. I though it would go alright. I created the sentiment myself all matted on green and yellow thick paper. I accented the Emerald City with Pearl Accents and made a pink poppy fiels with glue and 2 shades of pink glitter. I might go back and add a little something to the bottom corner like some pink flowers or something. I'll have a think about it...lol.

SUPPLIES USED:
Dottie Dorothy Digi Stamp - Bugaboo Stamps  (link goes directly to digi stamp page)
Promarkers
Emerald City Image - off Internet
Pearl Accents
White Cardstock base - Papermill Direct
Grass paper, yellow paper, green paper, pink glitter - from my stash
Tacky Glue, Pinflair Gel Glue (for doing 3D decoupage) and foam tape (for sentiment)

20 June 2014

DSC #93 - Transport

Here I am with another lovely DT project for Digitally Sweet Challenges! Our sponsor this week is Stitchy Bear Stamps and out of the wonderful images we were given to work with, I chose this little Train Engineer digi stamp and blue plaid paper.


I didn't get much craft room time this week as I had lots of work to finish at my "real" job and since I work from home..you know how that goes.  I coloured in this little fellow with my Copic Ciao markers and mounted him on black card and green paper I printed from Stitchy Bear. I also printed out the sentiment and mounted that on the same. The blue plaid paper was printed out as well. The area behind the sentiment is a piece of white card covered in 3 different washi tapes, lastly I added a couple of buttons from my stash.

SUPPLIES USED:
Trainspotting Digi Stamp, Blue plaid paper, green texture paper - Stitchy Bear Stamps
Stripe and dark blue Washi Tape - Papermania
Green Chevron Washi Tape - bought on Ebay
Black cardstock and buttons - from stash
White cardstock base

CHALLENGES ENTERED:
One Stitch at a Time Challenge - Button It

13 June 2014

DSC #92 - Holidays/Vacation

Yep, it's Friday and I'm here with my DT project for this week over at Digitally Sweet Challenges. Our theme was Holidays (UK) or Vacations (US) and we got to choose our own image to work with from our terrific sponsor, Lacy Sunshine Stamps! I've done another digital image this week as my craft room is a bit torn apart. More on that later.

(Click on image to see full size view)

This was completely done in Photoshop. I coloured in the digital image in a couple different ways each section on its own layer. Then to each layer I added an Inner Glow with a little bit of Noise. The colours I used came from the digital scrapbooking kit I used. I found a free clip art image of a tent. The background is a mountain image that I layered over papers from the kit. One paper was a gree/blue gradient then I added the cloud paper underneath and played with the Layer Properties so they blended well. The wording at the top eas done using an alpha that came with the scrap kit for the word "fun." I used the font Qarmic Sans for the word "camping." Al the other bits in the image and the frame are from the scrap kit.

A little about the scrap kit: I have been collecting freebie digital scrap kits since 2007 so you can image how many I have collected over the years. Funny thing is I couldn't find a camping kit so I improvised with this kit. It's no longer available so please do not ask me where it is. What I can tell you is it's called "Discovery" and its designed by Kim Cameron over at Daisies and Dimples. This freebie is a few years old and she has since closed her personal blog...sorry about that dearies.

My poor craft room is a bit blocked off at the moment as we had a water leak in our house. This has been going on awhile and the water company FINALLY came and rerouted the main supply but the pipe had to come in through half of my craft room. It's done now so I hope to be back in there this weekend! Hope so as I have a swap due and I want to do a video of my project. YIKES!

SUPPLIES USED:
Eleanor and Pickles Smores Digi Stamp - Lacy Sunshine Stamps
Free Stock Mountain Image - Photo Everywhere
Free Tent Clipart - Clipart Best
Digital Scrap Kit "Discovery" - Kim Cameron
Font Used "Qarmic Sans" - Font Squirrel

07 June 2014

Swap - TP Roll Mini Albums

Good day all! Hope you all are having a nice weekend so far. I'm off this afternoon to go shopping with my daughter to purchase prezzies for my hubby's birthday this week. The daughter also wants to find a few items to take with her to the Download Festival next weekend. She's gone for the last few years and spends most of the year saving for it, shopping for it and anticipating it. Then she has a rotten time...lol. Ah well...

I'm here today to share the results of a TP roll mini album swap I participated in over at UK-Ireland Craft Swaps Group. I received mine from my swap partner, Yvonne, yesterday afternoon. It was just the cutest mini!


She didn't use TP roll, neither did I btw. She used cardstock and I used kitchen roll tubes as they are bigger and more sanitary...lol. Yvonne also included a note to me on a colourful postcard and some gorgeous lace. Most of them are the crochet lace...love!

Now stupid me forgot to take a photo of the one I made her before I sent it...DUH! But she was so nice and made a video reveal of the album I made her. Have a look if you like:


I am a wee bit proud of the mini I made Yvonne. It is the very first mini album of any kind that I've made. I hope to do more of them as it was so much fun to make. It came together so well, that's probably why I enjoyed it so much. If I was messing it up, I'm sure it would have been my first a last mini album...LOL.

If you like to craft and swap, why not join us on the UK-Ireland Craft Swaps Group over at Facebook. We would love to meet you.

Hope you're getting some sunshine! Happy crafting!

06 June 2014

DSC #91 - All for the Girls

Happy Friday and welcome to my DT project for Digitally Sweet Challenges!  Our sponsor yet again is the lovely Lunagirl and she gave us some gorgeous images to choose from to create for this week's theme, All for the Girls. I made this sisterly card:


I took a kraft card blank and rounded the corners with my Zutter corner rounder. When I when to print the image I also created the To A Dear Sister sentiment in Word. I added the Lunagirl image and sentiment on some white card and trimmed to a 1/16th inch border using my wonder Perfect Layers. I also used a couple of Copic markers to colour the flowers in the image. The papers I used are from the Dovecraft 1st Edition 6" x 6" paper pad called Springtime. I used a greenish with flowery corner for the background and the centre strip is a glittered cardstock from the pad as well. I know it's hard to tell that. I added some cream lace and pearl string then 3 beige flowers from my stash. The 2 little tags were also from the paper line which I cut out and put on white card. All items were distressed with Old Paper Distress Ink.

SUPPLIES USED:
Image of 2 Girls - Lunagirl
Kraft Card Blank - Papermania 6 x 6 card & envelope pack
Papers - Dovecraft 1st Edition Springtime
Beige Flowers, cream lace, pearl string, 3 flowers, beige bakers twine - from my stash
Distress Ink - Old Paper
Copic Markers

CHALLENGES ENTERED:
Scribble and Scrap Challenge - Anything Goes
That Craft Place Challenge - Ribbon/Lace
The Squirrel and the Fox Challenge - Let's Hear It For The Girls
Crafty Sentiments Challenge - Anything Goes
Paper Take Weekly Challenge - Anything Goes
Try it on Tuesday Challenge - Feminie and Fancy
Crafty Creations Challenge - It's All About "S"
Creative Moments Challenge - Anything Goes
Rhedd & Rosie's Challenges - Vintage Style
Crafty Girls Challenge - Anything Goes


05 June 2014

A Craft Asylum Card

If you recall, a few months ago I posted that I won a Facebook contest run by Craft Asylum. You can read about it 
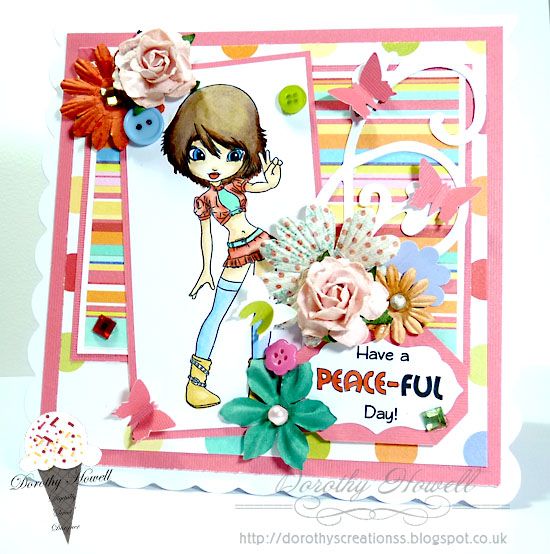
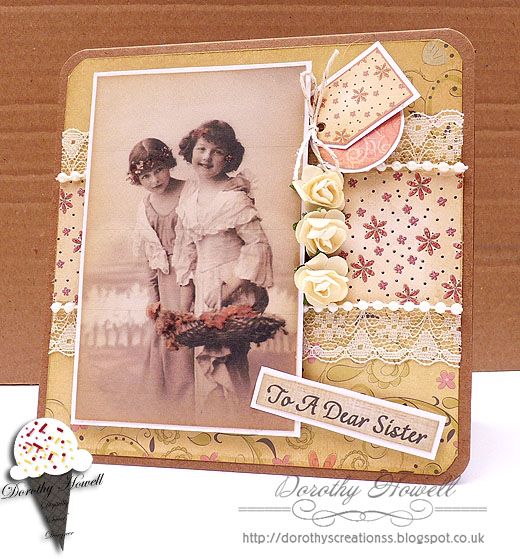
HERE. Well yesterday I finally received my prize. I figured it was coming soon when I saw their shows on Create and Craft.tv. Their goodies are so cute and the colours are fab. I received the Home Sweet Home set and here is the card I made from it today:

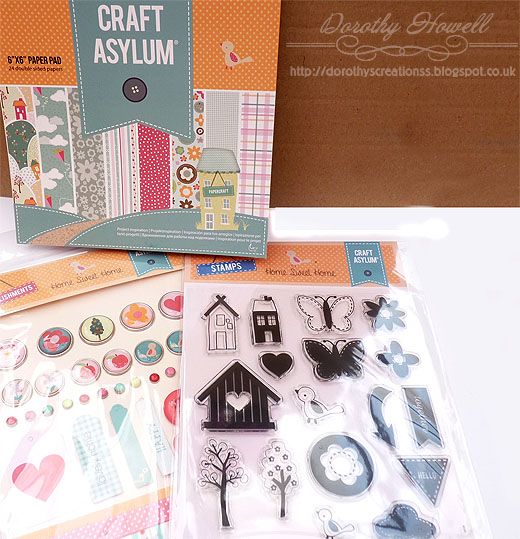
Below is a picture of what I received. I got thie 6" x 6" paper pad, the set of embellishments and the stamp set:


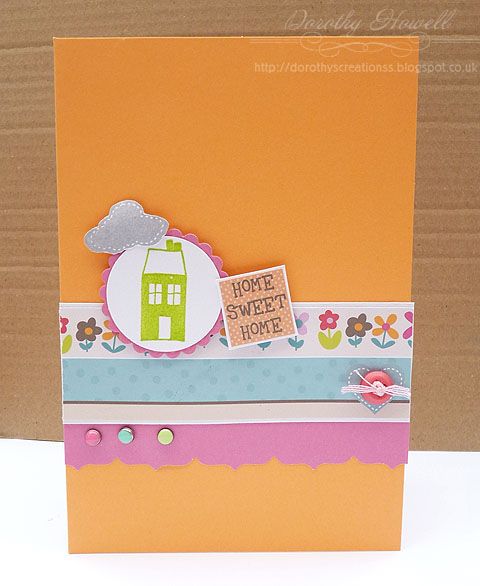
Like I said, I love the style and the colours. In my card I started with an orange card blank from my stash. I took one of the papers which was borders and used a few together across the card. I took the pink cardstock that was in the pad and used a Fiskars border punch called "Borders" and added it to the bottom and with 3 of their cute little brads. I added one of the kit's buttons to the heart with some pink embroidery thread tied in it. Then I stamped one of the little house stamps with green Papermania ink and punched it out with a 1" circle punch. I mounted it onto scalloped circle cut from the same pink card from pad. I also stamped the little cloud in silver ink and cut that out. The little sentiment is from one of the sheets of paper. It's just too cute, cute, cute!

Some notes about these Craft Asylum products:
Paper Pad (6" x 6") - Very nice paper, decent quality and the colours are sweet. The papers design are all great. I wanted to use them all. They even included some solid papers in there so you can have matching matting and layers! There are a couple of different sheet that have lots of toppers on them which are so nice to have when in a pinch.  On a scale from 1 to 10, I give these papers a solid 8

Embellishments - This comes with brads in 2 sizes , paper tags, buttons and ribbons. The brads are fab! The tiny ones are my fave but you get lots of the large ones. The quality of them is ok and comparable to Docraft quality. The paper tags are a bit meh. The button selection is good with different colours and sizes. The ribbons...cheap and you don't get a whole heck of a lot of it. Basically you get enough to do ONE card per ribbon and there are only 3 of them...not the greatest quality ribbon either. About par with what you would get as a free sample in a magazine. Overall I give the Embellishments a 7.

Clear Stamps - Ok...I am a stamp challenged person. I LOVE to stamp but my technique leaves much to be desired. So when I chose the solid colour house to stamp I knew there would be a bare patch...NOPE!!!! These stamps were nice and sticky and stuck to my block great. I got a perfect stamp the very first time I used. I usually stamp a practice first on some scrap because my stamping stinks so bad but my practice ones turned out great. I am well pleased with these stamps and can highly recommend them! I give these stamps a big old 10.

I haven't seen the prices they are charging so cannot tell you if their products are good value for money. I do hope they are somewhat in line with other brands such a Papermania. The quality is about the same, maybe a little bit better. So go ahead and have a punt. Grab one of their paper pads and/or stamp sets and have fun.

Happy Crafting!

31 May 2014

DSC #90 - Friendship

Happy Friday one and all! Here I am with my DT project for this week's challenge at Digitally Sweet Challenges. Our theme this week is FRIENDSHIP and our lovely sponsor is Sparkle & Sprinkle. For today's project I made a card of course...lol. This one was fun:


I enjoyed making this card because as soon as I saw this image, this card popped into my head. I wanted to use lots of bright colours so out came the Copic Ciao markers and away I went. The base is a scalloped edge white card, the flowers are old Prima Flowers I ordered off of QVC many moons ago. Final touch was adding the little shells. Hope you like it too!

SUPPLIES USED:
BFF Mermaid digital stamp - Sparkle & Sprinkle (link takes you right to the stamp's page)
Copic Ciao Markers
White Scalloped 6" x 6" blank card - From stash
Aqua cardstock & blue dotted cardstock - From stash
Prima Flowers - in tubes from stash
Green, Pink and Orange Trims - Bazzil Basic Cardstock Borders
Shells - From stash
Big flatback pearls, small pearls and Card Candi flower centres - From stash

Related Posts Plugin for WordPress, Blogger...