I haven't posted to WOYWW in the last few weeks because showing a messy DIY zone was getting a bit boring...lol. I'm posting today so guess what that means? It's about DONE! Here is what it looks like today:
Here is a small glance at my little craft room corner and what's on my new desk. I'm painting shelves for a little vestibule on the wall behind me (a pic is further down post.) I bought my hubby a new power saw for his birthday just so he could cut me some shelves...lol. They are cut from a piece of MDF which are being painted white. I still have another coat of white to do plus varnish.
Want to see the rest of my almost complete room? Here it is!
Here are some more photos of my new craft room. Notice on the pegboard the frame isn't finished being put up. It's done now though. At the end I'm going to list the supplies and stuff I used to put my little room together. All that's left is to fill it with all my crafting goodness and go pick up my short drawer set that matches the colourful tall one...lol.
I created my own stencil for this word across my wall. I used 300 gsm cardstock and cut with craft knife since my Silouette was packed away.
PEGBOARD...yeah! It was hard to find here in the UK as slatboard is what is used most in Europe YUK! This was so cheap and cheerful to put together, even the hooks were cheap. I bought white pegboard and stenciled the pattern in the blue paint. I used matt spray varnish to coat the whole pegboard so the paint wouldn't wear off so easily.
Here is the other end of my desk. I already had this set of plastic drawers. I wans't going to use them but they really did go well witht he rest of the room so now I'll get the shorter set to match for the other side. I might even get 2! Notice my hutch is back. It's not that old, about 8 months so kept that too.
This is the other wall. There is this recess in it that had these horrible homemade shelved nailed up in it. They were crooked and too thick for the small space and took them down years ago. My hubby had this good idea while waling around B&Q. Less that £25 for the metal back rails, shelf holders and the MDF we cut the shelves from. Not bad huh?
So that's my craft space. It's not that big and storage is going to be interesting but I'm a relatively new crafter so don't have a ginormous amout of stuff yet but getting there (to my hubby's chagrin.) Here is a list of the supplies I used to decorate my room and where I got them. Some items will have the prices as well since I did my best to do this on a budget. Hope you like it...I sure do. It will inspire me for a good while...lol.
Furniture:
Desk - Ikea, Galant Corner Desk w/1 side extension in white
Hutch - Ikea, Hemnes Add on unit in white stain
Drawer Set - Hobbycraft, Really Useful Drawer Unit tall
Recess Shelving - Wickes, Single Slot Metal Upright x 2, Single Slot Brackets 150mm x10,
B&Q, MDF for shelves (we got it for under £10 in store, not as priced on website)
Paint:
White Matt Emulsion - Homebase
Colour Paint - Wilkinson's Neptune Matt (This paint was not very nice to work with. It was too thick and had too much vinyl in to so it peels off when dry. Next time I'll get a better quality. Paint is brighter than seen on web.)
Stencils:
Create Word - 300 gsm cardstock printed with 1 letter per A4 sheet. Font used: Cafe Rojo
Round stencil on Pegboard - Pronty Mask Stencil 12" x 12" (I'm having my daughter add the stencil on the wall in a few more places too.)
Pegboard:
Pegboard - White faced Perforated Hardboard (pegboard) 2440 x 1220 x 3.2mm (You can only find this stuff at timber/lumber suppliers here in the UK. Not everywhere has it in white either. The place above was only place I found that did. Ordered it online to have it picked up. Had it cut to measure.)
Hooks for Pegboard - 4" Euro Hooks
Wood for base - 1" x 2" approx. wood bars
Frame - Wood Architraving (OK tried to get framing wood but here in the UK it's so darn expensive that it wasn't affordable to frame the 1550 x 735 mm piece of pegboard so used basic architraving instead...cheap cheap!)
Showing posts with label Craft Room. Show all posts
19 June 2013
25 May 2013
Mold and Moulds (tutorial)
Wow 2 posts in one day! Can't you tell I'm bored...lol. Nah not really. Well first let me tell you about MOLD as in mold and mildew. We took out my countertop with cabinets underneath and in the corner of the craft room there was a huge damp patch covered in black mold. I didn't get a chance to get a photo of it though. It was up the wall and all over the floor as well. Hubby bought cleaner for it and damp proofing stuff. He added mold resist paint to it. Then he patched the wall for new paint.
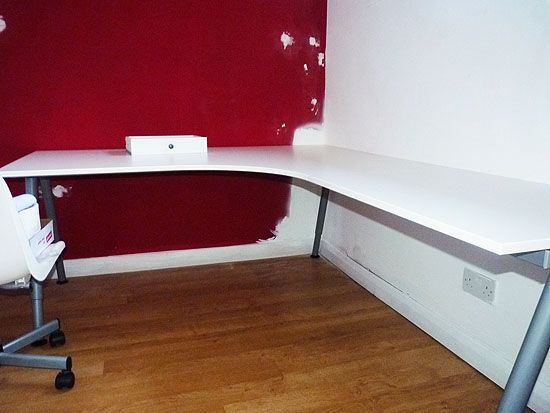
And there is my new desk all put together! I still need to get some storage drawers for underneath though. But you can see how the skirting board is all warped from damp. This is the front corner of the house and we're pretty sure our gutter is all stopped up there which is why water ran in the wall. Our roof gets covered in green moss and it falls off the roof all over and gathers in the gutters...yuck! I decided to change the red wall colour. It's going to be teal blue instead...woo hoo.
Next part here is a tutorial of sorts. I got a bit craft deprived these last few weeks so I sat and watched You Tube videos. I also watched too much Creat and Craft tv...lol. One day on C&C they had this Martha Stewart air dry clay and moulds on there and I thought that looked like fun...useful too. But the clay was a bit expensive so on to You Tube I went and found tons of videos on how to make your own air dry clay with cheap and cheerful ingredients so I thought I would try it out. Search for Cold Porceline tutorials on YT.
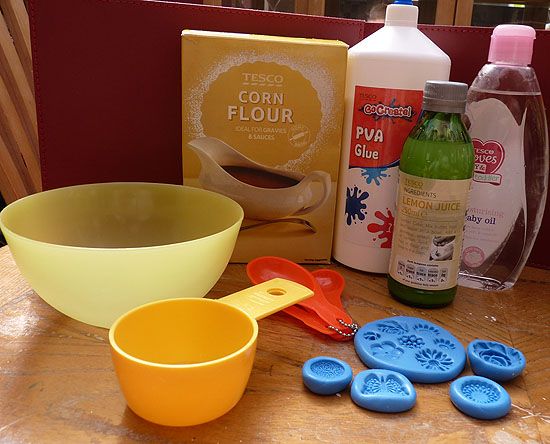
First I ordered some cute moulds. I ordered mine from Picklelilly Moulds. She not only had a big selection, the prices and designs were great. Then off to Tesco for the ingredients.
After watching about 20 different videos on how to make this, here is what I found worked for me:
Ingredients:
1/2 cup Cornflour
1/2 cup PVA Glue (I got my huge 1 litre bottle for £5)
1 tablespoon Lemon Juice (you can also use white vinegar)
1 tablespoon Baby Oil (you can also use olive oil or vegetable oil but note these may tint your clay)
Hand or Body Lotion (whatever you have around the house or just get cheapest)
Non stick craft mat or plastic wrap or greaseproof paper
Plastic wrap and zip lock sandwich baggie
(If you want more clay, just double the recipe and use a bigger bowl.)
SUPPLIES:
Mixing bowl (if choosing microwave method, make sure bowl is microwavable)
Mixing spoon
1/2 cup Measuring cup
1 tablespoon Measuring spoon
Add cornflour to bowl. Use spoon to break up any lumps in it.
Add PVA glue and mix together until combined.
Add both the oil and lemon juice.
Stir mixture until as smooth and until it pulls away from the sides of the bowl.
There may be a film of oil on the top of the mixture that doesn't get completely mixed in but that's ok.
Lay out your craft mat or big piece of greaseproof paper on the table.
Smear a little of your body lotion on the surface of the craft mat or greaseproof paper.
Now here is where I tried 2 different methods:
Method 1 - Cold straight from bowl
Empty the bowl of cornflour/glue mixture onto the body lotion. Add more lotion to your hands. Knead this like you would bread dough until is smooth and stretchy. This takes about 10 minutes.
Roll the clay into a fat tube shape, wrap with pastic wrap, put it into a zip lock sandwich bag and refrigerate overnight.
Method 2 - Microwave first
Put the bowl of cornflour/glue mixture into the microwave and heat for 20 seconds.
Remove and stir with spoon. Micrwave for another 20 seconds. Remove and stir again.
At this point check the consistency of your clay. If it seems too runny, microwave for another 10-15 seconds. The consistency should be creamy, stretchy and very slightly stiff. DO NOT OVERCOOK!!! I overcooked mine and you will see below how it turned out.
Empty bowl onto body lotion on craft mat/greaseproof paper and knead until smooth. (WARNING: clay WILL BE HOT. Knead as you can until cooled.) Roll the clay into a fat tube shape, wrap with pastic wrap, put it into a zip lock samdwich bag and refrigerate overnight.
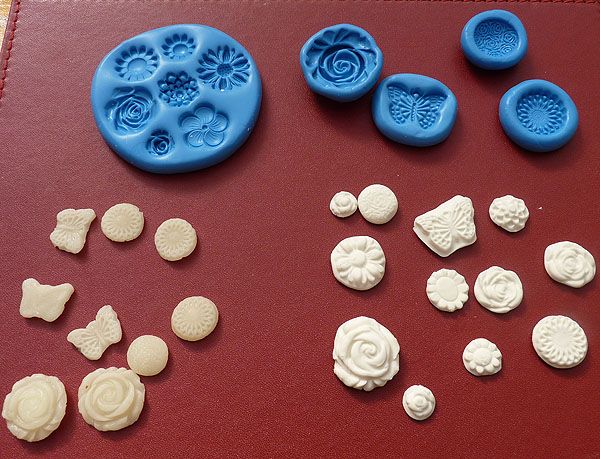
Here are my new moulds and the 2 batches of clay after they have been moulded and dried completely.
Aren't those moulds just the cutest???!!! They will make great embellishments for cards and other projects. Also some will be great for flower and bow centres.
Now on the right is the non cooked method clay after it has dried. This clay when moulding was very soft and silky. It was hard to get into the mould and hard to get out of them too because the clay was kind of mooshy. I had to redo them a lot of times. But the clay was nice and white and dried a nice translucent white as well. The pieces are light and feel just like dried clay.
On the left is the microwaved clay. I overcooked this clay by about 10 seconds. It was too hard and turned yellow on me. But it was really easy to get into the moulds and especially easy to get out with designs intact first time. But they dried even more yellow and they look rubbery once dried. Feels more like resin not as nice looking. That's why I have to stress to not overcook this stuff!
Note on drying these. The right side non cooked ones I dried for 8 hours on one side then turned them over so the underside dried for another 6 hours. The left side cooked ones, are still not dried in the middle after 2 whole days. So each recipe has it's problems but I think I'm going to stick with the non cooked recipe for my next batch.
Store your clay in an airtight container. You don't have to keep it in the refrigerator all the time, just the first overnight. I suggest you stick some damp kitchen roll sheets in there with the clay. When using the clay, add a squirt of hand lotion to your hands to knead the clay before each use. This will remoisten the clay and keep it from sticking to your hands.
Note about gloves...I actually made 3 batches but the first batch became a disaster when I tried to use rubber kitchen gloves to protect my hands to knead it. It glued onto the gloves even with lotion and ruined not only the clay but also the gloves. In fact they melded together so badly you couldn't tell where the clay started and the gloves ended. Both got binned. Use bare hands when doing this with lots of lotion on them...works fine and dandy.
As soon as the craft room is done, I'm going to paint, glitter and fancy these up. I'm also going to make some beads with the clay. Those will work a treat. Fun fun fun!!! If you give this a try, drop me a comment and link to your photos. I'd love to see what you come up with!!
Have a great bank holiday weekend!
And there is my new desk all put together! I still need to get some storage drawers for underneath though. But you can see how the skirting board is all warped from damp. This is the front corner of the house and we're pretty sure our gutter is all stopped up there which is why water ran in the wall. Our roof gets covered in green moss and it falls off the roof all over and gathers in the gutters...yuck! I decided to change the red wall colour. It's going to be teal blue instead...woo hoo.
Next part here is a tutorial of sorts. I got a bit craft deprived these last few weeks so I sat and watched You Tube videos. I also watched too much Creat and Craft tv...lol. One day on C&C they had this Martha Stewart air dry clay and moulds on there and I thought that looked like fun...useful too. But the clay was a bit expensive so on to You Tube I went and found tons of videos on how to make your own air dry clay with cheap and cheerful ingredients so I thought I would try it out. Search for Cold Porceline tutorials on YT.
First I ordered some cute moulds. I ordered mine from Picklelilly Moulds. She not only had a big selection, the prices and designs were great. Then off to Tesco for the ingredients.
After watching about 20 different videos on how to make this, here is what I found worked for me:
Ingredients:
1/2 cup Cornflour
1/2 cup PVA Glue (I got my huge 1 litre bottle for £5)
1 tablespoon Lemon Juice (you can also use white vinegar)
1 tablespoon Baby Oil (you can also use olive oil or vegetable oil but note these may tint your clay)
Hand or Body Lotion (whatever you have around the house or just get cheapest)
Non stick craft mat or plastic wrap or greaseproof paper
Plastic wrap and zip lock sandwich baggie
(If you want more clay, just double the recipe and use a bigger bowl.)
SUPPLIES:
Mixing bowl (if choosing microwave method, make sure bowl is microwavable)
Mixing spoon
1/2 cup Measuring cup
1 tablespoon Measuring spoon
Add cornflour to bowl. Use spoon to break up any lumps in it.
Add PVA glue and mix together until combined.
Add both the oil and lemon juice.
Stir mixture until as smooth and until it pulls away from the sides of the bowl.
There may be a film of oil on the top of the mixture that doesn't get completely mixed in but that's ok.
Lay out your craft mat or big piece of greaseproof paper on the table.
Smear a little of your body lotion on the surface of the craft mat or greaseproof paper.
Now here is where I tried 2 different methods:
Method 1 - Cold straight from bowl
Empty the bowl of cornflour/glue mixture onto the body lotion. Add more lotion to your hands. Knead this like you would bread dough until is smooth and stretchy. This takes about 10 minutes.
Roll the clay into a fat tube shape, wrap with pastic wrap, put it into a zip lock sandwich bag and refrigerate overnight.
Method 2 - Microwave first
Put the bowl of cornflour/glue mixture into the microwave and heat for 20 seconds.
Remove and stir with spoon. Micrwave for another 20 seconds. Remove and stir again.
At this point check the consistency of your clay. If it seems too runny, microwave for another 10-15 seconds. The consistency should be creamy, stretchy and very slightly stiff. DO NOT OVERCOOK!!! I overcooked mine and you will see below how it turned out.
Empty bowl onto body lotion on craft mat/greaseproof paper and knead until smooth. (WARNING: clay WILL BE HOT. Knead as you can until cooled.) Roll the clay into a fat tube shape, wrap with pastic wrap, put it into a zip lock samdwich bag and refrigerate overnight.
Here are my new moulds and the 2 batches of clay after they have been moulded and dried completely.
Aren't those moulds just the cutest???!!! They will make great embellishments for cards and other projects. Also some will be great for flower and bow centres.
Now on the right is the non cooked method clay after it has dried. This clay when moulding was very soft and silky. It was hard to get into the mould and hard to get out of them too because the clay was kind of mooshy. I had to redo them a lot of times. But the clay was nice and white and dried a nice translucent white as well. The pieces are light and feel just like dried clay.
On the left is the microwaved clay. I overcooked this clay by about 10 seconds. It was too hard and turned yellow on me. But it was really easy to get into the moulds and especially easy to get out with designs intact first time. But they dried even more yellow and they look rubbery once dried. Feels more like resin not as nice looking. That's why I have to stress to not overcook this stuff!
Note on drying these. The right side non cooked ones I dried for 8 hours on one side then turned them over so the underside dried for another 6 hours. The left side cooked ones, are still not dried in the middle after 2 whole days. So each recipe has it's problems but I think I'm going to stick with the non cooked recipe for my next batch.
Store your clay in an airtight container. You don't have to keep it in the refrigerator all the time, just the first overnight. I suggest you stick some damp kitchen roll sheets in there with the clay. When using the clay, add a squirt of hand lotion to your hands to knead the clay before each use. This will remoisten the clay and keep it from sticking to your hands.
Note about gloves...I actually made 3 batches but the first batch became a disaster when I tried to use rubber kitchen gloves to protect my hands to knead it. It glued onto the gloves even with lotion and ruined not only the clay but also the gloves. In fact they melded together so badly you couldn't tell where the clay started and the gloves ended. Both got binned. Use bare hands when doing this with lots of lotion on them...works fine and dandy.
As soon as the craft room is done, I'm going to paint, glitter and fancy these up. I'm also going to make some beads with the clay. Those will work a treat. Fun fun fun!!! If you give this a try, drop me a comment and link to your photos. I'd love to see what you come up with!!
Have a great bank holiday weekend!
16 May 2013
WOYWW 206
Not much crafting going on in my craft room lately because the room has finally been packed up and my new desk arrived! Here is what my current desktop looks right this moment:
Very very empty. Sad isn't it? lol I do have my new desk, it's just not put together yet. Hubby of mine won't have time until Saturday to put it up. :( I still need to buy some drawers or units of some sort to go underneather the desk to store all my crafty goodness. I packed up my stuff yesterday and I found a few bits I forgot I had like these cool 12" Bazzil decorative strips and a box of pastel brads among other things. Here is the main part of my desk that's arrived:
It's HUGE. Also yesterday I received a little something in the post that I'm looking forward to working with. I'll be testing them out tomorrow so I'll report my outcome tomorrow night. Have to get in at least a little bit of crafting sometime. So until then...y'all have a wonderful blessed day!
Thanks for lookin at my sad little desk.
Very very empty. Sad isn't it? lol I do have my new desk, it's just not put together yet. Hubby of mine won't have time until Saturday to put it up. :( I still need to buy some drawers or units of some sort to go underneather the desk to store all my crafty goodness. I packed up my stuff yesterday and I found a few bits I forgot I had like these cool 12" Bazzil decorative strips and a box of pastel brads among other things. Here is the main part of my desk that's arrived:
It's HUGE. Also yesterday I received a little something in the post that I'm looking forward to working with. I'll be testing them out tomorrow so I'll report my outcome tomorrow night. Have to get in at least a little bit of crafting sometime. So until then...y'all have a wonderful blessed day!
Thanks for lookin at my sad little desk.
09 May 2013
WOYWW
I have such a lovely Hubby. He is helping me redesign my craft room and he surprised me the other day by clearing out most of my craft room! I didn't even get a chance to take any "before" pics when the room was realllllly cluttered. What you see below is all that's left in my room...my messy craft desk! Thought I would post this over at WOYWW to show off my mess...lol.
Basically what you see on my worktop is leftover bits that didn't get packed away yet and my hutch of death which isn't as orgaised as I thought it would be. :( This whole set up is going though. My new Ikea Galant corner desk with some extention parts is going in the far right corner. It will run all across the back wall and up the side wall almost to the sink. This will give me lots of counter space plus the openess underneath will hold a few more storage drawers than those cabinets above. My desk top had to be delivered though as it wouldn't fit in the car...it arrived just over an hour ago. Yippee!
Another thing...going on the wall under the window, is pegboard! It's called perforated hardboard here in the UK. Once the desk is put together we will measure the space between the window and desktop and cut the pegboard to go in there. I got a bunch of Ikea storage buckets and rails to hang on there. This will greatly solve my problem of having to have everything lower down so I can reach them in my wheelchair. Here's another photo of the side wall where the pegboard is going (yes I have a hot AND cold water sink in my craft room:)
I desperately need new curtains on these windows. I'm not crazy about lace and I'm too short to be able to open and close curtains so I'm thinking about getting some funky black and white blinds instead. I can use a grab stck to pull the blinds up and down much easier methinks. The end wall is staying red and other walls staying white but I will be having red, black and white accents as well.
Thanks for looking and reading with me today...go do something crafty today! (I sure can't until me room is done...blah.) LOL
Basically what you see on my worktop is leftover bits that didn't get packed away yet and my hutch of death which isn't as orgaised as I thought it would be. :( This whole set up is going though. My new Ikea Galant corner desk with some extention parts is going in the far right corner. It will run all across the back wall and up the side wall almost to the sink. This will give me lots of counter space plus the openess underneath will hold a few more storage drawers than those cabinets above. My desk top had to be delivered though as it wouldn't fit in the car...it arrived just over an hour ago. Yippee!
Another thing...going on the wall under the window, is pegboard! It's called perforated hardboard here in the UK. Once the desk is put together we will measure the space between the window and desktop and cut the pegboard to go in there. I got a bunch of Ikea storage buckets and rails to hang on there. This will greatly solve my problem of having to have everything lower down so I can reach them in my wheelchair. Here's another photo of the side wall where the pegboard is going (yes I have a hot AND cold water sink in my craft room:)
I desperately need new curtains on these windows. I'm not crazy about lace and I'm too short to be able to open and close curtains so I'm thinking about getting some funky black and white blinds instead. I can use a grab stck to pull the blinds up and down much easier methinks. The end wall is staying red and other walls staying white but I will be having red, black and white accents as well.
Thanks for looking and reading with me today...go do something crafty today! (I sure can't until me room is done...blah.) LOL
Subscribe to:
Posts (Atom)