Showing posts with label Craft Project. Show all posts

19 March 2015

DSC #132 - Anything but a Card or Layout

It's Friday! time for a new challenge at Digitally Sweet Challenges! Our lovely sponsor is Bugaboo Stamps and you could win some free digis. Just follow our theme of Anything but a Card or Layout and using some digitally images and you're good to go! This challenge runs to the end of the month so you have plenty of time to enter.

Here is an inspirational image created by me as part of the design team...I made a menu:


I know it's hard to read but it's basically what I ate yesterday...lol. As I might have mentioned, I follow a plant based diet also known as Vegan. So everything on my menu is yummy and oh so good not only for you but great for the animals too! I took the cute Bugaboo Stamps image called Frame It - Stella - todays menu, and coloured it with my Copic Ciao markers in red, oranges and yellows. I matted it an the menu I created on orange, white and red cardstock. I didn't add any doo dads to it because it didn't really need nay. The colours made it look great on its own...lol. Here is the menu if you can't read it:

BREAKFAST:
1/2 a Pink Grapefruit
Bowl of Oatmeal swirled with Vegan Raspberry Jam (no gelatin)
small glass of unsweetened almond milk

LUNCH:
Mixed Baby Leaf Salad with dairy free pesto dressing 
Smooth and creamy (no dairy) Gazpacho soup (raw - made in my blender)
Berry Blast Iced Tea

SNACK:
2 large Rice Cakes with Caramelised Onion Hummus
Sliced Cherry tomatoes and chopped Cilantro on top

DINNER:
Curried Lentil and Butternut Squash Stew (made myself)
Served on a bed or Coriander Rice
Side of Purple Broccoli Stems (steamed)
Water with Lime Wedge

27 February 2015

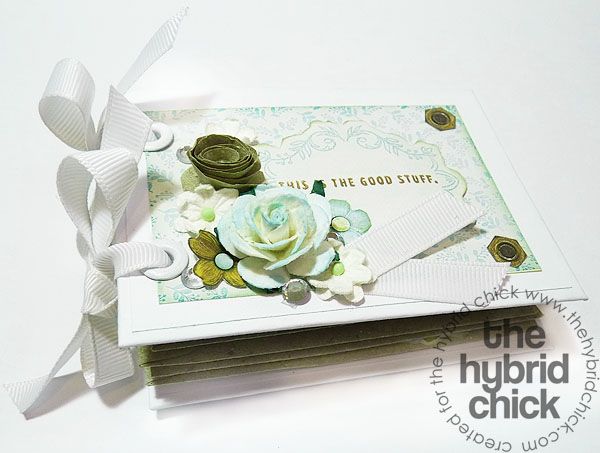
The Hybrid Chick - Mini Album

Hi all. I would love it if you would go check out my very first hybrid craft project that I posted over on The Hybrid Chick blog.

http://www.thehybridchick.com/2015/02/sweet-anemone-mini-album/

I created this mini album using a beautiful digital scrapbooking kit called "Sweet Anemone" by Paper Garden Projects. I have a step by step posted there. I sure hope you will have a peek!

Happy (Hybrid) Crafting!
Hugs, Dorothy

16 February 2015

It's Swap Time!!

I had another crafty swap at UK Ireland Craft Swaps Group over on FB and this time I participated in the Note Card & Tag Folio Swap. We were to create the folio from a tutorial on YouTube by papercrafter45 and you can find part 1 HERE. This is the one I made for my swap partner, Anita:

Here is how it looks closed up:


And here is what it looks like opened up as well as the cards:


I also sent her a few other craft goodies which I won't give away in case she reads my blog LOL. I started with white card but it was too stark so I toned it down with Old Paper Distress Ink. I also left the tags blank so that Anita cold do with them whatever she wanted such as journaling, stamping, staining, etc. The paper live I used was the gorgeous Tilda Tiny Treasures 12" x 12" paper pad. It came with a 3 sheets of thick card die cut toppers which I used on the front and insides of the folio and also on the cards. On the cards I wanted to give the die cuts some dimension so I curved them a bit with my bone folder and used Pinflair Glue Gel to pop them up just a little bit. I went searching through my glue stash (I have a glue foR EVERYTHING) and found some envelope glue. I made the envelopes with my WRMK envie punch board and add this glue to the flaps, let it dry, now you can lick it and seal the envies...cool huh? Here is a full supplies list:

SUPPLIES USED:
Tilda Tiny Treasures 12" x 12" paper pad
Distress Ink in Old Paper
Spellbinders Die - Sue Wilson Designs Lattice Accents
Martha Stewart Punch Around the Page Modern Garland (old one, used corner only) 
Viva Decor Pearl Pens (on front cover of folio & on cards)
Flowers from Mulberry Crafts (on front cover of folio)
Prima Flowers (on front cover of folio)
Prima Say It In Crystals (for tea steam on front of folio, mine were beige and crystal ones)
Tags - Fundamentals Australia
Jute piece in beige - Poundland (on front cover of folio) 
My Craft Studio Envelope Glue(no longer available but just google evelope glue and you should find some)

Now here is the folio and extras that my swap partner, Anita, sent to me:

I snet her a big THANK YOU as I really love what she sent me, including the flat backed pearls, xcut embossing folder and stamp. If you are in the UK, Ireland or anywhee really, why not join us at UK IReland Craft Swaps Group and join in the swapping fun! Thank so having alook and my crafty swap and I hope you have a most blessed day!

Happy Crafting!
hugs, Dorothy


23 January 2015

DSC #124 Anything but a Card or Layout

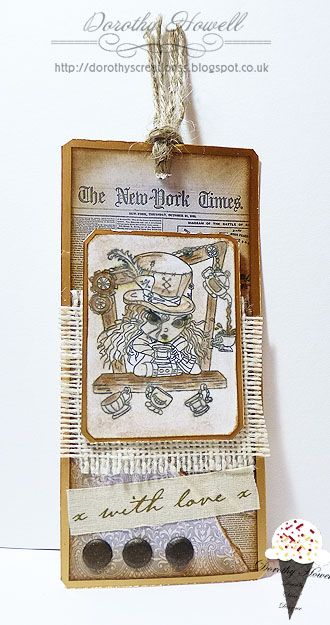
Happy Friday ya'll! Hope you had a good week and are ready for a new challenge over at Digitally Sweet Challenges. Our terrific sponsor this week is Lacy Sunshine and you could win some awesome images from her. All ya gotta do is enter a project using digital and it can be anything but a card or layout. I made a bookmark:

I don't have lots of embellishments on it as I wanted it to lay flat in a book. Yes I still read REAL books too...lol. I first coloured in the Lacy Sunshine image using Vintage Photo Distress Ink with a waterbrush. I also printed out some other papers from Far Far Hill. It's all matted on this matt gold mirri boaRD I found in my stash.  I added jute twine on the top and some frayed burlap under the image. I finished off with some dark brown card candies and some fabric tape that says "with love."

SUPPLIES USED:
Maddie Haddie Steampink Secret Window digi stamp - Lacy Sunshine Stamps
New York Times and Damask digital papers - Far Far Hill
Jute twine and Burlap - Poundland (UK)
Distress Ink - Vintage Photo

Gold mirri board, card candy, fabric tape - from my stash


01 December 2014

December Challenge at Bearly Mine

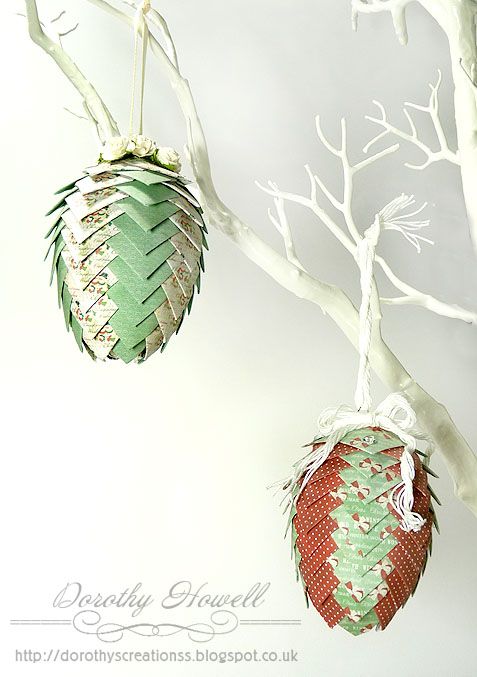
Welcome to the very last challenge for Bearly Mine Challenges. As I mentioned in yesterday's post, Bearly Mine is closing their door because of new EU ruling starting 1st January. Our challenge for December is Christmas Decoration or Ornament (no cards.) So let's see some gorgeous Christmas project entered in our challenge this month! Here is what I made, pinecone ornaments:

I saw this video by Mari Hop and thought I would give it a go using Bearly Mine digital papers from the Christmas Traditions 2 pack. Here's what I did:

Supplies to make ONE pinecone:

Styrofoam Egg (I used 80 mm eggs but next time I will use smaller ones)
2 x A4 or Letter sized sheets of designer paper, 2 different designs that coordinate.
Paper trimmer
Tacky Glue
Stuff to decorate the top of you egg
Ribbon to hang egg
Long Eye pin and large jump ring for hanging.

Directions for this larger size pinecone:

-Take your designer paper of choice and I cut them into 1 1/4" inch pieces. Keep the pile of each design separate. (In fact for my large size eggs next time I'll be making the squares 1 1/2" or most likely 1 3/4")
-One one of the square pieces, take two of the corners and fold them in halfway to about a 45 degree angle so there is a point on one side and the regular square on the other. Do this to all of the little squares.
-Start at the narrow end of the styrofoam egg, use 4 of the folded in squares in one pattern and line up the points to cover the bottom of the egg, glue them on with tacky glue, if it's a good one you shoudn't have to hold them in place too long.
-Then using the other pattern, glue 4 more on the square end on the paper piece only and glue it on making sure the pointed bit goes INBETWEEN the first row.
-Continue doing this all the way up the egg to the top.Using my sizes it will take between 36 to 40 pieces in each of the two paper designs.

How to hang:

-Before I added my flowers and bows to the top of my pinecone, I took a long eye pin for making jewellry, added a large jump ring to the eye and pushed it into the top through the paper and styrofoam. It went in quite easily. I took it out again, added tacky glue to the length of the eye pin and pushed it back into the pinecone for added strength.
-I added ribbon through the jump ring and knotted. Then I went about adding flowers and string bows to the top of my pinecones. You could add leaves, flowers, artificial pine boughs, gems, pearls, foam, die cuts, etc.

Of course if you cannot understand my directions, the Mari Hop video will help you out alot so check it out. These ornaments are easy to make and also are very light. They won't fall off the tree because they are too heavy...lol. The pinecones are also fab children's projects great for school, boy scouts, church groups, etc. You could cut up all the little squares in advance out of anything, even newspaper, craft paper or printer paper. My next one if going to be out of old book pages with lots of cream lace!

Hope you enjoyed...and also hope you join us for this month's challenge at Bearly Mine Challenges!

Happy Christmas Crafting!
Dorothy

14 November 2014

DSC #114 Photo Inspiration

It's time for another weekly challenge at Digitally Sweet Challenges! We have started a new format where there is still a new challenge each week but you have until the end of the month to get your project entered. You can read all about it here: New Rules. There is also a post about it HERE with info on our DT Call too!

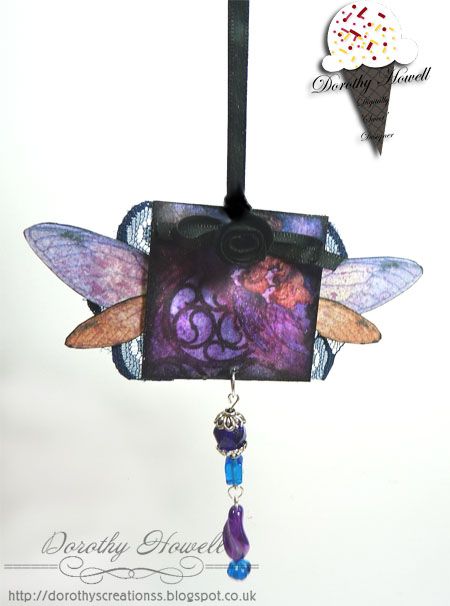
This week our sponsor is the lovely Lunagirl. I just love using Lunagirl images as I'm getting more into vintage style. Wanna win some vintage images? Then ya gotta enter the challenge for your chance! Lunagirl gave us Design Team members some images to work with and here is what I created, a hanging ornament:


Please forgive the bad photo. I took it at night and the light really stunk. This is a twinchie, a 2 inch by 2 inch piece of chipboard that I glued the digital image onto with matt gel medium. I edged the image and sides and back of the twinchie with Black Soot Distress Ink. On the back I added the printed out wings from Lunagirl and some royal blue lace which looks dark in the photo. I spritzed the wings and image with Grape Juice Inkadink spray from Imagination Crafts and I also spritzed with Mr Huey's Shine spray. I'm starting to get into beading, It's slow going but I decided to make a bead dangle. I finally added black ribbon to hang the ornament as well as a black bow and black fabric flower I made. I like how it turned out...now...where to hang it? LOL

SUPPLIES USED:
Main image and wings collage sheet - Lunagirl
Beads - Jesse James Beads Dress It Up Black Magic set
Grape Juice Inkadinks Spray - Imagination Crafts
Mr Huey Shine Spray
Distress Pad, Black Soot
Blue lace, black ribbon and black flower from my stash
Winsor & Newton Galeria Matt Medium - 250ml

09 October 2014

Dominoes & Art Tile Swap

OOPS...I forgot to post about this earlier in the week. I guess I was still in birthday mode with getting absolutely nothing done for a week...lol. I particiapted in a crafty swap over at UK and Ireland Craft Swaps. I was paired up woth Donna, which was cool as she lives in the same town I do.

The swap rules were to make a set of 3 inchie art tiles, any theme we wanted and a set of 3 altered dominoes.

First let em show off what Donna sent me. I got this weeks ago, she was so fast! Me, I'm slooooowww.


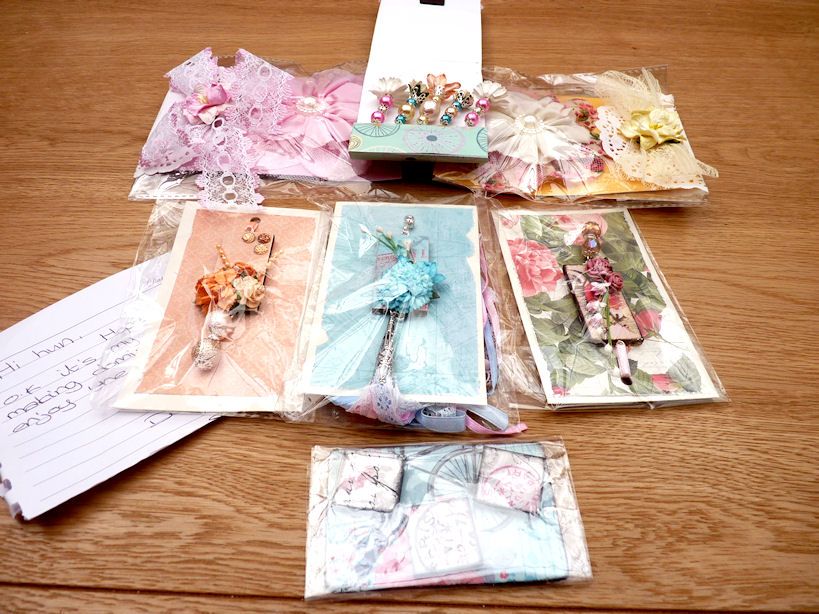
It's kind of hard to see them as I rushed to get the photo done. I should have taken them out of the plastic first. Ah well, lesson learned there. The art tiles are really hard to see but they are pretty, trust me! The middle items are the dominoes. She didn't use real dominoes but thick MDF ones from Fernli Designs methinks. Each is mounted on its own pretty cardstock base. She also put dangles on them all too. All of them are simply gorgeous! The top items are some extra goodies she made me. She made me 2 handmade lace flowers in adorable packaging and a set of homemade jewelled stick pins. I love them all! I don't do much beading or dangly bits so I always appreciate things like that.

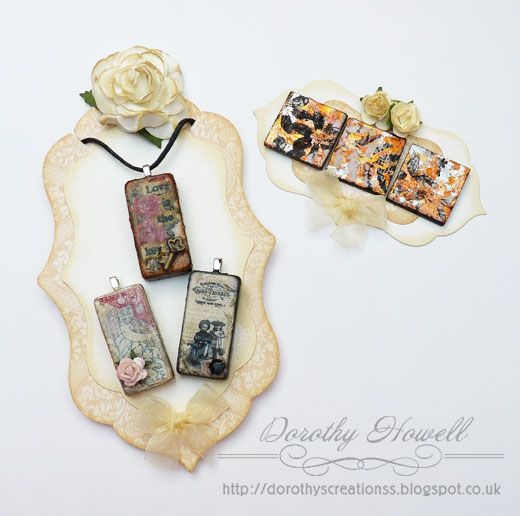
Here are the altered dominoes and art tiles I made for Donna. She did receive mine and has seen them. I'm glad she liked them too.


I didn't photo the extra bits I gave her. Mine weren't as nice as hers...lol. I sent her some laser cut wood bits, lace and stickers. For mine I used real dominoes. These are not the big ones but are a pack of smaller size donimoes that are perfect for necklaces. I measured the domino and printed out 3 digital images that I resized to correct size in Photoshop. Then I looked for colours to colourise the sides and backs of the dominoes. One coloured with my black Copic marker. For the roses image I used Ranger Alcohol Ink in Cappucino and using that and blendng solution to get a marbled look to it. On the pale image one I painted it with Mother of Pearl acylic paint. I cut the images and glued them onto the dominoes with Glossy Accents. I sealed the whole dominoes front and back with Mod Podge so the ink jet prints wouldn't blur. Then to seal the top and image I used Ultra Thick Embossing Powder and my heat gun. These gave the top a slightly rippley shiny look which I liked. Then I added the embellishment to each: a little metal key, a black gem and a flower. 

I wanted these to be used as a necklace or something your could hang onto something else so I added bales to them with E6000 glue. Then I made my very first necklace! I took black waxed cord, a lobster clasp, jump rings and bar ends and put them all together myself. I had to make sure it all fit through the bales so it could be interchanged between the dominos.

For the art tiles I started with 2 mm greyboard that I cut into 1 inch squares. I glued the 3 images I printed out on them. Then I had a think about what else to do to them. I've made a few art tiles before that turned out nice but I wanted an Autumnal theme to match the vintage images. Then I saw it...my Indigo Blu jar of guilding flakes in Lancashire Rose. These guilding flakes are a mixture of gold, copper, silver and fushia metal flakes. GORG! SO I had a dig through my stamps to see what I could stamp over top and I wanted lots of shine so I chose a Penny Black stamp with lots of solid background. I stamped on the tiles with the Indigo Blu glue, added the guilding flakes, scooched off the excess, used Black Soot Distress ink to colour the sides and back of tiles, sealed with Mod Podge then again used Ultra Thick Embossing Powder on the top. I love how they turned out!

I used my X-Cut Doorplate dies to make the display backings out of cardstock then added a little bow and flowers.

Images Used:
Black & Cream image of label words and 2 children domino - Astrid's Artistic Efforts
Dark Roses with Key image domino - Lilac - n - Lavender
Pale birdie image domino - I forgot and can't find it now. :(
Art Tile Images all from Lilac- n - Lavender

Other Supplies Used:
Xcut 5-Piece Large Nesting Dies Doorplate
Ultra Thick Embossing Powder (generic brand)
Indigo Blu Lancashire Rose Guilding Flakes
Indigo Blu Flitter Glue

Thanks so much for reading! Hope you enjoyed and...

Happy Crafting,
Dorothy

23 September 2014

My Bearly Mine Inspiration Project

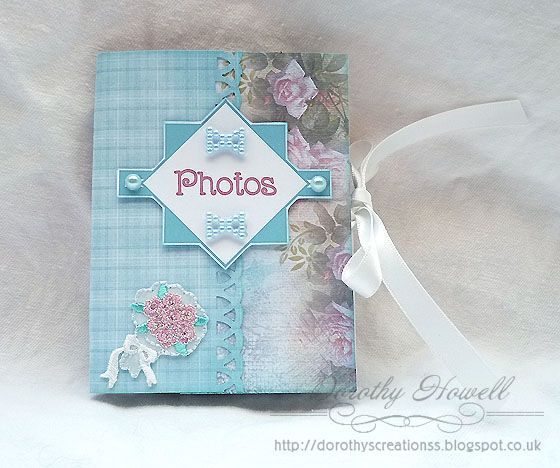
Hello all! As I posted the other day, I am one of the new Design Team gals for Bearly Mine Designs and it's my very first inspiration project using Bearly Mine digital papers. I created a cute little hybrid crafting wedding mini photo folio!

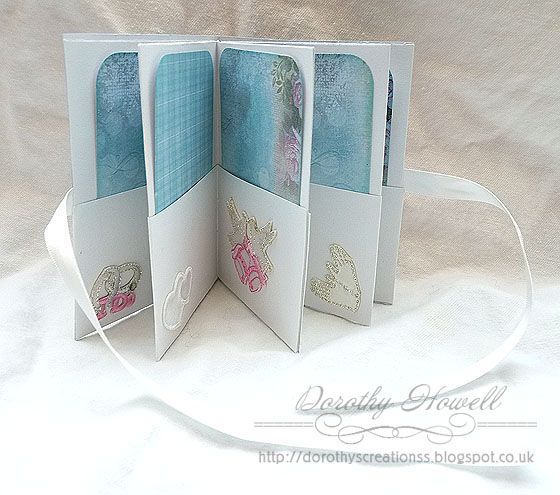
Here is what it looks like inside:

This is sute a cute and quick project to make. I followed a video tutorial by CreationsbyChristie and it uses only one sheet of 12" x 12" cardstock. I used a sheet of textured white card. I took a piece of white ribbon and glued it to the front and back covers. I covered over top the covers with papers I printed from a Bearly Mine Designs paper kit called Summer Floral Delights. I used an edge punch on a 4" x 4" square of the blue pattern to wrap the binding putting that over top a lovely rose print I also printed out eight 2 1/2" x 3 3/4" rectangles of more of the papers to make the photo mats for inside the folio. All the papers were edged in Broken China Distress Ink.

On the cover, I printed out the sentiment I created in Paint Shop Pro to match. Then put that on dimentional foam pads and added some pale blue pearl embellies from my stash. Finally I added these lovely fabric wedding stickers I just bought. They came in a big job lot of stickers I got off of eBay. The album measures 3" x 4" and it was quick and easy to make.

We have a monthly challenge on over at the Bearly Mine Challenge blog, so please check out the current challenge. I sure hope you join us! God bless your today, thank you for having a peek at my blog and, as always...

Happy Crafting!
Dorothy

CHALLENGES ENTERED:

Scribble and Scrap Challenge - Anything Goes
Crafting from the Heart Challenge - Anything Goes
Whoopsi Daisy Challenge - Bling and/or Pearls
Crafty Boots Challenge - Anything Goes
Crafty Cardmakers and more - Ribbon/Lace and Pearls
Inky Chicks Challenge - Anything Goes
Diva by Design Challenge - Anything but a Card
Ruby's Rainbow Challenge - Anything Goes
Crafty Girls Challenge - Anything Goes
Creative Fingers Challenge - Anything Goes
A Creative Romance - Anything Goes


17 September 2014

My 1st DT Project for Crafty Creations!

Hi everyone..it's time for my very first Design Team project for Crafty Creations Challenges! I do hope you will join us for this fortnight's challenge and the theme is VINTAGE! So come and show us your Vintage-ness...lol. Our sponsor for this challege is Whiff of Joy Stamps and they are offering an adorable Christmas mouse rubber stamp to the winner. Go HERE for more on this challege.

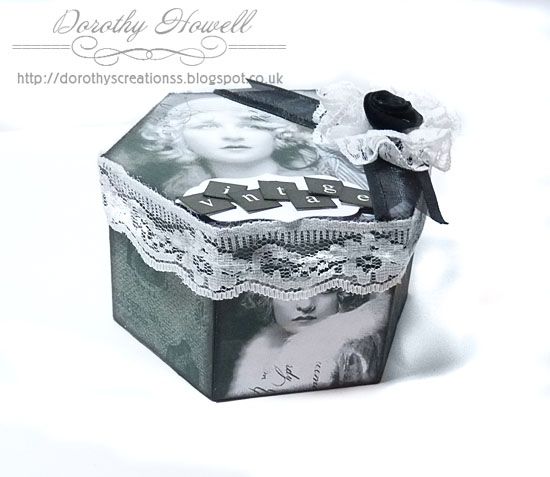
Here is my project...a sweet vintage box:


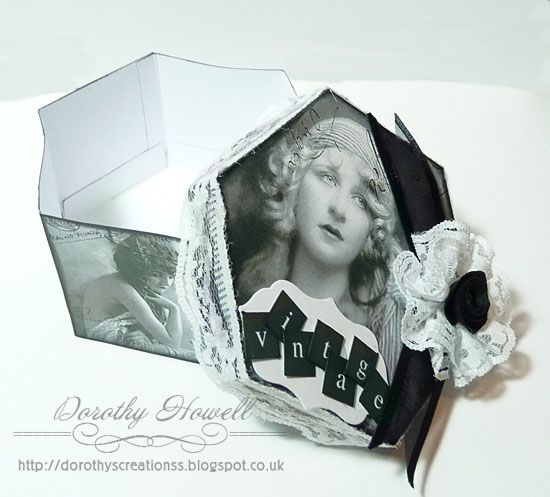
Ain 't it cute? LOL This is a vintage digital project, you know how I love doing digital. I started off with a template I downloaded free from Belle's Printables. I opened it in Photoshop and added a vintage dark digital paper and the free lady images which are from French and Sparrow (lots of gorgeous images there!) I then printed it off, cut it out and glued it together. Then it was a matter of decorating the box with lace, lace flower, felt flower, ribbon and the sentiment. It was simple to make and I hope you will give it a go too!

SUPPLIES USED:
Box Template - Belle's Printables (I used the one called Small Hex Box)
Vintage Ladies - French and Sparrow.com (link goes to the images page)
Sentiment badge - Xcut 5-Piece Large Nesting Dies Doorplate 
Lace & Felt flowers were made by me with stash
Ribbon, lace, Vintage letters from my stash.

Hope you will join in the challenge at Crafty Creations! Have a Craft Happy Day!
Hugs, Dorothy

08 September 2014

My Rosette Creations

I participated in a crafty swap over at UK Ireland Craft Swaps Facebook group and were challenged to create 6 rosettes with packaging. My swap partner was Jacqui and I showied you what she made me in my video HERE.

Here is what I sent her:


I made 2 sets of matching rosettes and set them on extra long tags. Here is a clser look at all 6, click on image for larger view:


 I do hope you check out our wonderful swap group at UK Iremand Craft Swaps if you like to craft and swap with others. It's so much fun and the different challenges really push my creativity!

Happy Crafting Everyone!

SUPPLIES USED:
Spellbinders Dies - Scalloped Circle & Fancy Circle
Martha Stewart Scoreboard to make rosettes
Old butterfly punch
Lace, feathers, black tassles, flowers, jewelled flower, pink lace butterfly, chipboard mask & corset, pearl strands all from my stash
Black & white papers from- Colorbok Paper Plus+ Fruit Punch 12" x 12" paper pad
Pastel Floral & Polka Dot papers from - First Edition by Tanya Whelan Floral Pavilion 12" x 12" paper pad

08 August 2014

DSC #100 - White on White with Pink

It's Friday and time for my Design Team project for Digitally Sweet Challenges! We have reached a milestone of 100 challenges. Why not come join us? Our sponsor this week is Lunagirl. I love the images we got to work with this week. Isn't a shame that I only used a small part of one...lol.


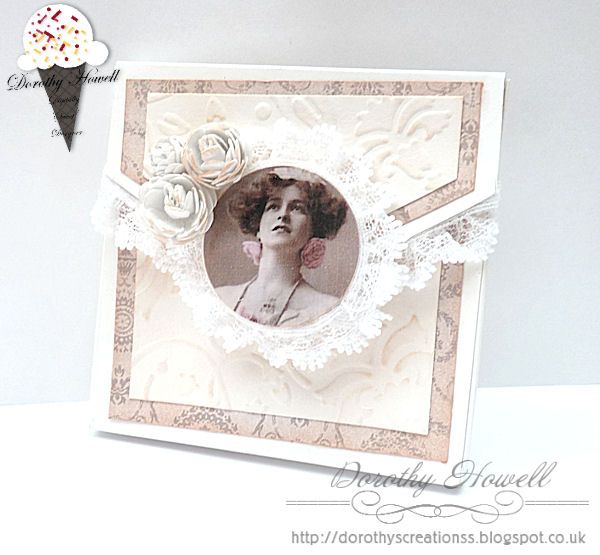
I was cleaning my craft room and I faound a small box of project I never finished. One was this 3" x 3" box with flap. It was plain white so I decided to finish it. I printed out part of the lady along with the patterened paper. I coated the lady with a few coats of glossy Mod Podge. You cannot tell but it's shiny. Then I punched out her face with a 1.5 inch circle punch. I hot glued some lace from my stash around the circle and around the edge of the box flap.

I also found a pile of backing papers I made. One was a piece of white card that I had embossed at one time. So I added some Distress Ink to it and some white roses. I added a piece of hook and loop (Velcro) to the flap to keep it closed. I think I will make some notecards to go inside...lol.

SUPPLIES USED:
Woman image - Lunagirl
Digital Pattered Paper - Far Far Hill
White Roses - Hobbycraft Brand English Roses
Embossed white cardstock - used Spellbinders M-Bossabilities folder: Enchanted Side B
Lace and white card box from my stash.
Mod Podge - Glossy
Distress Ink in Tattered Rose
Small Velcro circle

Thanks for having a look and do hope you will join in the challenge at DSC!!
Dorothy

07 June 2014

Swap - TP Roll Mini Albums

Good day all! Hope you all are having a nice weekend so far. I'm off this afternoon to go shopping with my daughter to purchase prezzies for my hubby's birthday this week. The daughter also wants to find a few items to take with her to the Download Festival next weekend. She's gone for the last few years and spends most of the year saving for it, shopping for it and anticipating it. Then she has a rotten time...lol. Ah well...

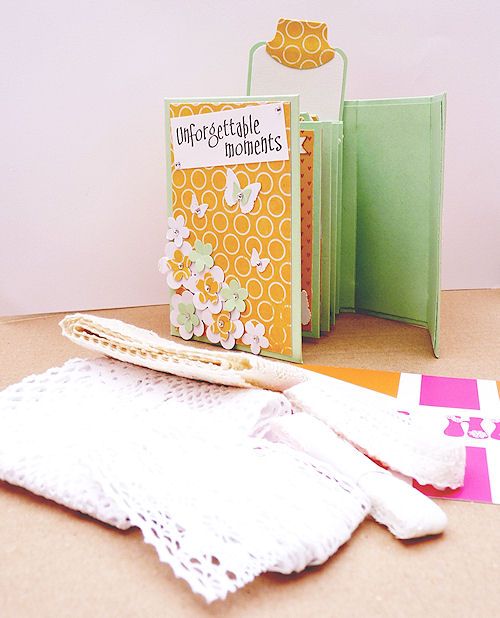
I'm here today to share the results of a TP roll mini album swap I participated in over at UK-Ireland Craft Swaps Group. I received mine from my swap partner, Yvonne, yesterday afternoon. It was just the cutest mini!


She didn't use TP roll, neither did I btw. She used cardstock and I used kitchen roll tubes as they are bigger and more sanitary...lol. Yvonne also included a note to me on a colourful postcard and some gorgeous lace. Most of them are the crochet lace...love!

Now stupid me forgot to take a photo of the one I made her before I sent it...DUH! But she was so nice and made a video reveal of the album I made her. Have a look if you like:


I am a wee bit proud of the mini I made Yvonne. It is the very first mini album of any kind that I've made. I hope to do more of them as it was so much fun to make. It came together so well, that's probably why I enjoyed it so much. If I was messing it up, I'm sure it would have been my first a last mini album...LOL.

If you like to craft and swap, why not join us on the UK-Ireland Craft Swaps Group over at Facebook. We would love to meet you.

Hope you're getting some sunshine! Happy crafting!

22 May 2014

My First Swap

Happy Thursday All! I'd like to show you what I received. I recently joined my first Swap Group on Facebook and just completed my very first swap ever! The group is UK-Ireland Craft Swaps. Since I am just beginning to get into Altered Art and Crafting, I thought I would start simple by entering a Tag Swap. We were to stamp with Stazon black ink on 10 tags with 10 different stamps and swap with a partner.

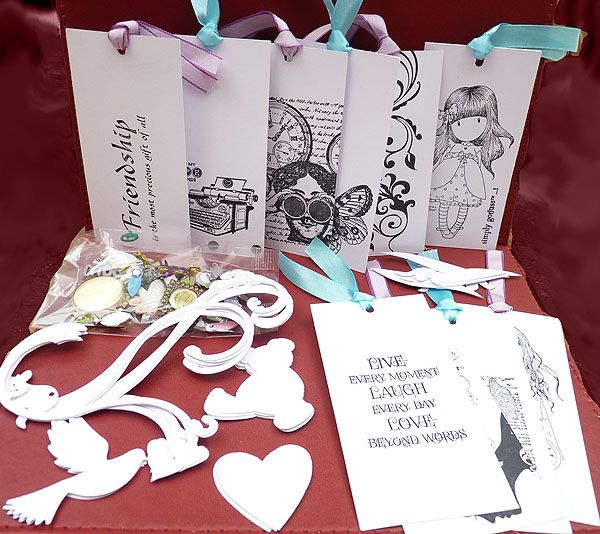
My lovely partner was Mandy and here is what she sent me:


She sent me some great stamped images that I know I can use in other projects. It's also customary to send other extra little goodies to add to our stashes. She sent me some really neat die cuts: a huge swirl, doves, teddy bears, hearts, little tulip blossoms and brackets. There were several of each, I didn't count them but I think there are 4 or 5 of each. The last item was a bag of sparkly goodness full of beads, flat backed gems, brads, resin pieces, bottle cap, etc.

I also sent her 10 tags with goodies but I didn't take a photo of them. I sent 5 white tags and 5 kraft card tags with seam binding ribbon that I colourised in 5 different colours. I did 2 in each colour as follows: 2 were spritzed with white pearl homemade glimmer mist, 2 spritzed with dark grey homemade glimmer mist, 2 spritzed with Mr Huey Tan Paint Mist, 2 coloured with Distress Ink in Dusty Rose and the last 2 I colored with Ranger Alcohol Ink in Cloudy Blue. The goodies I sent were a bunch of sheer ribbons in black, gray and white, a smal heart frame, 2 very large black roses from Mulberry Crafts, 4 Vintage images I printed out and coated in matt medium and 2 large panels of really interesting lace I recently bought. Mandy does lots of altered projects so I hope these will come in handy for her.

So I think my first swap was a success. I really enjoyed putting it all together. It was so much fun waiting for my parcel to arrive from Mandy and wondering if she would like what I sent her. I will participating in a few more swaps coming up so I'll be reporting how they go. If you like altered art and altered crafting and live in the UK or Ireland (or anywhere really as there are International swaps as well) then come join us over at UK-Ireland Craft Swaps...we would love to have you join in the fun!

Have a wonderful day and Happy Crafting!!!

09 May 2014

DSC #87 - Mother's Day

Happy Friday all! It's time for this week's challenge at Digitally Sweet challenges! This week our theme was Mother's Day since it's this Sunday in the US. Our lovely sponsor is Lunagirl and we were given a bunch of images to choose from.

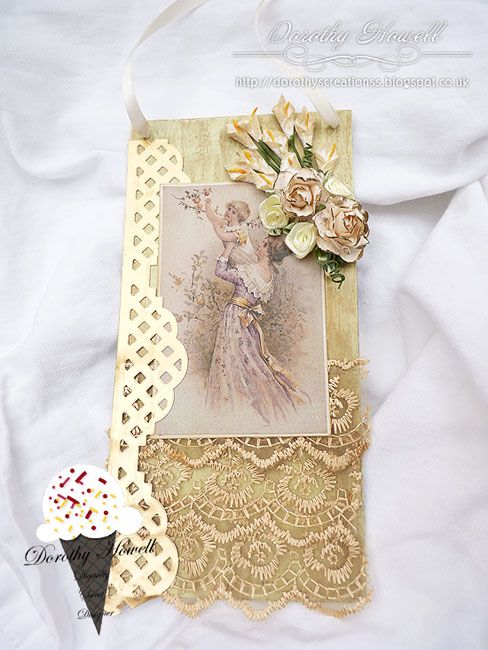
I chose to use one image on a little hanging plaque that would make a quick, inexpensive gift for Mum.


Supplies List:

White coated Chipboard base - from stash
Pale green paint - I mixed 2 Dulux paint tester pots to get a yellowy green
Gold Paint - DecoArt Dazzling Mettalic Elegant Finsh in Glorious Gold
Flowers (Lillies, large roses) - Mulberry Crafts
Little Silk Rosettes - from stash
Gold Lace - from a kit bought from Fiona aka Jennings644
Matt Gold Mirror Cardstock - from stash
Spellbinder Dies -  Lattic Accents
Galleria Matt Medium
Distress Ink in Antique Linen

I painted the white side of the chipboard in the yellow-green paint and dried with heat gun. I then took some metallic gold paint and smudged it in one direction with my finger. This gave the background an antiqued look. I coated the printed Lunagirl image with matt medium to protect the inkjet print surface. I added the lace, lattice side boder and flowers. I used my Crop a Dile Big Bite to punch 2 holes in the corners and added a cream ribbon for hanging.

It was a quick project that would make a great Mother's Day gift that doesn't cost a lot of money.

04 April 2014

DSC #82 "Anything but a Card"

Welcome to this week's DT project for Digitally Sweet Challenges! DSC has weekly craft challenge that's all about digital! If you love scrapping and cardmaking with digital images, then come join us!

This week we are sponsored by Lunagirl Images. Lunagirl was kind enough to supply us DT members with some gorgeous vintage-y images to work with and here is what I made for you...a box:


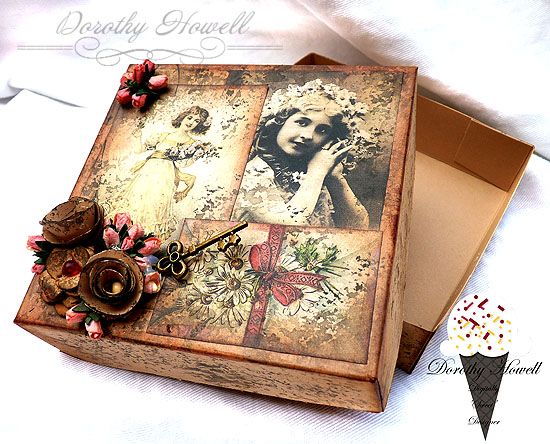
It's always nice to have a cute little box onhand for little last minute Mother's Day or birthday gifties. This box is 4" x4" and made of kraft card. I printed and cut out 3 of Lunagirl's images then distressed the edges in Vintage Photo Distress Ink. I adhered them to the lid with matt medium, which I think turned out nice as I just LOVE the matt non shiny look. I took a piece of natural sponge and dabbed around the box with watered down Black Soot Distress Ink. I edged and dabbed the whole outside of the box to match.

I took more of the kraft card and made 3 flowers, 2 rolled ones and 1 with a Tonic flower punch. Those got distress and dabbed with the sponge as well. I added tiny Mulberry Crafts rosebuds that I coloured with a waterbrush and Fired Brick Distress Ink. Lastly I tucked in a little brass key.

It came together so quick and easy, hope you like it!

SUPPLIES USED:
Lunagirl Images - 3 vintage images
Papermill Direct - 12" x 12" Buff cardstock
Mulberry Crafts -  Off white Mulberry paper rose buds small S#151
Yummy Honey Crafts - key
Galleria Matt Medium
Beads from stash
Tonic Sm Flower Punch
TH Distress Inks - Vintage Photo, Fired Brick & Black Soot

Entering in the following challenges:
Glitter n Sparkle Challenges - Mother's Day
Dream Valley Challenge - Mothering Sunday 
Scribble and Scrap Challenge - Anything Goes
Papertake Weekly Challenge - Anything Goes
Crafts 4 Eternity - Anything but a card
Crafty Hands Challenge Blog - Shabby Chic
Seemacraft Challenge - Vintage

10 July 2013

WOYWW # 214

The beautiful UK weather has had me out and about a little or the heat had me in bed trying to keep cool. Since being paralysed, my body doesn't like the weathers changes very much and it takes awhile to get acclimated. So when it got so warm, my body, being the rebel that it is, swelled up to twice it's size and then terrible leg pain from the swelling. (Yes even paralysed I can feel pain. It's actually a blessing.) But I have been in my craft room the last few days making (or sttempting to make) some craft goodies. Thought I would share this over at WOYWW.  Here's what I got on my desk today:


I've been thinking about doing a couple of Christmas Craft Fairs so I thought I could whip up some cheap and cheerful goodness for Christmas. So last night and this affy, I'm making some altered clothes peg sets. Here are the pegs painted. Don't mind the whitish ones. They are a major crackled effect FAIL. The crackle I used stinks!!! It's the Plaid FolkArt one, this is the second time I've used it and the second time it failed to crackle. Maybe I have a bad or old batch? Gosh I hope so because I'm going to have to throw this junk away and get a new crackle glaze...ugh!

Above I'm using my old craft sheet under neath but...on the other side of my desk is my brand new craft sheet (which I haven't used yet because I want to protect it...weird I know.) Since my desk is so big and WHITE, I wanted to cover as much of it as possible when inking and painting so I bought me a huge one! It's 50 x 100 cm and it takes up over half my desktop...woo hoo! You'll see it once I get my video camera set up and running. You want a big giant craft sheet to protect a big area and are in the UK?  I got it here: Craft Obsessions. They have 50 x 50 cm, 50 x 100 cm and 80 x 100 cm. You can also request bespoke sizes as well so you can have basically any size you need. The 50 x 100 does me fine though I wish I had bought the 80 x 100 one. Great price on them too!

That's all from me today. Hope you all have a wonderful day and those in the UK I hope you get outside and enjoy the weather while you can!

Hugs, Dorothy

25 May 2013

Mold and Moulds (tutorial)

Wow 2 posts in one day! Can't you tell I'm bored...lol. Nah not really. Well first let me tell you about MOLD as in mold and mildew. We took out my countertop with cabinets underneath and in the corner of the craft room there was a huge damp patch covered in black mold. I didn't get a chance to get a photo of it though. It was up the wall and all over the floor as well. Hubby bought cleaner for it and damp proofing stuff. He added mold resist paint to it. Then he patched the wall for new paint.

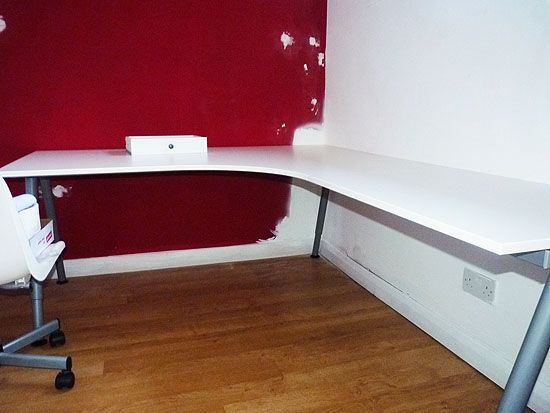
And there is my new desk all put together! I still need to get some storage drawers for underneath though. But you can see how the skirting board is all warped from damp. This is the front corner of the house and we're pretty sure our gutter is all stopped up there which is why water ran in the wall. Our roof gets covered in green moss and it falls off the roof all over and gathers in the gutters...yuck! I decided to change the red wall colour. It's going to be teal blue instead...woo hoo.

Next part here is a tutorial of sorts. I got a bit craft deprived these last few weeks so I sat and watched You Tube videos. I also watched too much Creat and Craft tv...lol. One day on C&C they had this Martha Stewart air dry clay and moulds on there and I thought that looked like fun...useful too. But the clay was a bit expensive so on to You Tube I went and found tons of videos on how to make your own air dry clay with cheap and cheerful ingredients so I thought I would try it out. Search for Cold Porceline tutorials on YT.

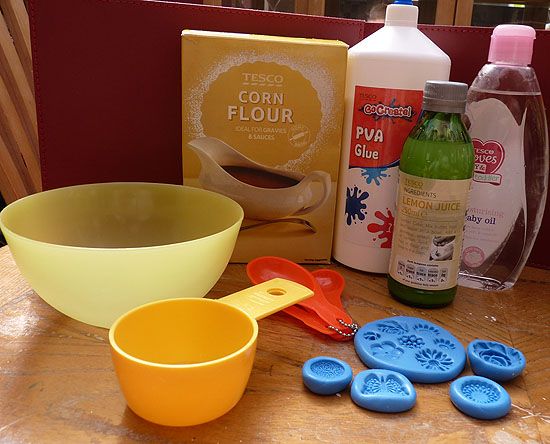
First I ordered some cute moulds. I ordered mine from Picklelilly Moulds. She not only had a big selection, the prices and designs were great. Then off to Tesco for the ingredients.

After watching about 20 different videos on how to make this, here is what I found worked for me:

Ingredients:

1/2 cup Cornflour
1/2 cup PVA Glue (I got my huge 1 litre bottle for £5)
1 tablespoon Lemon Juice (you can also use white vinegar)
1 tablespoon Baby Oil (you can also use olive oil or vegetable oil but note these may tint your clay)
Hand or Body Lotion (whatever you have around the house or just get cheapest)
Non stick craft mat or plastic wrap or greaseproof paper
Plastic wrap and zip lock sandwich baggie

(If you want more clay, just double the recipe and use a bigger bowl.)

SUPPLIES:

Mixing bowl (if choosing microwave method, make sure bowl is microwavable)
Mixing spoon
1/2 cup Measuring cup
1 tablespoon Measuring spoon

Add cornflour to bowl. Use spoon to break up any lumps in it.
Add PVA glue and mix together until combined.
Add both the oil and lemon juice.
Stir mixture until as smooth and until it pulls away from the sides of the bowl.
There may be a film of oil on the top of the mixture that doesn't get completely mixed in but that's ok.
Lay out your craft mat or big piece of greaseproof paper on the table.
Smear a little of your body lotion on the surface of the craft mat or greaseproof paper.

 Now here is where I tried 2 different methods:

Method 1 - Cold straight from bowl
Empty the bowl of cornflour/glue mixture onto the body lotion. Add more lotion to your hands. Knead this like you would bread dough until is smooth and stretchy. This takes about 10 minutes.

Roll the clay into a fat tube shape, wrap with pastic wrap, put it into a zip lock sandwich bag and refrigerate overnight.

Method 2 - Microwave first
Put the bowl of cornflour/glue mixture into the microwave and heat for 20 seconds.
Remove and stir with spoon. Micrwave for another 20 seconds. Remove and stir again.
At this point check the consistency of your clay. If it seems too runny, microwave for another 10-15 seconds. The consistency should be creamy, stretchy and very slightly stiff. DO NOT OVERCOOK!!! I overcooked mine and you will see below how it turned out.

Empty bowl onto body lotion on craft mat/greaseproof paper and knead until smooth. (WARNING: clay WILL BE HOT. Knead as you can until cooled.) Roll the clay into a fat tube shape, wrap with pastic wrap, put it into a zip lock samdwich bag and refrigerate overnight.

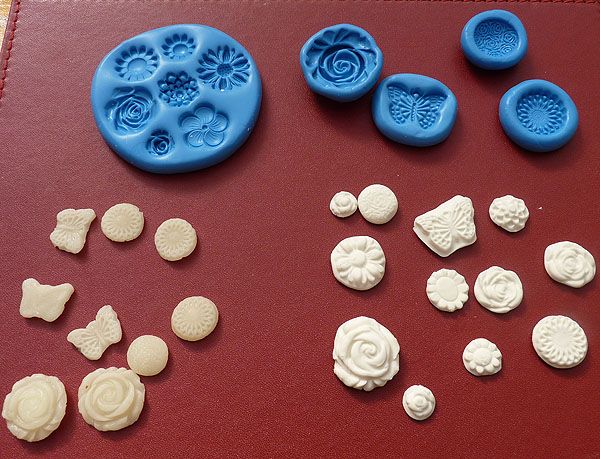
Here are my new moulds and the 2 batches of clay after they have been moulded and dried completely.


 Aren't those moulds just the cutest???!!! They will make great embellishments for cards and other projects. Also some will be great for flower and bow centres.

Now on the right is the non cooked method clay after it has dried. This clay when moulding was very soft and silky. It was hard to get into the mould and hard to get out of them too because the clay was kind of mooshy. I had to redo them a lot of times. But the clay was nice and white and dried a nice translucent white as well. The pieces are light and feel just like dried clay.

On the left is the microwaved clay. I overcooked this clay by about 10 seconds. It was too hard and turned yellow on me. But it was really easy to get into the moulds and especially easy to get out with designs intact first time. But they dried even more yellow and they look rubbery once dried. Feels more like resin not as nice looking. That's why I have to stress to not overcook this stuff!

Note on drying these. The right side non cooked ones I dried for 8 hours on one side then turned them over so the underside dried for another 6 hours. The left side cooked ones, are still not dried in the middle after 2 whole days. So each recipe has it's problems but I think I'm going to stick with the non cooked recipe for my next batch.

Store your clay in an airtight container. You don't have to keep it in the refrigerator all the time, just the first overnight. I suggest you stick some damp kitchen roll sheets in there with the clay. When using the clay, add a squirt of hand lotion to your hands to knead the clay before each use. This will remoisten the clay and keep it from sticking to your hands.

Note about gloves...I actually made 3 batches but the first batch became a disaster when I tried to use rubber kitchen gloves to protect my hands to knead it. It glued onto the gloves even with lotion and ruined not only the clay but also the gloves. In fact they melded together so badly you couldn't tell where the clay started and the gloves ended. Both got binned. Use bare hands when doing this with lots of lotion on them...works fine and dandy.

As soon as the craft room is done, I'm going to paint, glitter and fancy these up. I'm also going to make some beads with the clay. Those will work a treat. Fun fun fun!!! If you give this a try, drop me a comment and link to your photos. I'd love to see what you come up with!!

Have a great bank holiday weekend!
Related Posts Plugin for WordPress, Blogger...