31 October 2014

DSC #112 Anything Goes

Here I am with my latest Design Team project for Digitally Sweet Challenges and we have an easy these this week...ANYTHING GOES! So I know lots of you will join in the fun. We have a new sponsor this week that anyone who loves digi kits will love: Scrappiness Designs! She was kind enough to provide the DT with one of her adorable digital scrapbooking kits and I did myself a layout:


This is my hubby and daughter back in 2011 while we were on our summer holiday to Canet Plage, France. This was one evening while sitting outside along the beach at one of the many bars and restaurants. We've spent a few summers here as we rent a wheelchair accessible apartment and spend a few weeks at the beach. It's not far from the border of Spain as well so we usually drive down to Barcelona while there. We LOVE Barca...amazing city!

SUPPLIES USED:

Digital Scrap kit called "My Backyard - Bundle" - by Scrapiness Designs

Thanks for looking and hope you will join in the challenge at Digitally Sweet Challenges!

Happy Scrapping!
Dorothy

29 October 2014

#275 Buttons, Brads and Bows

Hi all...it's time for a new challenge at Crafty Creations Challenges! Join us every other week for a new challenge and this week's theme is Buttons, Brads and Bows. Use all of these on your crafty creations and join in the challenge! Our terrific sponsor this week is A Creative Need and you could win some awesome digital images from them! Here is my design team project using one of A Creative Needs gorgeous images:

My printer malfuntioned so I wasn't able to print off any digi stamps so I decided to go with a completely digital image! I opened Photoshop and created this cute little card front that could be printed off and placed on a card or craft project. I really liked how it all turned out, hope you do too.

SUPPLIES LIST
Snowglobe with Reindeer digital stamp - A Creative Need (links directly to image page)
Brat Pack Blog Train Santa's Workshop free digital scrap kit - MediEvil Creations

27 October 2014

A Swap and a Haul

I have a busy week ahead wth lots of DT projects crafty work due (YEAH) and lots of real bookeeping work due (BOO.) Thought I would start of the week showing off my latest swap over at UK Ireland Craft Swap FB group and show off a mini Hobbycraft haul from yesterday.

First the swap! This swap had us sharing our stash of washi tape with a partner. My partner was Tina and here is what we swapped. Tina sent me an old gift card wrapped with four diffferent washi tapes. they were all so pretty. A couple of them vintage looking which I really liked. She also sent me lots of black and white feathers, lace, ribbons, chipboard bits and some lovely purple flowers.


Here are the things I sent to Tina. I took some thick plastic packaging and cut out two rectangles the same width as a gift card but made it almost double the length. Then on one of the plaastic pieces I stamps some swirls with Stazon ink, I used Glossy Accents to glue the pieces together to make it thicker like a card. I rounded the corners and punched a hole to run some ribbon through. I wrapped lots of washi around it. When the washi is gone, it could make a nice bookmark for her trusty Filofax...hee hee hee. I also sent her a Christmas ornament, some hook and loop (Velcro) circles, stickers and burlap butterflies.


Well after church on Sunday, hubby took me over to the local Hobbycraft because I was wanting some styrofoam eggs to make these cool Christmas ornaments I plan to do so while I wandered around Hobbycraft, hubby went to run another errand. Letting me loose by myself ya just KNOW I bought more than just eggs. Yup I did. I had to control myself because 1. Hobbycraft is expensive and 2. I'm trying to budget my crafty spends per month. So here is what I came out with totalling under £25.


As you can see I got myself 6 styrofoam eggs. But the shop really started as I entered the door. My Hobbycraft has lots of bins right inside the door with goodies in them. So I picked up a roll of double sided tape and those 2 wooden spoons (£1 each.) I also grabbed some clear large bauble ornaments that are fillable. Then I hit the bead section. Oh my it's so much bigger now with really gorgeous beads. I restrained myself and only bought some bead caps and a set of charms. Then I found the Tim Holtz section, which thankfully was mostly empty but I picked up some garment clips as I've never used them before but the look useful. Last area I looked was at the paper. This 12" x 12" Grace Taylor pad called "Parisian Chic" was on sale for £5 so picked that up as well as some matching cardboard pieces for £2.50. I know it's all a little haphazard but I'm a relatively new crafter and I don't have much stash. I lack embellishments really. But I do have some things to work on now (not that I didn't before lol) but I'l have a think on those spoons (shall I do Christmas or simply Vintage style?) and clear baubles. I'm planning a mini album with the paper and matching pieces. Whew...better get myself in that craft room of mine and get to work!

Thanks for reading and Happy Crafting!
Dorothy

24 October 2014

DSC #111 - Steampunk Tag

Welcome to this Friday's design team project for Digitally Sweet Challenges! I hope you all will like this week's theme of STEAMPUNK! Our sponsor this week is the wonderful Lunagirl! Come join us and show off you use of steampunk digital images. This week I made a tag:


I started with a 3" x 5" tag I made out of cardstock. I nked all over it with Vintage Photo Distress Ink. I glued down one of the Lunagirl clockface image then stamped over it all with a Kaisercraft clear stamp called . Then I distress other Lunagirl images overtop and the "Explorer" word art I made in Photoshop. I stamped some corners on there as well. I made the balloon look 3D by printing it off twice and layering one on top of the other and added lace to the bottom and tucked some behind the balloon. This is my very first steampunk project as it's not my usual style but I'm happy with how it turned out...hope you all like it!

SUPPLIES USED
All images - Lunagirl
Distress Ink - Vintage Photo
Fine print stamp - Kaisercraft clear stamp called Dictionary Meanings
Corner Stamp - Papermania Urban Stamp set called Type Print
Jute Twine
Lace from stash

Happy Crafting!
Dorothy

23 October 2014

Bearly Mine Inspiration - Christmas ATCs

Hi everyone! It's the 23rd so it's time for me to show off the wonderful digital papers from Bearly Mine Designs! For this project I made ATCs...little 2.5" x 3.5" pieces of art! I went with a Christmas theme to show off the new holiday papers new out this month:

These little ATCs have a country Christmas feel to them. I started with a few digital papers from the Bearly Mine Designs "Christmas Joy" set.


I distressed the edges with Vintage Photo and Antique Linen Distress Inks. I tore one of them to add another paper layer. I stamped a swirl with Vintage Photo then added 2 Christmas chalkboard sentiments I got off of Pinterest. I also printed out some stars I created in Photoshop. I wanted a textured feel to these so first I spritzed the cards with Tsukineko's Goosebumps Clear Texture Spray. This stuff is pretty cool. It gives a slightly satin clear finish from a spray bottle. You can use it for texturising, or resist techniques. I also spritzed with a little Mr Huey's Opaque White mist which caused the little paint splatters. Across the bottom I made some glittery "snow" and I faux stitched the edges too.

Our October Challenge is in full swing so go over and check out the latest challenge at Bearly Mine Challenges. We would love to have you join us!

Happy Creating!
Dorothy

17 October 2014

DSC #110 - Your Hero

Happy Friday all! It's time for this week's challenge at Digitally Sweet Challenges and our sponsor this week is Bugaboo Stamps! Our theme this week is "Your Hero" but this could have many takes on it such as a friend, parent,dog...lol, or just someone or some position you admire like fireman, military, nurse, etc. We would love for you to join us! Here is the card I made this week as an example:

Look...NO distress ink! LOL. I just used lots of layers for this simple card as I really wanted the image and sentiment to stand out. I love dogs and one day soon I'll introduce you to my two fuzzy puppykids Buster and Paris. When I saw this image I knew I had to use it! Of course this also is me at least 10 times a day...hugging my dogs....lol.

SUPPLIES USED:
GirlPuppyLove digi image - Bugaboo Stamps
Scalloped white card blank - Cards UK bought in The Range
All cardstock - American Crafts Tropical collection
Border Punch - Fiskars Punch called Bracket Border
Copic Ciao markers
Gems from stash

Have a Happy Crafty Day!
Dorothy

16 October 2014

Challenge #274 Thinking of You

Here I am a day late and dollar short for this challenge round post for Crafty Creations Challenge. I have a good reason, I am so so sick. I had the start of a chest infection, then I coughed really hard and pulled a mucle in my chest. Talk about excrutiating pain...OUCH! Then the chest infection went full blown. No eating, no sleeping = UGH. Enough about me, now on to the newest challenge!

This week's theme at Crafty Creations is "Thinking of You" and we do hope you will join in. Our lovely sponsor is San's Designs..check out her shop..it's has gorgous digis. Here is the card I made as a Design Team member:


I took a craft card blank then mat and layered papers edged in Distress Ink. Then just layered up my embellies: the lacey circle diecut, the image coloured with Copics, the sentiment I made myself, leafy diecut and flowers.

SUPPLIES USED:
Waiting 4 U digi stamp - San's Designs
6" x 6" kraft card base by Papermania Square Card Blanks w/ Envelopes
Designer papers - Crate Paper "Fourteen" 6" x 6" paper pad
Larger Flowers - from old Prima Flowers Tubes bought off of QVC years ago.
Small Flowers - Mulberry Crafts UK
Large Diecut - Spellbinders Nestabilities Dies-Lacey Circles
Leafy Diecut - Poppystamps Lovely Tendril Style #956
Copic Ciao markers
Distress Ink in Antique Linen

Happy Craftin All!
Dorothy

10 October 2014

DSC #109 - Sports

It's be a week since i've posted and I missed last week's challenge at Digitally Sweet because of my birthday goings on. I'm back this week with another easel card and our theme for our challenge is SPORTS. Make a crafty project with a sports theme and using some sort of digital image on it then come on over to Digitally Sweet Challenges and enter! You could win some gorgeous digi treats from our sponsor Stitchy Bear Stamps!

Here's my easel card:

I started with an A6 blank card in medium blue and folded it into an easel card shape. I coloured in the Trophy Bowler digi stamp with my Copic ciaos and printed out my own sentiment. I cut out the sentiment and the bowling ball will circle dies and I used white gelly pen to highlight the holes of the bowling ball. For the matted layers I used black cards and paper from the Stitchy Bear paper set called King of the Couch. Extras added was a sheer stripe gray ribbon and black card candi.

SUPPLIES USED (All links go to product)
Trophy Bowler digi Stamp - Stitchy Bear Stamps
King of the Couch Papers - Stitchy Bear Stamps
300 GSM Black Cardstock - Papermill Direct
Blue Card base & White cardstock - from my stash
Spellbinders Die Large Standard Circle Nestabilities
Sheer Stripe Gray Ribbon - Ribbon Oasis
Candi Dot Embellishments .35oz-Metropolis


09 October 2014

Dominoes & Art Tile Swap

OOPS...I forgot to post about this earlier in the week. I guess I was still in birthday mode with getting absolutely nothing done for a week...lol. I particiapted in a crafty swap over at UK and Ireland Craft Swaps. I was paired up woth Donna, which was cool as she lives in the same town I do.

The swap rules were to make a set of 3 inchie art tiles, any theme we wanted and a set of 3 altered dominoes.

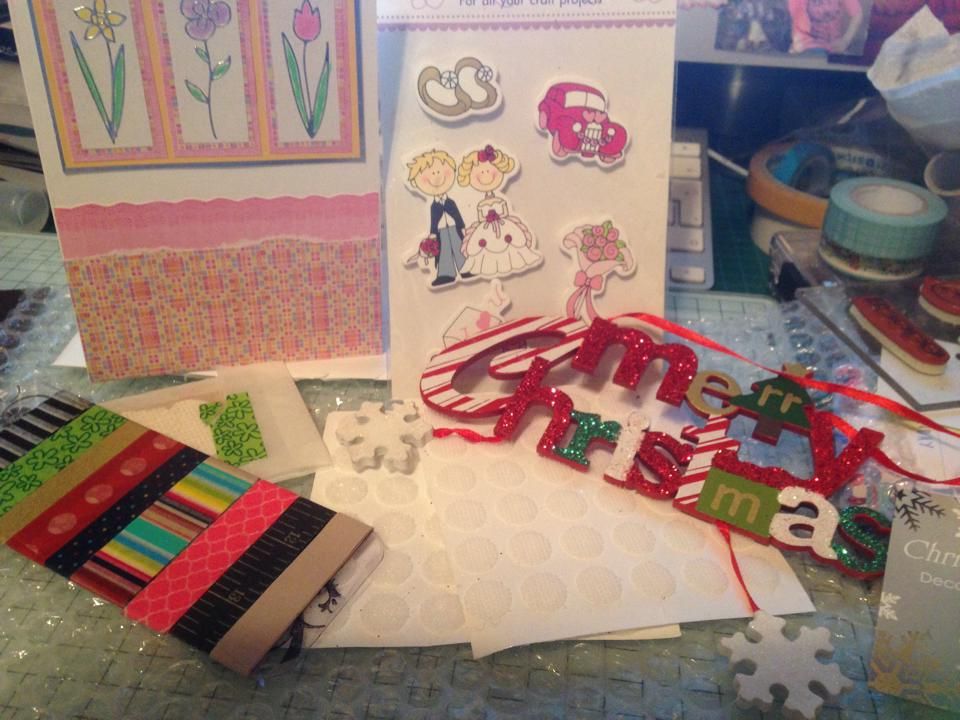
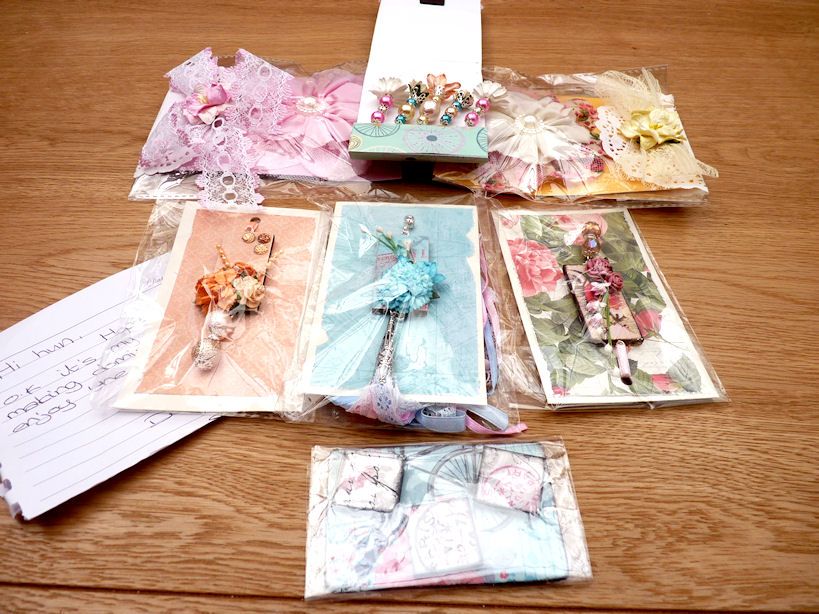
First let em show off what Donna sent me. I got this weeks ago, she was so fast! Me, I'm slooooowww.


It's kind of hard to see them as I rushed to get the photo done. I should have taken them out of the plastic first. Ah well, lesson learned there. The art tiles are really hard to see but they are pretty, trust me! The middle items are the dominoes. She didn't use real dominoes but thick MDF ones from Fernli Designs methinks. Each is mounted on its own pretty cardstock base. She also put dangles on them all too. All of them are simply gorgeous! The top items are some extra goodies she made me. She made me 2 handmade lace flowers in adorable packaging and a set of homemade jewelled stick pins. I love them all! I don't do much beading or dangly bits so I always appreciate things like that.

Here are the altered dominoes and art tiles I made for Donna. She did receive mine and has seen them. I'm glad she liked them too.


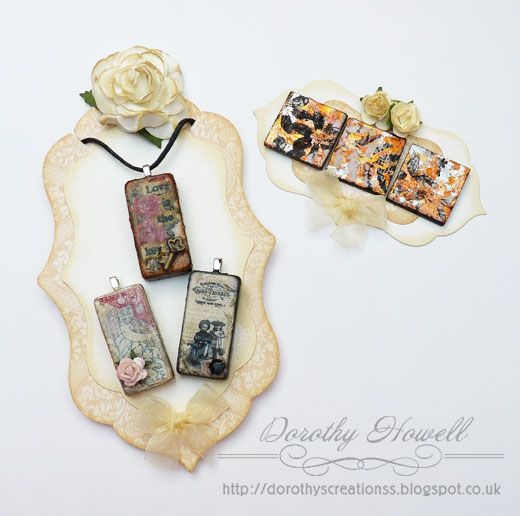
I didn't photo the extra bits I gave her. Mine weren't as nice as hers...lol. I sent her some laser cut wood bits, lace and stickers. For mine I used real dominoes. These are not the big ones but are a pack of smaller size donimoes that are perfect for necklaces. I measured the domino and printed out 3 digital images that I resized to correct size in Photoshop. Then I looked for colours to colourise the sides and backs of the dominoes. One coloured with my black Copic marker. For the roses image I used Ranger Alcohol Ink in Cappucino and using that and blendng solution to get a marbled look to it. On the pale image one I painted it with Mother of Pearl acylic paint. I cut the images and glued them onto the dominoes with Glossy Accents. I sealed the whole dominoes front and back with Mod Podge so the ink jet prints wouldn't blur. Then to seal the top and image I used Ultra Thick Embossing Powder and my heat gun. These gave the top a slightly rippley shiny look which I liked. Then I added the embellishment to each: a little metal key, a black gem and a flower. 

I wanted these to be used as a necklace or something your could hang onto something else so I added bales to them with E6000 glue. Then I made my very first necklace! I took black waxed cord, a lobster clasp, jump rings and bar ends and put them all together myself. I had to make sure it all fit through the bales so it could be interchanged between the dominos.

For the art tiles I started with 2 mm greyboard that I cut into 1 inch squares. I glued the 3 images I printed out on them. Then I had a think about what else to do to them. I've made a few art tiles before that turned out nice but I wanted an Autumnal theme to match the vintage images. Then I saw it...my Indigo Blu jar of guilding flakes in Lancashire Rose. These guilding flakes are a mixture of gold, copper, silver and fushia metal flakes. GORG! SO I had a dig through my stamps to see what I could stamp over top and I wanted lots of shine so I chose a Penny Black stamp with lots of solid background. I stamped on the tiles with the Indigo Blu glue, added the guilding flakes, scooched off the excess, used Black Soot Distress ink to colour the sides and back of tiles, sealed with Mod Podge then again used Ultra Thick Embossing Powder on the top. I love how they turned out!

I used my X-Cut Doorplate dies to make the display backings out of cardstock then added a little bow and flowers.

Images Used:
Black & Cream image of label words and 2 children domino - Astrid's Artistic Efforts
Dark Roses with Key image domino - Lilac - n - Lavender
Pale birdie image domino - I forgot and can't find it now. :(
Art Tile Images all from Lilac- n - Lavender

Other Supplies Used:
Xcut 5-Piece Large Nesting Dies Doorplate
Ultra Thick Embossing Powder (generic brand)
Indigo Blu Lancashire Rose Guilding Flakes
Indigo Blu Flitter Glue

Thanks so much for reading! Hope you enjoyed and...

Happy Crafting,
Dorothy

02 October 2014

Happy Birthday to ME!

 Photo courtesy Screenwallpapers.net

Yep...it's my birthday...I'm gonna party like it's my birthday! LOL It's a BIG one too...I am 50 years young today. Hubbs asked me if I felt like an old lady...sheesh. I had to remind him that although I am older than he is, I'm not THAT much older and he will be catching me up soon enough. Then he informed me that he already felt like an old man...double sheesh!

So it's not just a special day but my birthday is lasting a few days. It started last night with Hubbs and I going to The Arsenal match at Emriates Stadium. Hubbs bough me a new home shirt...here's me outside the stadium wearing it:


OK confession time.. I DETEST having my photo taken. There are many reason why I suppose, mostly it's because I've always been very overweight. I can honestly say (shockingly!) that I like this one of myself. I mean it's alright. I've really changed how I eat and it's working. I got lots more to lose and you cannot see my big roll of fat and loose skin down around my lower abdomen but hey. It's so hard to be objective of yourself, especially when you ain't so confident in how you look (like me!) Just to compare, here's a photo of me a few years ago with my daughter in Biarritz, France:


Back in April of this year (2014) I had a mini stroke. It was a huge wake up call and I decided it was time to get my health back or at least do what I could. Being a paraplegic causes all kind of health probs as well as being so fat. Drastic times called for drastic measures and after months of trying to find the best lifestyle for me, I became vegan. In fact I am a Raw Til 4 Vegan. You can find out more about this at RawTil4.com.  I love the food I eat and it's making me more aware of what I put on the inside AND outside of my body.

I know my blog is mostly about crafting and I don't go into my private life too much but I'm hoping to change that. I'd like to take my blog on a journey with me this year, my 50th year on planet Earth. I'd like you to get to know me through my faith (I'm a Christian,) my food (I'm a Vegan) and my free time (I'm a Crafter.) I hope you will join me on this journey.

Thanks for reading...have a wonderful day...God bless...and as always...

HAPPY CRAFTING,
Dorothy

01 October 2014

Challenge #273 - Use Orange

Two weeks gone and it's time for a new challenge at Crafty Creations Challenges! Our theme this time around is to use orange in your project. Our sponsor is Robyn's Fetish and I used one of her gorgeous images. I made a Happy autumn card:

First I coloured in the Fall Pumpkin digital stamp with my copic Ciao markers. Then I fussy cut it out. I took a white card base, inked the edges with Linen Distress Ink. On top I layered burnt orange card, the fall leaf digital paper from a digital scrapbooking kit then some dark brown card that I embossed with a folder and my Cuttlebug. I added a tag I also distressed with the Linen ink. I added jute twine to the tag. A simple yet effective card!

SUPPLIES USED:
Robyn's Fetish Fall Pumpkin digi stamp
Fall Leaf paper from digi kit - "Autumn Thoughts" by Designs by Megan Turnidge
Orange and Brown card from stash
White card base from stash
Copic Ciao markers
Cuttlebug Embossing Folder Argyle
Jute Twine from stash

New Bearly Mine Challenge

It's a new month so that means it's time for a new challenge at Bearly Mine Challenges! Join us for this month's challenge with the theme halloween. I personally don't "do" halloween so I made a card with a basic theme...SPIDERS...lol.

Whatcha think? Not halloween but still a bit scary huh? Well if you live in the UK you will know we get some really big spiders here, I mean creepy, massively huge, long hairy legged suckers. Don't what it is about the UK that breeds big spiders...lol. Anyway, I used the Bearly Mine paper set called Halloween Fantasy. I used 4 different papers and I colourised 2 of them to match in Photoshop. I edged the papers with Distress Ink in Black Soot. I placed these on a black card base. I embellished with black Card Candi, Spellbinder diecuts and a big green glittered spider I got in a pack of 4 from a local 99p Store.

SUPPLY USED:
Bearly Mine papers - Halloween Fantasy
Black Cardstock - Papermill Direct
Spellbinders - Nestabilities Marvelous Squares S4-383
Craftword Card Candi-Metropolis
Green Glitter Spider - from a local 99p Store
Related Posts Plugin for WordPress, Blogger...